Navigation

Ventuz 6 Quick Guide

  • Introduction
  • Getting Started
  • Ventuz Editions
  • Designer Overview
  • Ventuz System Requirements
  • Configuration
  • Video/Audio Configuration
  • Machine Configuration
  • GPI Configuration for Runtime or Director
  • Optimize Rendering Performance
  • Supported Formats
  • Supported Hardware
  • Multisampling / Anti-Aliasing
  • Input Subsystem
  • Ventuz Proprietary Files
  • What's new
  • FAQ
  • Common Mistakes
  • Deployment
  • Migration Guide
  • Ventuz 5 Migration Guide
  • Summary Shortcuts

Ventuz 6 Designer

  • Index
  • Getting Started
  • Designer Options
  • Designer Overview
Projects & Scenes
  • Projects and Scenes
  • Project Browser
  • Project Properties
  • Project Maintenance
  • Project and Scene Data
  • Scene Tree
  • Scene Management
  • Scene Statistics
  • Deployment
Interface
  • Designer Interface
  • Renderer Window
  • Realtime Rendering
  • Optimize Scene Performance
  • Performance Statistics
  • Transformation Gizmo
  • Render to Disk
  • Camera Navigation
  • Isolated Objects
  • Manipulate Objects with Gizmos
  • Layer Editor
  • Common Layer Properties
  • IPP Effects
  • Color Correction FX
  • Distortion FX
  • Filter FX
  • Layer Editor Shortcuts
  • Hierarchy Editor
  • Working with Nodes
  • Containers
  • Find and Replace
  • Shortcuts Hierarchy Editor
  • Content Editor
  • Working with Nodes
  • Containers
  • Content Editor Shortcuts
  • Toolbox
  • Property Editor
  • Project Data and Scene Data
  • Property Groups
  • Shader Editor
  • Text Editor
  • Scene Tree
  • Message View
  • Stage Editor
  • Container Outline
  • Watches Editor
  • Animation Editor
  • Animation and State Engine
  • Templates
  • Template Engine
  • Shortcuts Animation Editor
  • Text Rendering
  • Text Editor
  • Character Sets
  • Geometry Import
  • Input Subsystem
  • Multitouch
  • TUIO Protocol
  • Open Sound Control
  • How to work with Head Mounted Displays
  • Cluster
  • Multi Display Setups and Shaping
  • Warping, Soft Edging and Masking
  • Available Nodes
  • Animation Nodes
  • Material&Color Nodes
  • Data Nodes
  • Geometry Nodes
  • Interaction Nodes
  • IO Nodes
  • Layers
  • Light Nodes
  • Logic Nodes
  • Render Option Nodes
  • Slides Nodes
  • Sound Nodes
  • Text Nodes
  • Texture Nodes
  • VR Nodes
  • World Nodes

Ventuz 6 Node Reference

ANIMATION
  • Mover
  • Alternator
  • Simple Control
  • Timeline Control
  • Anmation Rig
  • Keyframe Animation
  • Animation Group
COLOR/MATERIAL
  • Alpha
  • Fog
  • Ground Fog
  • Sky Box
  • Color to RGBA
  • HSLA to Color
  • RGBA to Color
  • Color Transformer
  • HLSL Shader
  • Color
  • Material
  • Color Picker
  • Substance Material
DATA
  • Database
  • Excel
  • JSON
  • RSS Feed
  • Resource Linker
  • Text File
  • XML
GEOMETRY
  • Rectangle
  • Rounded Rectangle
  • Gradient Rectangle
  • Overlay Rectangle
  • Cube
  • Circle
  • Sphere
  • Cylinder
  • Cone
  • Torus
  • Chart
  • Random Points
  • Mesh Loader
  • Geometry Import (Live)
  • Volume
  • Get Bounding Box
  • Arrow
  • Particle System
  • Path Renderer
  • Geometry Renderer
INTERACTION
  • Interaction Rect
  • Touch Button
  • Touch Excluder
  • Touch Marker
  • Touch Paint
  • Touch Pattern
  • Touch Proxy
  • Touch Ripples
  • Touch Transformations
  • Web Browser
  • Touch Teleport
  • Touch Simulator
INPUT/OUTPUT (I/O)
  • GPI
  • Joystick
  • Keyboard
  • MIDI
  • Mouse
  • Network
  • Open Sound Control
  • Serial
  • Timecode
  • DMX
LAYER
  • 3D Layers
  • 3D Layer Reference
  • 2D Layers
  • PSD Import Layer
  • Others
LIGHT
  • Light Sources
LOGIC
  • Array Processing
  • Convert To Text
  • Cluster Synchronization
  • Counter
  • Date Time
  • Directory
  • Dispatcher
  • Enumeration
  • Expressions
  • Invert
  • Log
  • Loop Breaker
  • Math Effects
  • Matrix Operations
  • Scene Event
  • Script
  • String Operations
  • System ID
  • Text Splitter
  • Timer
  • Toggle
  • URL
  • Value Switch
  • Value Buffer
  • Variables
  • Visual Indexer
RENDER OPTIONS
  • Alpha Blending
  • Color Write
  • Alpha Testing
  • Clip Plane
  • Filter
  • Mask
  • Mirror
  • Effect
  • Render Cube Map
  • Draw Modes
  • Stencil
  • ZTesting
SOUND
  • Audio Clip
  • Sound
  • Volume Control
  • Audio Analysis
SLIDES
  • Slide Manager
  • Slide
  • Slide Port
  • Pivot
TEXT
  • Text Effects
  • Text Layouts
  • Text Rendering
TEXTURE
  • Background
  • Hatch
  • Image
  • Texture
  • SVG Loader
  • Gradient Texture
  • Live Video
  • Movie Stream
  • Movie Frame
  • Movie Clip
  • Texture Loader
  • Snapshot
  • Snapshot Framebuffer
  • Texture Saver
  • Video Source Selector
  • VIO Input
  • Spout Receiver
  • NDI Receiver
  • Substance Loader
VR/AR
  • Tracked Devices
  • Draw Tracked Devices
WORLD
  • Axis
  • Billboard
  • GetWorld
  • SetWorld
  • Arrange
  • Ticker
  • Layout
  • Group
  • World Z Sort
  • YesNo
  • Switch
  • Spread
  • Filter Pass
  • Set Pass
  • Hierarchy Container
  • Scene Port
  • Content Container
  • Template Port
  • Container Info
  • Camera
  • Paths

Ventuz 6 Configuration Editor

  • Configuration
  • Machine Configuration
  • Video/Audio Configuration
  • Web Configuration Editor and License Manager
  • Render Setup Editor
  • Warping and Soft-Edging Editor
  • Supported Hardware
  • How to Setup a Cluster Render

Ventuz 6 Director

  • Application Settings
  • Assets
  • Channels
  • Command Line Options
  • Content References
  • Designing Templates
  • Environment
  • Glossary
  • Index
  • Introduction
  • Pages
  • Playlist
  • Plug-Ins
  • Project Data
  • Property Editor
  • Shortcuts
  • GPI Configuration
  • Shot Box
  • Show
  • Taking Action
  • Timeline
  • Topology
  • User Interface
  • Director Mode
  • Macros

How To

  • How to Run Ventuz
  • How to Work with Designer
  • Ventuz Designer Drag&Drop workflow
  • How to use Head Mounted Displays
  • How to work with Shadows
  • How to use Emoijs
  • How to Build a Template
  • How to use Newtek NDI
  • How to Create Visuals Loader Node
  • How to Remote Control with a Phone
  • How to Setup a Cluster Render
  • How to use a Mixed Frame Rate Cluster
  • How to use Tracking
  • How to work with 3D Reference Layers
  • How to create a Firework Particle System
  • How to use DDS with new Block Compression modes
  • How to setup Spout with Ventuz
  • How to use the Substance Integration

Keyboard Shortcuts

  • Summary Shortcuts
  • Layer Editor Shortcuts
  • Hierarchy Editor Shortcuts
  • Content Editor Shortcuts
  • Animation Editor Shortcuts
  • Director Shortcuts

Advanced and Development

  • Command Line Options
  • Remoting Overview
  • Remoting 4
  • Remoting 4 via Websockets
  • Deprecated Remoting
  • Ventuz IP Ports
  • Ventuz Machine Service
  • Remoting Machine Signature
  • TUIO
  • .NET Scripting
  • HLSL Shader Programming
  • Ventuz API and SDK
  • Ventuz VIO API
  • Ventuz File Format (VFF)
  • Ventuz Stream Out API

General Reference

  • Terminology
  • Manual Index

Miscellaneous

  • Presets
« Previous Article
» Index «
Next Article »

The User Interface

Table of Contents

  1. Layouts
    1. Design
    2. Logic
    3. Animation
    4. Data
  2. Not Shown per default
  3. Changing Layouts
    1. Show/ Hide windows
    2. Docking- Undocking
  4. Workspaces
    1. Export
    2. Import
    3. Set as Default
    4. Reset

When launching Ventuz and either having created a new or opened an existing project, the graphical user interface will look something like the following. Please note that the application might look slightly different on your machine due to the Color Scheme set under Tools/Options/Layout/Color Scheme. Also the size and position of the various docking windows can be adjusted by the user. One can reset the layout in the menu under View/Layout/Reset Layout or re-open one of the docking windows under View if it has been closed.

Layouts

One of the new features introduced in Ventuz 5 is the possibility to create custom Layouts and Tabs to switch between them. By default Ventuz includes 4 different layouts tailored for specific tasks, but these layouts can be edited, customized and saved for later use, depending on each user and project needs. The available layouts are:
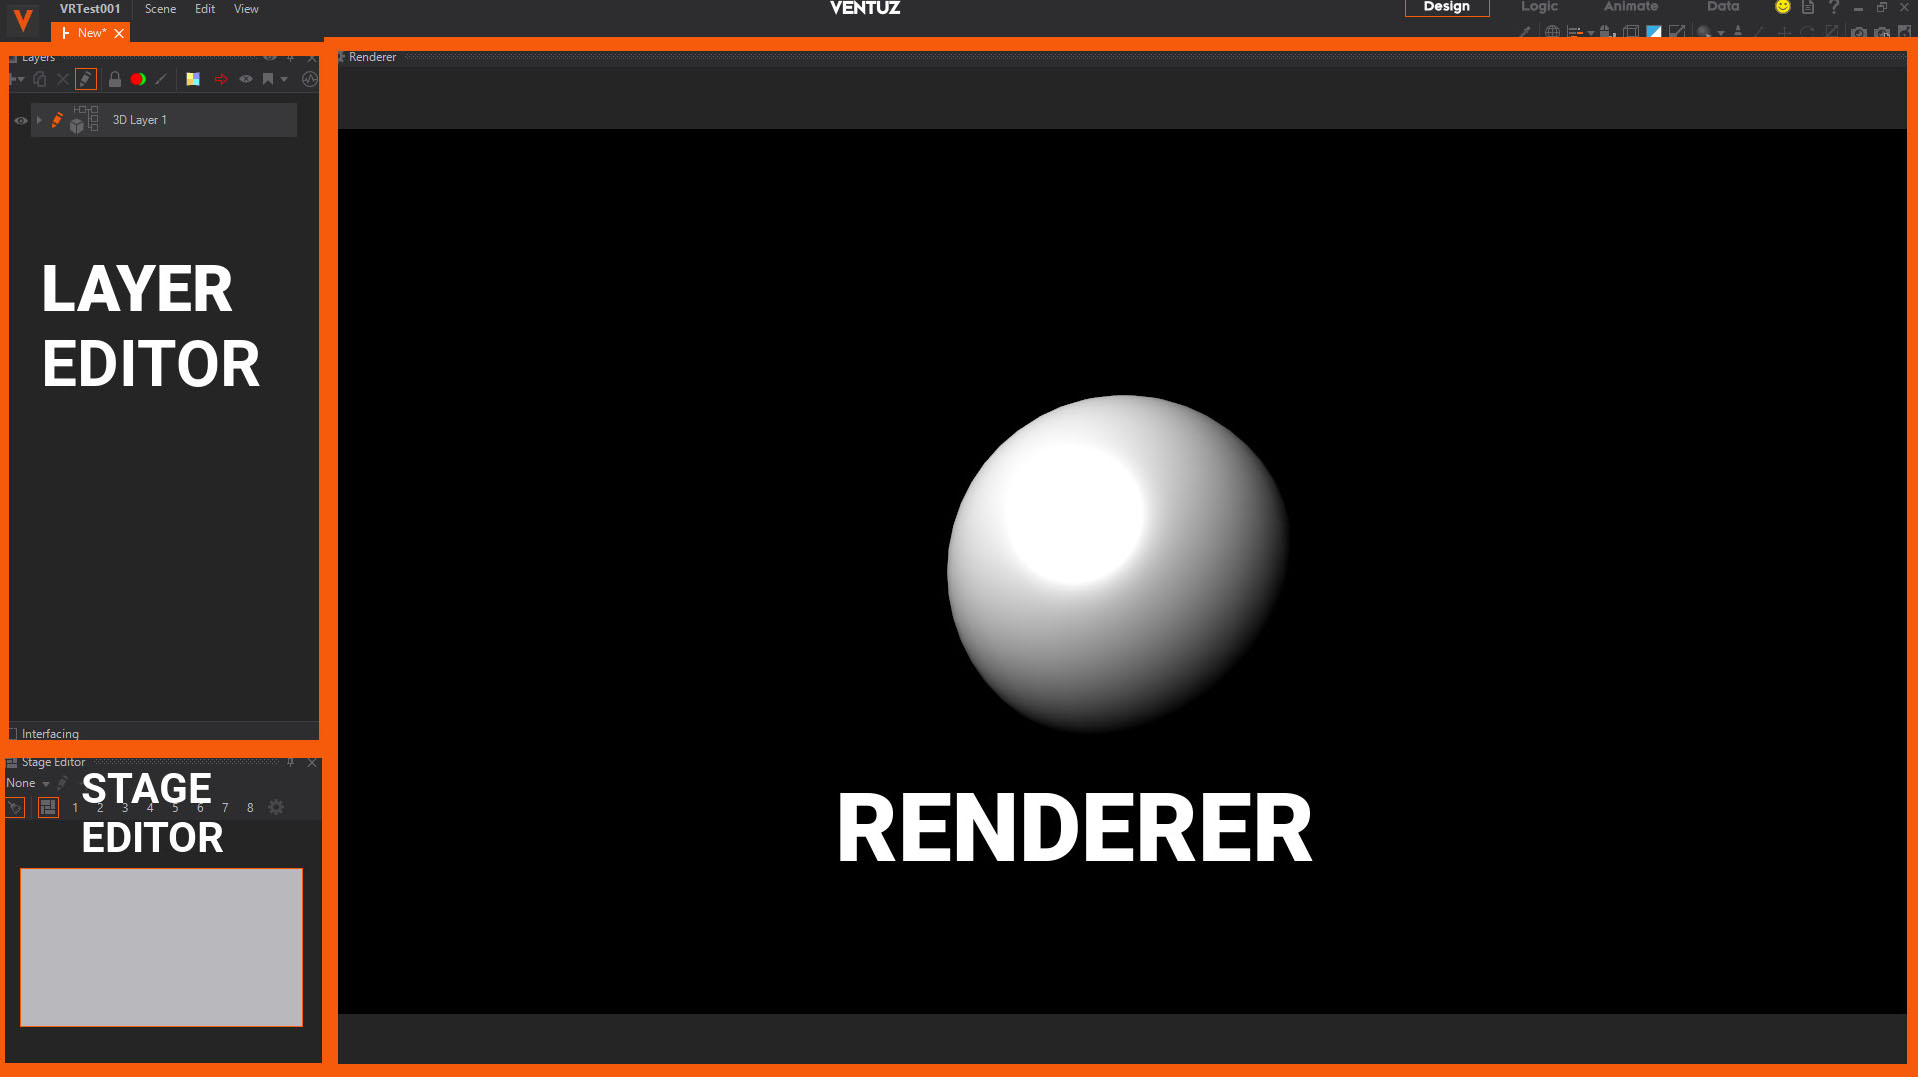
Design

This is the first layout that you will see when you open the program and it is intended to be used for Design and styling tasks. It features a big Renderer view and the Layers and Stage Editors.
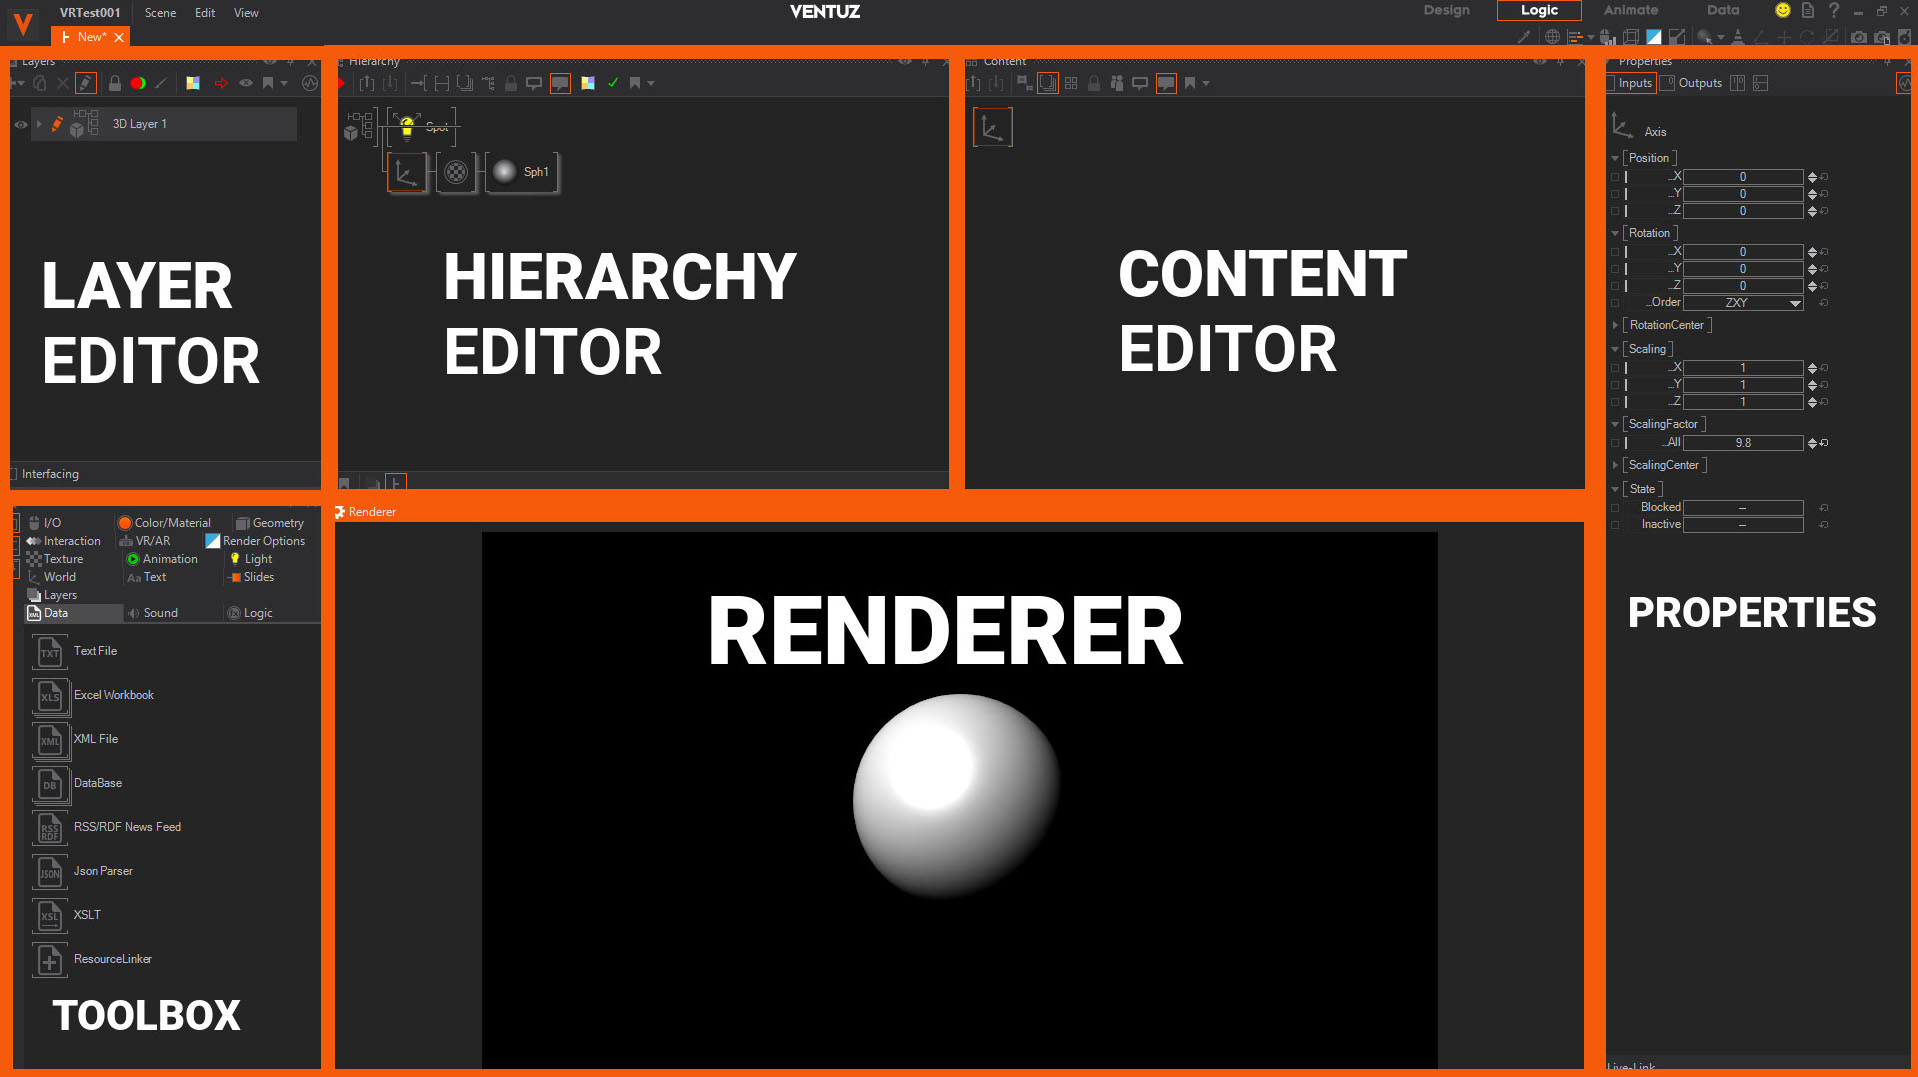
Logic

This Layout is made for all the tasks that involve creating complex logic and 3D scenes. It is the closest to previous versions of Ventuz, and apart from the Renderer, it features the Layer Editor, Hierarchy Editor and Content Editor, together with the [Toolbox Toolbox] with the available nodes and the Property Editor to adjust the available parameters.
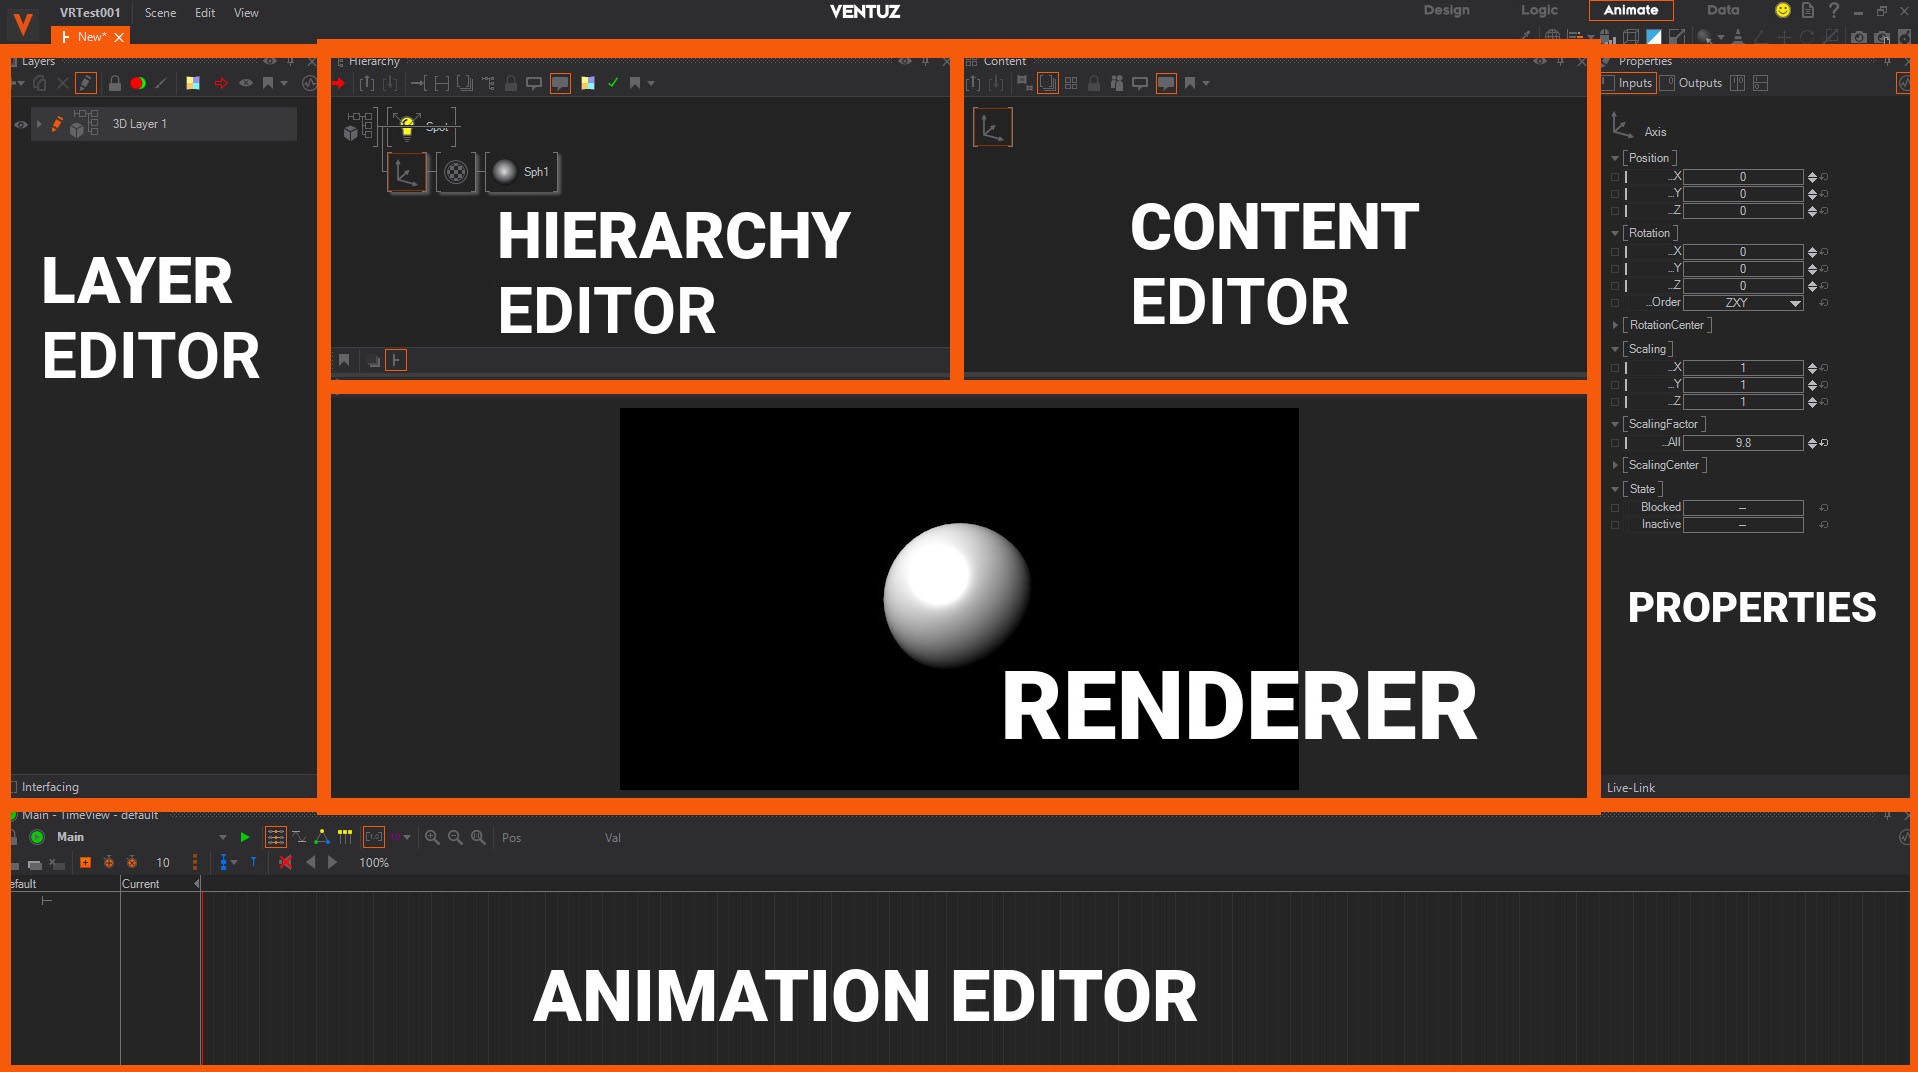
Animation

This Layout features all Elements like with the Logic Layout but in addition it has the Animation Editor in the bottom area.
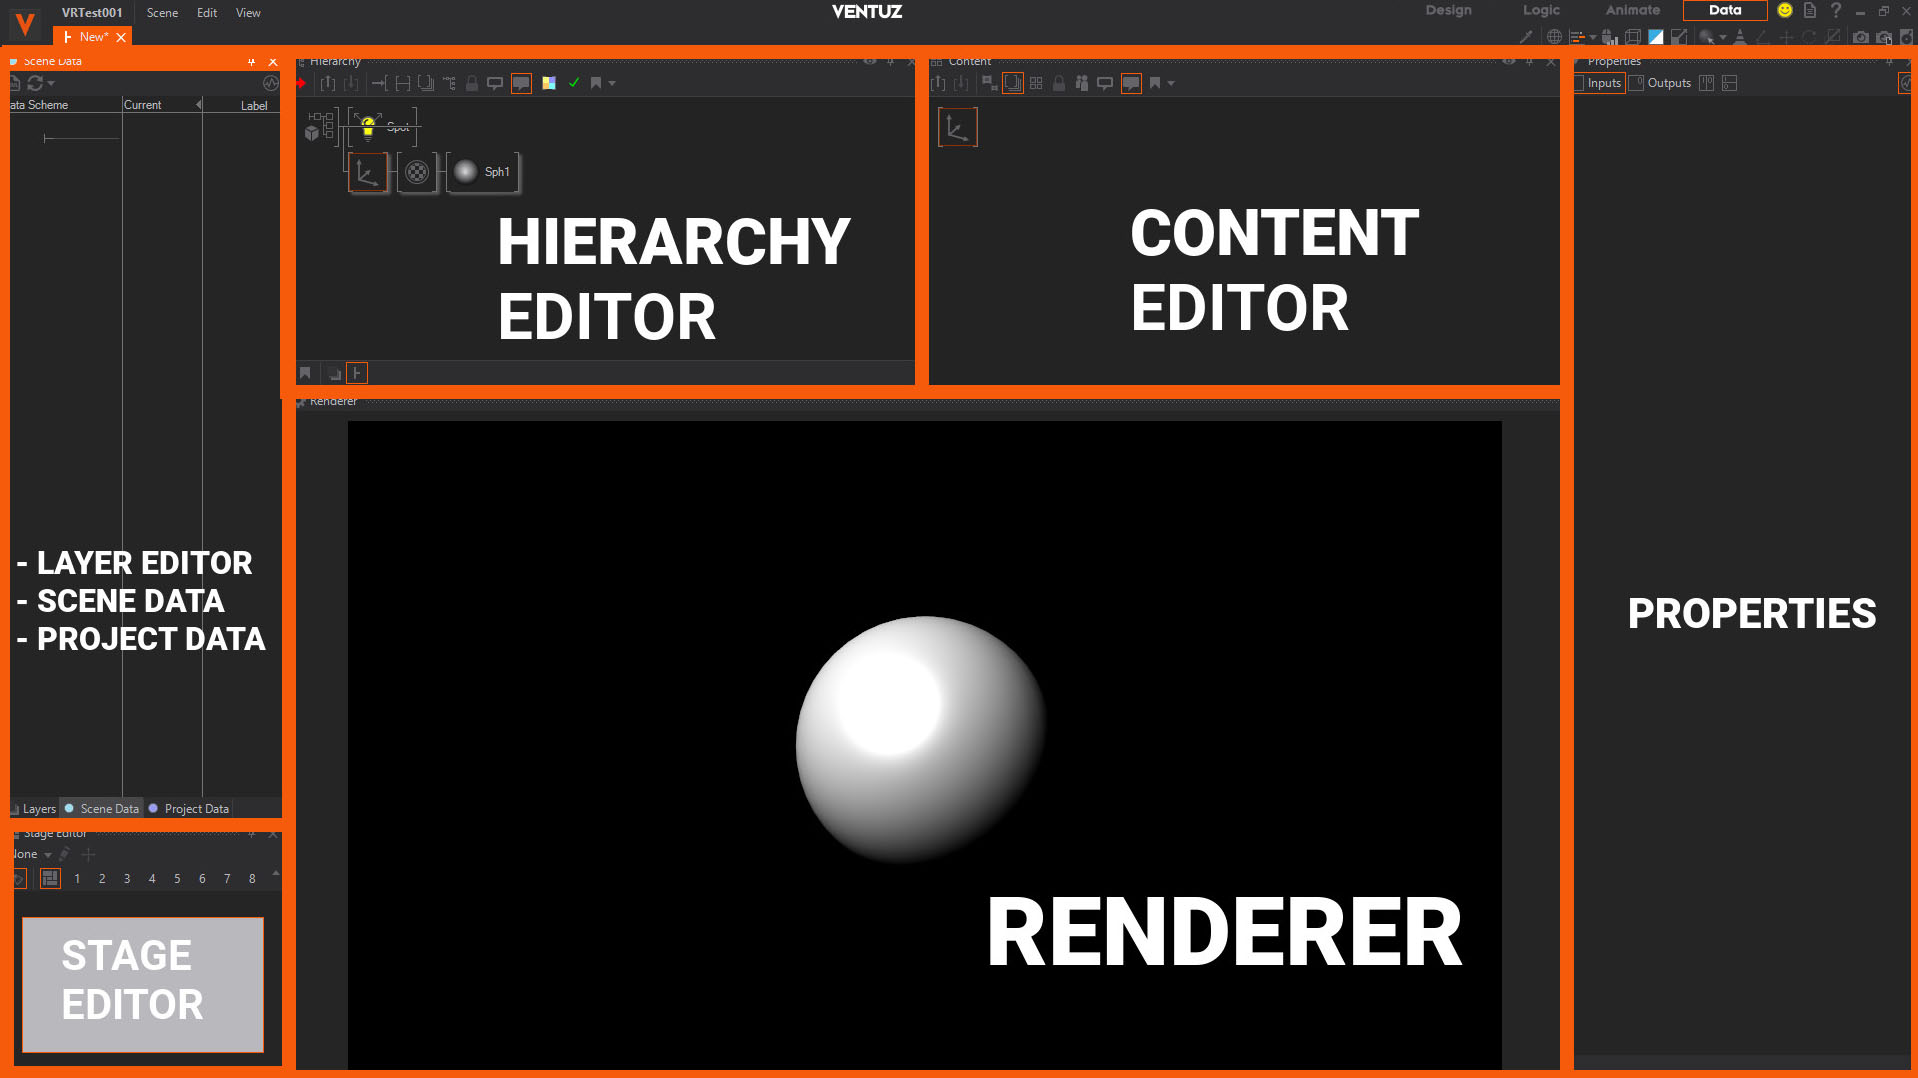
Data

The Data Layout is made to give you quick access to Data related Windows like the Scene Data Editor, Project Data Editor and the Stage Editor. It still has the Hierarchy and Content Editor.

Not Shown per default

Following you find Windows which are currently not shown with the default layouts. Some appear while working with the nodes, like the Text Editor. To Show and Hide windows see Changing Layouts.

  • Text Editor
  • Live Options
  • Project Data
  • Scene Tree
  • Repositorys
  • Message and Log window
  • Container Outline
  • Watches Editor

Changing Layouts

Show/ Hide windows

You can Show/Hide windows with the View menu in the top bar. Simply check/uncheck the window you want Show/Hide.

Docking- Undocking

You can simply drag&drop windows to any position you want. You can have the Windows floating around or dock them. To dock a window, simply drag&drop a window ONTO any of the docking icons.

Workspaces

Additional to that you can save, export and import your customized Workspace to always work with your preferred Layout on a certain machine or project. A workspace includes all custom Layouts for the different Tabs and all the Window Options you customized inside the Editors.

Export

A customized workspace can be exported through View-Workspace-Export Workspace from within Ventuz Designer as a .vws File to put it on a thumb drive and use it on any other Ventuz workstation.

Import

To import a Ventuz Workspace (.vws File) start the Ventuz Designer and open the project your workspace should be applied to. Go to View-Workspace-Import Workspace to load a [VentuzFileTypes .vws File. The imported Workspace is automatically applied and used for that Project in the future.

The workspace is not saved inside the Project but is part of the Windows User Settings and therefor will not be carried over if you copy the Project to another machine.

Set as Default

Whenever you create a new Ventuz Project you might want to use the same Workspace and not always import your favorite one. Therefor you can set a certain workspace as Default that is from then on used for every that is newly created.

Reset

If you messed up your window layouts there is always the option to reset it with the following options View-Worspace -...

  • Reset to Default: activates the Layout saved inside the Default workspace
  • Reset to Factory: activates the Factory Layout delivered by Ventuz

See also:
  • Animation Editor
  • Scene Management and Stage Editor
  • Toolbox and Repository
  • Nodes and Bindings
  • Shader Editor

« Previous Article
» Index «
Next Article »
Copyright 2020 Ventuz Technology