Navigation

Ventuz 6 Quick Guide

  • Introduction
  • Getting Started
  • Ventuz Editions
  • Designer Overview
  • Ventuz System Requirements
  • Configuration
  • Video/Audio Configuration
  • Machine Configuration
  • GPI Configuration for Runtime or Director
  • Optimize Rendering Performance
  • Supported Formats
  • Supported Hardware
  • Multisampling / Anti-Aliasing
  • Input Subsystem
  • Ventuz Proprietary Files
  • What's new
  • FAQ
  • Common Mistakes
  • Deployment
  • Migration Guide
  • Ventuz 5 Migration Guide
  • Summary Shortcuts

Ventuz 6 Designer

  • Index
  • Getting Started
  • Designer Options
  • Designer Overview
Projects & Scenes
  • Projects and Scenes
  • Project Browser
  • Project Properties
  • Project Maintenance
  • Project and Scene Data
  • Scene Tree
  • Scene Management
  • Scene Statistics
  • Deployment
Interface
  • Designer Interface
  • Renderer Window
  • Realtime Rendering
  • Optimize Scene Performance
  • Performance Statistics
  • Transformation Gizmo
  • Render to Disk
  • Camera Navigation
  • Isolated Objects
  • Manipulate Objects with Gizmos
  • Layer Editor
  • Common Layer Properties
  • IPP Effects
  • Color Correction FX
  • Distortion FX
  • Filter FX
  • Layer Editor Shortcuts
  • Hierarchy Editor
  • Working with Nodes
  • Containers
  • Find and Replace
  • Shortcuts Hierarchy Editor
  • Content Editor
  • Working with Nodes
  • Containers
  • Content Editor Shortcuts
  • Toolbox
  • Property Editor
  • Project Data and Scene Data
  • Property Groups
  • Shader Editor
  • Text Editor
  • Scene Tree
  • Message View
  • Stage Editor
  • Container Outline
  • Watches Editor
  • Animation Editor
  • Animation and State Engine
  • Templates
  • Template Engine
  • Shortcuts Animation Editor
  • Text Rendering
  • Text Editor
  • Character Sets
  • Geometry Import
  • Input Subsystem
  • Multitouch
  • TUIO Protocol
  • Open Sound Control
  • How to work with Head Mounted Displays
  • Cluster
  • Multi Display Setups and Shaping
  • Warping, Soft Edging and Masking
  • Available Nodes
  • Animation Nodes
  • Material&Color Nodes
  • Data Nodes
  • Geometry Nodes
  • Interaction Nodes
  • IO Nodes
  • Layers
  • Light Nodes
  • Logic Nodes
  • Render Option Nodes
  • Slides Nodes
  • Sound Nodes
  • Text Nodes
  • Texture Nodes
  • VR Nodes
  • World Nodes

Ventuz 6 Node Reference

ANIMATION
  • Mover
  • Alternator
  • Simple Control
  • Timeline Control
  • Anmation Rig
  • Keyframe Animation
  • Animation Group
COLOR/MATERIAL
  • Alpha
  • Fog
  • Ground Fog
  • Sky Box
  • Color to RGBA
  • HSLA to Color
  • RGBA to Color
  • Color Transformer
  • HLSL Shader
  • Color
  • Material
  • Color Picker
  • Substance Material
DATA
  • Database
  • Excel
  • JSON
  • RSS Feed
  • Resource Linker
  • Text File
  • XML
GEOMETRY
  • Rectangle
  • Rounded Rectangle
  • Gradient Rectangle
  • Overlay Rectangle
  • Cube
  • Circle
  • Sphere
  • Cylinder
  • Cone
  • Torus
  • Chart
  • Random Points
  • Mesh Loader
  • Geometry Import (Live)
  • Volume
  • Get Bounding Box
  • Arrow
  • Particle System
  • Path Renderer
  • Geometry Renderer
INTERACTION
  • Interaction Rect
  • Touch Button
  • Touch Excluder
  • Touch Marker
  • Touch Paint
  • Touch Pattern
  • Touch Proxy
  • Touch Ripples
  • Touch Transformations
  • Web Browser
  • Touch Teleport
  • Touch Simulator
INPUT/OUTPUT (I/O)
  • GPI
  • Joystick
  • Keyboard
  • MIDI
  • Mouse
  • Network
  • Open Sound Control
  • Serial
  • Timecode
  • DMX
LAYER
  • 3D Layers
  • 3D Layer Reference
  • 2D Layers
  • PSD Import Layer
  • Others
LIGHT
  • Light Sources
LOGIC
  • Array Processing
  • Convert To Text
  • Cluster Synchronization
  • Counter
  • Date Time
  • Directory
  • Dispatcher
  • Enumeration
  • Expressions
  • Invert
  • Log
  • Loop Breaker
  • Math Effects
  • Matrix Operations
  • Scene Event
  • Script
  • String Operations
  • System ID
  • Text Splitter
  • Timer
  • Toggle
  • URL
  • Value Switch
  • Value Buffer
  • Variables
  • Visual Indexer
RENDER OPTIONS
  • Alpha Blending
  • Color Write
  • Alpha Testing
  • Clip Plane
  • Filter
  • Mask
  • Mirror
  • Effect
  • Render Cube Map
  • Draw Modes
  • Stencil
  • ZTesting
SOUND
  • Audio Clip
  • Sound
  • Volume Control
  • Audio Analysis
SLIDES
  • Slide Manager
  • Slide
  • Slide Port
  • Pivot
TEXT
  • Text Effects
  • Text Layouts
  • Text Rendering
TEXTURE
  • Background
  • Hatch
  • Image
  • Texture
  • SVG Loader
  • Gradient Texture
  • Live Video
  • Movie Stream
  • Movie Frame
  • Movie Clip
  • Texture Loader
  • Snapshot
  • Snapshot Framebuffer
  • Texture Saver
  • Video Source Selector
  • VIO Input
  • Spout Receiver
  • NDI Receiver
  • Substance Loader
VR/AR
  • Tracked Devices
  • Draw Tracked Devices
WORLD
  • Axis
  • Billboard
  • GetWorld
  • SetWorld
  • Arrange
  • Ticker
  • Layout
  • Group
  • World Z Sort
  • YesNo
  • Switch
  • Spread
  • Filter Pass
  • Set Pass
  • Hierarchy Container
  • Scene Port
  • Content Container
  • Template Port
  • Container Info
  • Camera
  • Paths

Ventuz 6 Configuration Editor

  • Configuration
  • Machine Configuration
  • Video/Audio Configuration
  • Web Configuration Editor and License Manager
  • Render Setup Editor
  • Warping and Soft-Edging Editor
  • Supported Hardware
  • How to Setup a Cluster Render

Ventuz 6 Director

  • Application Settings
  • Assets
  • Channels
  • Command Line Options
  • Content References
  • Designing Templates
  • Environment
  • Glossary
  • Index
  • Introduction
  • Pages
  • Playlist
  • Plug-Ins
  • Project Data
  • Property Editor
  • Shortcuts
  • GPI Configuration
  • Shot Box
  • Show
  • Taking Action
  • Timeline
  • Topology
  • User Interface
  • Director Mode
  • Macros

How To

  • How to Run Ventuz
  • How to Work with Designer
  • Ventuz Designer Drag&Drop workflow
  • How to use Head Mounted Displays
  • How to work with Shadows
  • How to use Emoijs
  • How to Build a Template
  • How to use Newtek NDI
  • How to Create Visuals Loader Node
  • How to Remote Control with a Phone
  • How to Setup a Cluster Render
  • How to use a Mixed Frame Rate Cluster
  • How to use Tracking
  • How to work with 3D Reference Layers
  • How to create a Firework Particle System
  • How to use DDS with new Block Compression modes
  • How to setup Spout with Ventuz
  • How to use the Substance Integration

Keyboard Shortcuts

  • Summary Shortcuts
  • Layer Editor Shortcuts
  • Hierarchy Editor Shortcuts
  • Content Editor Shortcuts
  • Animation Editor Shortcuts
  • Director Shortcuts

Advanced and Development

  • Command Line Options
  • Remoting Overview
  • Remoting 4
  • Remoting 4 via Websockets
  • Deprecated Remoting
  • Ventuz IP Ports
  • Ventuz Machine Service
  • Remoting Machine Signature
  • TUIO
  • .NET Scripting
  • HLSL Shader Programming
  • Ventuz API and SDK
  • Ventuz VIO API
  • Ventuz File Format (VFF)
  • Ventuz Stream Out API

General Reference

  • Terminology
  • Manual Index

Miscellaneous

  • Presets
« Previous Article
» Index «
Next Article »

Axis

Axis Used to position, orientate and scale complete subtrees with common properties such as position, rotation and scaling.
Get World Used to retrieve the World, View and Projection matrix at a position in the scene hierarchy.
Set World Used to position, orientate and scale complete subtrees with a 4x4 matrix.
Anchor Used to retrieve the World matrix at a position in the scene hierarchy that is usable in specific nodes.
Billboard Used to orientate objects so that they always face the camera.
Shear Used to deform single meshes or complete subtrees

Axis

Unlike most 3D modelling programs, an object such as a mesh or light source does not have a position or orientation itself. Instead, one inserts Axis nodes to transform the space opposed to transforming the object itself (see use of the World Matrix in Rasterization). So if an Axis has a rotation of 90 degrees, the whole coordinate system of its subtree is rotated and therefore the transformation affects all objects underneath the axis. This is similar to an animation rig where moving the upper arm of a model will also affect the elbow, lower arm and hand but the hand can be transformed independently.

The majority of Ventuz users prefer to edit the Axis properties manually to exactly position objects. However, Ventuz 3 also introduced a way to this directly in the renderer window via a Transformation Gizmo. If an object does not have an axis, the Gizmo will be rendered gray and as soon as the user picks the Gizmo, an axis will automatically be inserted.

Most properties of the Axis node should be self-explanatory. The rotation order is something most users will not have to worry about: When expressing a rotation by three ​Euler angles, there is a degree of freedom in which order the individual rotations are applied. Since the default order is different from application to application, Ventuz offers this as a property so that meshes coming from other applications as well as their animations can be imported correctly.

Please try to avoid using Default-Axis just for grouping Hierarchy Nodes. A Default-Axis (or Indentity-Axis) is an Axis or World node with all its input properties set to their default values. Use a Group Node instead.

Get/Set World

The Get World node provides the World, View and Projection matrix values at its position in the scene hierarchy. If a Get World node is used in a subtree that is linked at multiple places in the scene hierarchy, the outputs will represent the values at the first use of that subtree.

Due to technical reasons, the output values of the Get World node have a delay of one frame!

The Set World node is similar to the Axis but uses a 4x4 matrix as often found in computer graphics instead of semantic values like rotation angles or units of translation. It is designed for situations where a transformation is transmitted to Ventuz from a Script node, another device or application. For example, certain tracking systems output the position and orientation of an object in one matrix instead of separate parameters.

Anchor

The Anchor Node works similar to the Get World Node. The difference is that this can only be used by specific Nodes that know how to handle its reference in their Input Properties, like the Particle System's Emitter Modules or the Arrow Node. The upside of using the Anchor Node is that its world matrix can be used without the frame delay of the Get World Node.

Anchor Nodes can have references to other Anchor Nodes to create Chains of Anchors. This can be interpreted by some Nodes as well, especially the Arrow Node can use that to render several chained arrows with one instance.

Note that the output of the Anchor cannot be modified further in the scene logic - like you could do with matrices. If you need to apply custom modifications to the World Matrix of a specific position in the Hierarchy before using it you will need to use the Get World Node.

Billboard

The Billboard node is a specialized version of Axis that aligns the coordinate system of its subtree to the camera. The Billboard node tries to calculate a rotation that will align the x axis with the horizontal, the y axis with the vertical and the z axis with the viewing direction. By unchecking one of the input properties, that axis will not be used to compensate the rotation of the camera. Imagine a user that manually tries to use the three rotation properties of the standard Axis to align the coordinate system. Unchecked axes are forbidden to be changed by that user. If the ScreenOrientated property is checked, the 'billboarded' object always points in direction of the camera view vector. In this mode a rectangle would have the same orientation as the screen; the other properties do not have any effect then and are hidden.

Shear

The Shear node is another specialized version of the Axis that allows you to deform single meshes or a complete subtree.
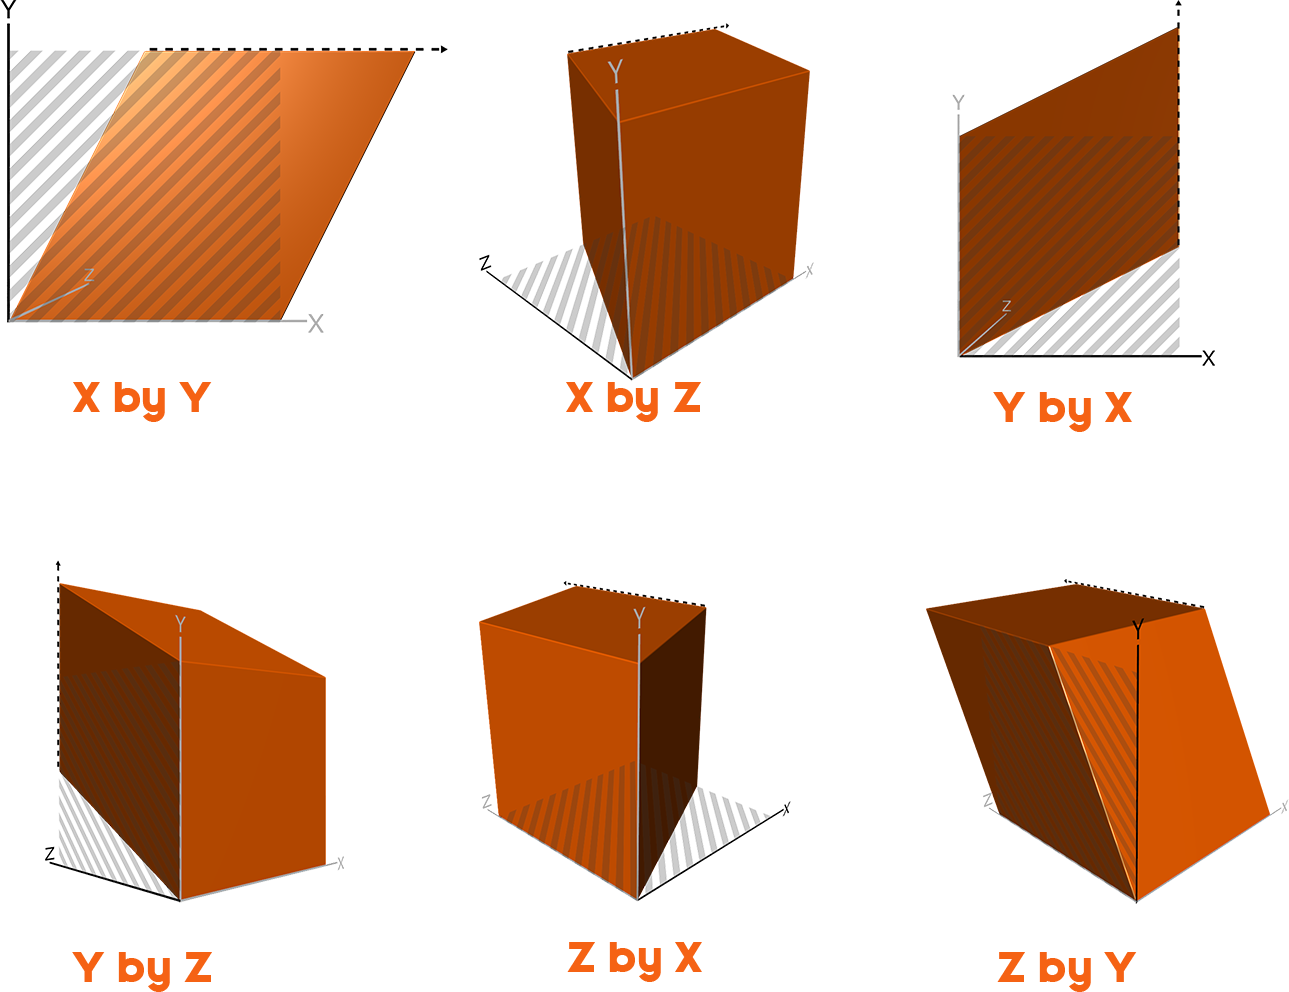
The Axis Property allows you to select the axis where the shearing is applied to. X by Y in that sense means the object is sheared along the X axis on the X-Y Plane. With the Amount Property the strenght of the transformation in percentage can be adjusted whereby an Amount of 100 results in an angle of 45 degrees.

This means the offset on the X-Axis is depending on the (signed) distance of each point to the origin of the Y Axis. The Amount defines the relation between the distance and the resulting offset. When set to 100% the offset will be the same as the distance and is also using the same direction (positive distance results in positive offset). The higher the amount the higher the offset. A negative amount results in a change of the direction of the shearing. See the below images for a visual reference.

See also:
  • An Introduction to Realtime Rendering
  • Transformation Gizmo
  • Matrix Operations
  • Spread node

« Previous Article
» Index «
Next Article »
Copyright 2020 Ventuz Technology