Navigation

Ventuz 6 Quick Guide

  • Introduction
  • Getting Started
  • Ventuz Editions
  • Designer Overview
  • Ventuz System Requirements
  • Configuration
  • Video/Audio Configuration
  • Machine Configuration
  • GPI Configuration for Runtime or Director
  • Optimize Rendering Performance
  • Supported Formats
  • Supported Hardware
  • Multisampling / Anti-Aliasing
  • Input Subsystem
  • Ventuz Proprietary Files
  • What's new
  • FAQ
  • Common Mistakes
  • Deployment
  • Migration Guide
  • Ventuz 5 Migration Guide
  • Summary Shortcuts

Ventuz 6 Designer

  • Index
  • Getting Started
  • Designer Options
  • Designer Overview
Projects & Scenes
  • Projects and Scenes
  • Project Browser
  • Project Properties
  • Project Maintenance
  • Project and Scene Data
  • Scene Tree
  • Scene Management
  • Scene Statistics
  • Deployment
Interface
  • Designer Interface
  • Renderer Window
  • Realtime Rendering
  • Optimize Scene Performance
  • Performance Statistics
  • Transformation Gizmo
  • Render to Disk
  • Camera Navigation
  • Isolated Objects
  • Manipulate Objects with Gizmos
  • Layer Editor
  • Common Layer Properties
  • IPP Effects
  • Color Correction FX
  • Distortion FX
  • Filter FX
  • Layer Editor Shortcuts
  • Hierarchy Editor
  • Working with Nodes
  • Containers
  • Find and Replace
  • Shortcuts Hierarchy Editor
  • Content Editor
  • Working with Nodes
  • Containers
  • Content Editor Shortcuts
  • Toolbox
  • Property Editor
  • Project Data and Scene Data
  • Property Groups
  • Shader Editor
  • Text Editor
  • Scene Tree
  • Message View
  • Stage Editor
  • Container Outline
  • Watches Editor
  • Animation Editor
  • Animation and State Engine
  • Templates
  • Template Engine
  • Shortcuts Animation Editor
  • Text Rendering
  • Text Editor
  • Character Sets
  • Geometry Import
  • Input Subsystem
  • Multitouch
  • TUIO Protocol
  • Open Sound Control
  • How to work with Head Mounted Displays
  • Cluster
  • Multi Display Setups and Shaping
  • Warping, Soft Edging and Masking
  • Available Nodes
  • Animation Nodes
  • Material&Color Nodes
  • Data Nodes
  • Geometry Nodes
  • Interaction Nodes
  • IO Nodes
  • Layers
  • Light Nodes
  • Logic Nodes
  • Render Option Nodes
  • Slides Nodes
  • Sound Nodes
  • Text Nodes
  • Texture Nodes
  • VR Nodes
  • World Nodes

Ventuz 6 Node Reference

ANIMATION
  • Mover
  • Alternator
  • Simple Control
  • Timeline Control
  • Anmation Rig
  • Keyframe Animation
  • Animation Group
COLOR/MATERIAL
  • Alpha
  • Fog
  • Ground Fog
  • Sky Box
  • Color to RGBA
  • HSLA to Color
  • RGBA to Color
  • Color Transformer
  • HLSL Shader
  • Color
  • Material
  • Color Picker
  • Substance Material
DATA
  • Database
  • Excel
  • JSON
  • RSS Feed
  • Resource Linker
  • Text File
  • XML
GEOMETRY
  • Rectangle
  • Rounded Rectangle
  • Gradient Rectangle
  • Overlay Rectangle
  • Cube
  • Circle
  • Sphere
  • Cylinder
  • Cone
  • Torus
  • Chart
  • Random Points
  • Mesh Loader
  • Geometry Import (Live)
  • Volume
  • Get Bounding Box
  • Arrow
  • Particle System
  • Path Renderer
  • Geometry Renderer
INTERACTION
  • Interaction Rect
  • Touch Button
  • Touch Excluder
  • Touch Marker
  • Touch Paint
  • Touch Pattern
  • Touch Proxy
  • Touch Ripples
  • Touch Transformations
  • Web Browser
  • Touch Teleport
  • Touch Simulator
INPUT/OUTPUT (I/O)
  • GPI
  • Joystick
  • Keyboard
  • MIDI
  • Mouse
  • Network
  • Open Sound Control
  • Serial
  • Timecode
  • DMX
LAYER
  • 3D Layers
  • 3D Layer Reference
  • 2D Layers
  • PSD Import Layer
  • Others
LIGHT
  • Light Sources
LOGIC
  • Array Processing
  • Convert To Text
  • Cluster Synchronization
  • Counter
  • Date Time
  • Directory
  • Dispatcher
  • Enumeration
  • Expressions
  • Invert
  • Log
  • Loop Breaker
  • Math Effects
  • Matrix Operations
  • Scene Event
  • Script
  • String Operations
  • System ID
  • Text Splitter
  • Timer
  • Toggle
  • URL
  • Value Switch
  • Value Buffer
  • Variables
  • Visual Indexer
RENDER OPTIONS
  • Alpha Blending
  • Color Write
  • Alpha Testing
  • Clip Plane
  • Filter
  • Mask
  • Mirror
  • Effect
  • Render Cube Map
  • Draw Modes
  • Stencil
  • ZTesting
SOUND
  • Audio Clip
  • Sound
  • Volume Control
  • Audio Analysis
SLIDES
  • Slide Manager
  • Slide
  • Slide Port
  • Pivot
TEXT
  • Text Effects
  • Text Layouts
  • Text Rendering
TEXTURE
  • Background
  • Hatch
  • Image
  • Texture
  • SVG Loader
  • Gradient Texture
  • Live Video
  • Movie Stream
  • Movie Frame
  • Movie Clip
  • Texture Loader
  • Snapshot
  • Snapshot Framebuffer
  • Texture Saver
  • Video Source Selector
  • VIO Input
  • Spout Receiver
  • NDI Receiver
  • Substance Loader
VR/AR
  • Tracked Devices
  • Draw Tracked Devices
WORLD
  • Axis
  • Billboard
  • GetWorld
  • SetWorld
  • Arrange
  • Ticker
  • Layout
  • Group
  • World Z Sort
  • YesNo
  • Switch
  • Spread
  • Filter Pass
  • Set Pass
  • Hierarchy Container
  • Scene Port
  • Content Container
  • Template Port
  • Container Info
  • Camera
  • Paths

Ventuz 6 Configuration Editor

  • Configuration
  • Machine Configuration
  • Video/Audio Configuration
  • Web Configuration Editor and License Manager
  • Render Setup Editor
  • Warping and Soft-Edging Editor
  • Supported Hardware
  • How to Setup a Cluster Render

Ventuz 6 Director

  • Application Settings
  • Assets
  • Channels
  • Command Line Options
  • Content References
  • Designing Templates
  • Environment
  • Glossary
  • Index
  • Introduction
  • Pages
  • Playlist
  • Plug-Ins
  • Project Data
  • Property Editor
  • Shortcuts
  • GPI Configuration
  • Shot Box
  • Show
  • Taking Action
  • Timeline
  • Topology
  • User Interface
  • Director Mode
  • Macros

How To

  • How to Run Ventuz
  • How to Work with Designer
  • Ventuz Designer Drag&Drop workflow
  • How to use Head Mounted Displays
  • How to work with Shadows
  • How to use Emoijs
  • How to Build a Template
  • How to use Newtek NDI
  • How to Create Visuals Loader Node
  • How to Remote Control with a Phone
  • How to Setup a Cluster Render
  • How to use a Mixed Frame Rate Cluster
  • How to use Tracking
  • How to work with 3D Reference Layers
  • How to create a Firework Particle System
  • How to use DDS with new Block Compression modes
  • How to setup Spout with Ventuz
  • How to use the Substance Integration

Keyboard Shortcuts

  • Summary Shortcuts
  • Layer Editor Shortcuts
  • Hierarchy Editor Shortcuts
  • Content Editor Shortcuts
  • Animation Editor Shortcuts
  • Director Shortcuts

Advanced and Development

  • Command Line Options
  • Remoting Overview
  • Remoting 4
  • Remoting 4 via Websockets
  • Deprecated Remoting
  • Ventuz IP Ports
  • Ventuz Machine Service
  • Remoting Machine Signature
  • TUIO
  • .NET Scripting
  • HLSL Shader Programming
  • Ventuz API and SDK
  • Ventuz VIO API
  • Ventuz File Format (VFF)
  • Ventuz Stream Out API

General Reference

  • Terminology
  • Manual Index

Miscellaneous

  • Presets
« Previous Article
» Index «
Next Article »

Scene Management

Table of Contents

  1. Introduction
  2. Port Nodes
  3. Interfacing
  4. Export Scenes and Projects

Introduction

The Scene Management enables a modular project design where complex scenes can be split into multiple sub-scenes, thus simplifying workflows in Ventuz substantially. It also covers the internal scene handling which is necessary for Remoting features (like loading multiple instances of the same scene) and the principle of Project Layout scenes. The integral parts of the Scene Management are the Scene Port and Scene Layer Nodes and the Scene Tree Editor which visualizes the structure of nested scenes.

Port Nodes

Available Port Nodes

  • Scene Layer
  • Template Layer
  • Scene Port
  • Template Port
  • Slide Port

All Port Nodes can load scenes and integrate them in the host or master scene. This Host-Sub-scene construct acts the same way as if it had been built as one scene. Splitting a Ventuz Presentation into several sub-scenes which are loaded to a master scene has a number of advantages:

  • If a Port is blocked by its Blocked property or by any parent node (Alpha, Switch, etc.) the loaded scene gets inactivated and the internal scene logic is turned off completely. In this state, the inner scene will not affect the overall performance at all!
  • A Port can reference a scene by its name (URL) but can also reference a scene from memory. Thus Remoting is able to load a scene and assign it to a Port later. This technique allows switching or cycling scenes between Ports in Ventuz. If the Inner-scene holds Templates you can address them by the Template Address.
  • Ports can load scenes asynchronously (i.e. in the background). A Progress value from 0% to 100% informs the hosting scene about the load progress. The Port also provides a Loaded and a Failed event to trigger scene logic inside the hosting scene (like a fade in/out animation).

Inner-Scenes that are build with Layer Nodes can only be applied to Layer Ports (Scene Layer,Template Layer). If they are loaded inside a Scene Port only the first 3D Layer is used.

A Port can be locked. This means Remoting or the Scene Tree Editor are not able to change the scene-to-port assignment. One can either lock a port by checking its Lock property or simply bind the File property to a data source (e.g. URL node or Excel). Every Scene can have an unlimited number of Scene Ports to host sub-scenes. The level of nesting is called the Scene Level. The scene level one usually works with is Level 1, the next lower level is Level 2 and so forth. Layout Scenes work at Level 0!

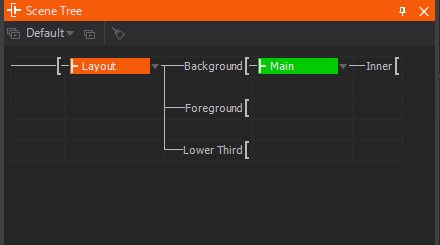
Check the Scene Tree Editor to understand how the scenes are connected.

Every Scene Port has a name (the normal node name) and an Ordinal number starting at zero. This number is used to address Ports within a scene via Remoting. It is also important for Layout Scenes. The ordinal number can be changed via the node context menu in the Hierarchy Editor or the buttons at the bottom of the Property Editor. A scene assigned to a Port can be opened and edited on-the-fly without the need to reload it into its current scene ports. A scene-to-scene communication can be realized via the Interfacing mechanism as will be discussed later.

Interfacing

Interfacing allows communication between Layout scenes and the inner scenes loaded via the corresponding Scene Ports. The properties which should be used for the inter-scene communication have to be exposed in the inner scene at the Scene Root level. To create the interface counterpart on Layout scene level, an inner scene with the appropriate exposings has to be loaded to a Scene Port.

If this Scene Port is selected in the Stage or Hierarchy Editor, the exposed properties of the inner scene should be displayed in the Property Editor. In this state it is only possible to modify these properties in the Property Editor but not to bind them to other nodes. To enable binding, the property has to be double-clicked or the context-menu via right-mouse-button has to be opened and Edit Interface… has to be selected. Do not forget to save the scene after this modification. After this the Interface is complete and reading and writing properties of the inner scenes from within the Layout scene is possible.

Export Scenes and Projects

Inside Ventuz Designer all Layouts of a project are loaded into memory to allow the user to switch between them without delay. The Ventuz Runtime only loads one Layout and does not provide the ability to switch Layouts during presentation! If you export scenes/projects to archives, please note the following:

  • Exporting a scene to VZA (Ventuz Design Archive)
    A VZA export saves the current open scene of the Designer into an archive including all nested scenes and their resources. Resources can be deselected in the Resource dialog during export.
  • Exporting to VPR (Ventuz Presentation)
    A Presentation export does not just export the currently opened scene! It actually exports the Runtime Layout as defined in the Project Properties (see above) and the current scene assigned to the Default Port of the Runtime Layout. If you need to add more scenes to your VPR, you can use the Resource Linker node to embed more scenes. The main scene can decide which scene to load during runtime!
  • Director Mode
    If Ventuz is started in Director mode, it automatically loads the Runtime Layout if any is selected in the Project Properties.

See also:
  • Scene Tree
  • Stage Editor
  • Container and Interfaces
  • Project Properties
  • Director Mode

« Previous Article
» Index «
Next Article »
Copyright 2020 Ventuz Technology