Navigation

Ventuz 6 Quick Guide

  • Introduction
  • Getting Started
  • Ventuz Editions
  • Designer Overview
  • Ventuz System Requirements
  • Configuration
  • Video/Audio Configuration
  • Machine Configuration
  • GPI Configuration for Runtime or Director
  • Optimize Rendering Performance
  • Supported Formats
  • Supported Hardware
  • Multisampling / Anti-Aliasing
  • Input Subsystem
  • Ventuz Proprietary Files
  • What's new
  • FAQ
  • Common Mistakes
  • Deployment
  • Migration Guide
  • Ventuz 5 Migration Guide
  • Summary Shortcuts

Ventuz 6 Designer

  • Index
  • Getting Started
  • Designer Options
  • Designer Overview
Projects & Scenes
  • Projects and Scenes
  • Project Browser
  • Project Properties
  • Project Maintenance
  • Project and Scene Data
  • Scene Tree
  • Scene Management
  • Scene Statistics
  • Deployment
Interface
  • Designer Interface
  • Renderer Window
  • Realtime Rendering
  • Optimize Scene Performance
  • Performance Statistics
  • Transformation Gizmo
  • Render to Disk
  • Camera Navigation
  • Isolated Objects
  • Manipulate Objects with Gizmos
  • Layer Editor
  • Common Layer Properties
  • IPP Effects
  • Color Correction FX
  • Distortion FX
  • Filter FX
  • Layer Editor Shortcuts
  • Hierarchy Editor
  • Working with Nodes
  • Containers
  • Find and Replace
  • Shortcuts Hierarchy Editor
  • Content Editor
  • Working with Nodes
  • Containers
  • Content Editor Shortcuts
  • Toolbox
  • Property Editor
  • Project Data and Scene Data
  • Property Groups
  • Shader Editor
  • Text Editor
  • Scene Tree
  • Message View
  • Stage Editor
  • Container Outline
  • Watches Editor
  • Animation Editor
  • Animation and State Engine
  • Templates
  • Template Engine
  • Shortcuts Animation Editor
  • Text Rendering
  • Text Editor
  • Character Sets
  • Geometry Import
  • Input Subsystem
  • Multitouch
  • TUIO Protocol
  • Open Sound Control
  • How to work with Head Mounted Displays
  • Cluster
  • Multi Display Setups and Shaping
  • Warping, Soft Edging and Masking
  • Available Nodes
  • Animation Nodes
  • Material&Color Nodes
  • Data Nodes
  • Geometry Nodes
  • Interaction Nodes
  • IO Nodes
  • Layers
  • Light Nodes
  • Logic Nodes
  • Render Option Nodes
  • Slides Nodes
  • Sound Nodes
  • Text Nodes
  • Texture Nodes
  • VR Nodes
  • World Nodes

Ventuz 6 Node Reference

ANIMATION
  • Mover
  • Alternator
  • Simple Control
  • Timeline Control
  • Anmation Rig
  • Keyframe Animation
  • Animation Group
COLOR/MATERIAL
  • Alpha
  • Fog
  • Ground Fog
  • Sky Box
  • Color to RGBA
  • HSLA to Color
  • RGBA to Color
  • Color Transformer
  • HLSL Shader
  • Color
  • Material
  • Color Picker
  • Substance Material
DATA
  • Database
  • Excel
  • JSON
  • RSS Feed
  • Resource Linker
  • Text File
  • XML
GEOMETRY
  • Rectangle
  • Rounded Rectangle
  • Gradient Rectangle
  • Overlay Rectangle
  • Cube
  • Circle
  • Sphere
  • Cylinder
  • Cone
  • Torus
  • Chart
  • Random Points
  • Mesh Loader
  • Geometry Import (Live)
  • Volume
  • Get Bounding Box
  • Arrow
  • Particle System
  • Path Renderer
  • Geometry Renderer
INTERACTION
  • Interaction Rect
  • Touch Button
  • Touch Excluder
  • Touch Marker
  • Touch Paint
  • Touch Pattern
  • Touch Proxy
  • Touch Ripples
  • Touch Transformations
  • Web Browser
  • Touch Teleport
  • Touch Simulator
INPUT/OUTPUT (I/O)
  • GPI
  • Joystick
  • Keyboard
  • MIDI
  • Mouse
  • Network
  • Open Sound Control
  • Serial
  • Timecode
  • DMX
LAYER
  • 3D Layers
  • 3D Layer Reference
  • 2D Layers
  • PSD Import Layer
  • Others
LIGHT
  • Light Sources
LOGIC
  • Array Processing
  • Convert To Text
  • Cluster Synchronization
  • Counter
  • Date Time
  • Directory
  • Dispatcher
  • Enumeration
  • Expressions
  • Invert
  • Log
  • Loop Breaker
  • Math Effects
  • Matrix Operations
  • Scene Event
  • Script
  • String Operations
  • System ID
  • Text Splitter
  • Timer
  • Toggle
  • URL
  • Value Switch
  • Value Buffer
  • Variables
  • Visual Indexer
RENDER OPTIONS
  • Alpha Blending
  • Color Write
  • Alpha Testing
  • Clip Plane
  • Filter
  • Mask
  • Mirror
  • Effect
  • Render Cube Map
  • Draw Modes
  • Stencil
  • ZTesting
SOUND
  • Audio Clip
  • Sound
  • Volume Control
  • Audio Analysis
SLIDES
  • Slide Manager
  • Slide
  • Slide Port
  • Pivot
TEXT
  • Text Effects
  • Text Layouts
  • Text Rendering
TEXTURE
  • Background
  • Hatch
  • Image
  • Texture
  • SVG Loader
  • Gradient Texture
  • Live Video
  • Movie Stream
  • Movie Frame
  • Movie Clip
  • Texture Loader
  • Snapshot
  • Snapshot Framebuffer
  • Texture Saver
  • Video Source Selector
  • VIO Input
  • Spout Receiver
  • NDI Receiver
  • Substance Loader
VR/AR
  • Tracked Devices
  • Draw Tracked Devices
WORLD
  • Axis
  • Billboard
  • GetWorld
  • SetWorld
  • Arrange
  • Ticker
  • Layout
  • Group
  • World Z Sort
  • YesNo
  • Switch
  • Spread
  • Filter Pass
  • Set Pass
  • Hierarchy Container
  • Scene Port
  • Content Container
  • Template Port
  • Container Info
  • Camera
  • Paths

Ventuz 6 Configuration Editor

  • Configuration
  • Machine Configuration
  • Video/Audio Configuration
  • Web Configuration Editor and License Manager
  • Render Setup Editor
  • Warping and Soft-Edging Editor
  • Supported Hardware
  • How to Setup a Cluster Render

Ventuz 6 Director

  • Application Settings
  • Assets
  • Channels
  • Command Line Options
  • Content References
  • Designing Templates
  • Environment
  • Glossary
  • Index
  • Introduction
  • Pages
  • Playlist
  • Plug-Ins
  • Project Data
  • Property Editor
  • Shortcuts
  • GPI Configuration
  • Shot Box
  • Show
  • Taking Action
  • Timeline
  • Topology
  • User Interface
  • Director Mode
  • Macros

How To

  • How to Run Ventuz
  • How to Work with Designer
  • Ventuz Designer Drag&Drop workflow
  • How to use Head Mounted Displays
  • How to work with Shadows
  • How to use Emoijs
  • How to Build a Template
  • How to use Newtek NDI
  • How to Create Visuals Loader Node
  • How to Remote Control with a Phone
  • How to Setup a Cluster Render
  • How to use a Mixed Frame Rate Cluster
  • How to use Tracking
  • How to work with 3D Reference Layers
  • How to create a Firework Particle System
  • How to use DDS with new Block Compression modes
  • How to setup Spout with Ventuz
  • How to use the Substance Integration

Keyboard Shortcuts

  • Summary Shortcuts
  • Layer Editor Shortcuts
  • Hierarchy Editor Shortcuts
  • Content Editor Shortcuts
  • Animation Editor Shortcuts
  • Director Shortcuts

Advanced and Development

  • Command Line Options
  • Remoting Overview
  • Remoting 4
  • Remoting 4 via Websockets
  • Deprecated Remoting
  • Ventuz IP Ports
  • Ventuz Machine Service
  • Remoting Machine Signature
  • TUIO
  • .NET Scripting
  • HLSL Shader Programming
  • Ventuz API and SDK
  • Ventuz VIO API
  • Ventuz File Format (VFF)
  • Ventuz Stream Out API

General Reference

  • Terminology
  • Manual Index

Miscellaneous

  • Presets
« Previous Article
» Index «
Next Article »

Analyze Audio

Analyze Audio This node analyzes sounds and provides a .

Ventuz provides real-time audio analysis for creating graphics that react to sound sources. This can be used to create custom graphical equalizers of any kind of show and exhibition enhancements with audience interacting with the graphics via sound. The Analyze Audio node analyses the audio frequencies of a sound source and outputs the result as either an array or a texture.

The property Channels defines which stereo channel should be analyzed. You can either use the Left or Right channel, a sum of both (Mid) or the difference (Side). The Ordinal property specifies the audio capture device that should provide the audio data for analysis. Gain adds an offset to the output to create enough contrast in loud or quiet sounds.

Analysis

There are three different options of what can be analyzed. You can change that by adjusting the Analyzer property group.

Scope

Scope will return the sampled waveform of your audio source. Size defines the count of samples in each frame. 800 creates just as many samples as your audio source if it has a sample rate of 48kHz at 60 frames - 48000 / 60 = 800. More samples would not affect the accuracy anymore. Sync To Zero Crosspoint will move the resulting waveform so that the nearest sample to the center of the waveform will be zero. This is purely cosmetical. High Cut will remove high frequencies from the waveform while sampling so that the result will look smoother but has less details.

Spectrum

Spectrum returns the samples of a Fourier Transformation of your audio source representing the different frequencies of your waveform. Bands changes the amount of resulting values. Using a linear distribution of samples will result in less detail in the higher frequencies (we perceive frequencies in a logarithmic manner), to compensate for that you can use one of the logarithmic distributions of samples in Bands. The Logarithmic flag will enable a logarithmic scaling of the resulting values - this makes sense in most cases since volume is perceived logarithmically as well. If turning on the Logarithmic flag you need to define the Floor volume that is the minimum shown resulting level. By changing Falloff you can define a delay in the decrease of the results, the increase will still be immediate. 100% means immediate falloff, 0% will never decrease again.

VU Meter

VU Meter will simply return the overall volume of your sound as single value. Using the Mode you can either choose to search for the Peak in the last time Window or you can analyze the average amplitude of the sound with the RMS mode (​Root Mean Square). Again you can scale the output logarithmically to compensate for the logarithmic perception of loudness. If turned on you need to define the Floor as well. By changing Falloff you can define a delay in the decrease of the results, the increase will still be immediate. 100% means immediate falloff, 0% will never decrease again.

Output

You have different options to output the gathered data.

Data

The Data property group will output an array with as many elements as defined in the Analyzer property group. Additionally it will return the Sum of all values.

Note that processing Arrays in Ventuz oftentimes is a lot slower than using Textures - so in most cases the Texture Output property groups are preferred. Especially when using a Particle System as a destination for the outputs of this nodes you should decide to work texture based directly.

1D Texture

The 1D Texture property group returns a texture with a size of 1 by as many pixels as you have samples in the Analyzer property group. You can change the Format to either only write to the Red Channel of the texture with 8-bit integers (R8) or with 16-bit floating point numbers (R16F). Lastly you can sample from a Gradient depending on the Output value using the RGBA8 method. Vertical changes the orientation of the texture.

2D Texture

The 2D Texture returns a texture just like the 1D Texture, but will keep the results of the last few frames and add it to the second dimension of the texture. Thus all properties work the same. History Size changes the number of saved frames in the texture.

To avoid unnecessay performance problems, only one Analyze Audio node should be used per sound source.

Audio Configuration

To listen to a Ventuz Audio device you have to configure them in the Ventuz Audio Video Configuration. In the Cross Point section you can add and remove virtual audio cables. I.e. you can add a cable Ventuz A --> Ventuz A to listen to the first stereo pair of the Ventuz Audio device.

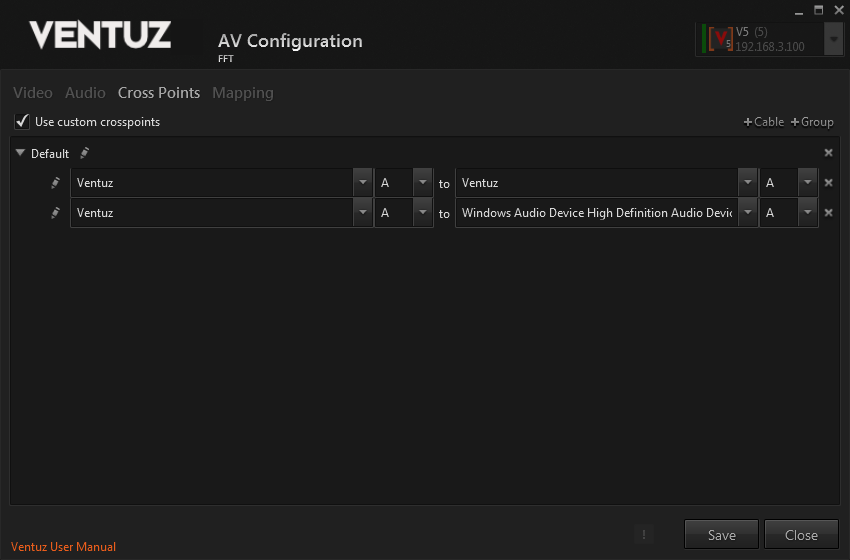
The first Cable is necessary to make the Analyze Audio node listen to audio and sound played by Ventuz. The second Cable is only necessary if the audio should be forwarded to an audio hardware in the Ventuz machine.

See also:
  • Audio playback nodes
  • Audio Video Configuration

« Previous Article
» Index «
Next Article »
Copyright 2020 Ventuz Technology