Playback
 | Audio Clip | This node loads and plays different types of audio files, such as MP3 and WMA. |
 | Sound | This node loads and plays sounds and audio clips. |
Both Audio Clip and Sound node are based on the FFMPEG project. This allows them to load many audio formats, see Supported Audio Formats. In addition to that, these nodes can also play audio tracks in video files, although that is wasteful in terms of memory and CPU resources.
Audio Clip
The Audio node plays back most of the common file formats like MP3, WMA, and WAV for a full list of supported audio codes, see Supported Audio Formats. The Audio Clip node offers several input properties for controlling playback of an audio file. The property File specifies the audio file to play. The property Loop indicates if the playback should be looped. If the property MultiPlay is activated, a new additional playback of the sound file starts every time the Play method is triggered. The property AutoActivate specifies if the playback should start automatically when the scene is loaded or activated. The property Volume adjusts the playback volume.
Note that if MultiPlay is enabled the whole file is loaded into the memory. Only enable the option with short enough audio clips to avoid out-of-memory-issues.
The Audio Clip node is capable of playing back on multiple output Ordinals.
Each of these Ordinals can be mapped to the physical stereo pairs of your machine in the Audio Video Configuration. You can define several mappings of a stream and channel to an output ordinal by adding any number of Property Groups with the  in the Property Group List inside the Property Editor. The Stream dropdown defines which stream of the File to use. For the Channels you can choose to use any single Mono Channel, two consecutive channels as Stereo Channels or to Downmix the whole stream into a single stereo signal. In the Flags property you can turn on several options: Flip L/R swaps the left and right channels if it plays back two channels as stereo. Invert left/right phase invert the polarity of either channel. And Mid/Side to Stereo converts a mid or side channel to a stereo channel. Ordinal selects the Logical Device Ordinal used for this mapping. Gain changes the sound level of this input and the Balance adjusts the playback volume between the left and right audio channel.
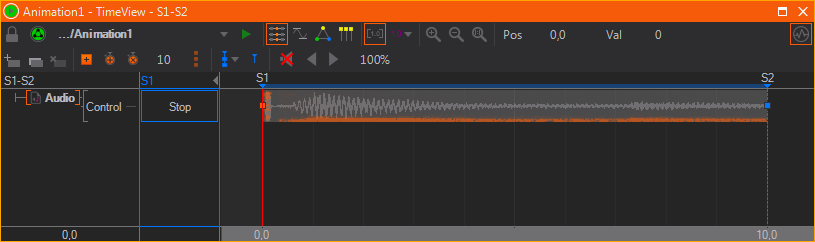
The category Audio Control provides properties to start, pause and continue the audio playback. The property Control can be bound to a Keyframe Animation node to control the playback in the time-line of the Animation Editor.
The property Ordinal specifies the audio device that should be used for playback. Stream changes the used Audio Stream in the file, normally Default should do.
The output event Complete is fired if playback has reached the end of the audio file. Loaded is true at all times the node has a valid sound file loaded. Playing additionally only returns true when the node is currently playing back a file. The Position gives information about the current playback point. Duration gives information about the overall length of the clip and Meta returns the descriptive data of the file.
Sound
The Sound node can be used to play back sounds and audio clips for a full list of supported audio codecs see Supported Audio Formats. It provides functionality similar to the Audio Clip Node. The main difference is that the Sound node decodes the whole audio clip into the memory and supports multi-play functionality. Therefore only short audio clips or sound effects should be played by using the Sound node. Long audio clips should be transcoded into a compressed audio file format to reduce file size.
The property File specifies the audio file to play. The property Loop indicates if the playback should be looped. The property AutoActivate specifies if the playback should start automatically when the scene is loaded or activated. If the property MultiPlay is activated, a new additional playback of the sound file starts every time the Play method is triggered. This may be useful for playing back multiple overlapping sound effects. Continue resumes playing the sound at the position where it has been stopped by calling the Stop method.
The property Volume adjusts the playback volume. The property Balance adjusts the playback volume between the left and right audio channel.
The category Audio Control provides properties to start and stop the audio playback. The property Control can be bound to a Keyframe Animation node to control the playback in the time-line of the Animation Editor. The property Ordinal specifies the audio device that should be used for playback.
Audio Compensation
Usually audio and video have slightly different timing. This may cause audio timing to drift compared to the video output. This can be especially bad if the video system reports an inaccurate timing, which is worst with DVI outputs. On SDI outputs, audio and video are always perfectly synchronized.
Audio playback nodes get their timing from the sound card. By binding the control of the audio playback node to an animation, the animation takes over the timing, and now the audio playback gets their timing from the video subsystem. Also, movie clip nodes tie the audio timing to video. Now audio and video can drift apart, and this is where audio compensation comes into play.
If audio compensation is enabled, Ventuz will try to speed up or slow down audio playback just slightly to compensate the drift between sound and video subsystem. If it is disabled, audio will skip to the right position when the difference gets too big. This can be controlled by pressing the configure button in the property sheet.
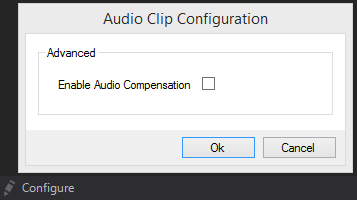
Unfortunately our current implementation of audio compensation can get confused when the frame-rate is low and unsteady. In such cases wobbling can be heard and audio compensation should be disabled.