Navigation

Ventuz 6 Quick Guide

  • Introduction
  • Getting Started
  • Ventuz Editions
  • Designer Overview
  • Ventuz System Requirements
  • Configuration
  • Video/Audio Configuration
  • Machine Configuration
  • GPI Configuration for Runtime or Director
  • Optimize Rendering Performance
  • Supported Formats
  • Supported Hardware
  • Multisampling / Anti-Aliasing
  • Input Subsystem
  • Ventuz Proprietary Files
  • What's new
  • FAQ
  • Common Mistakes
  • Deployment
  • Migration Guide
  • Ventuz 5 Migration Guide
  • Summary Shortcuts

Ventuz 6 Designer

  • Index
  • Getting Started
  • Designer Options
  • Designer Overview
Projects & Scenes
  • Projects and Scenes
  • Project Browser
  • Project Properties
  • Project Maintenance
  • Project and Scene Data
  • Scene Tree
  • Scene Management
  • Scene Statistics
  • Deployment
Interface
  • Designer Interface
  • Renderer Window
  • Realtime Rendering
  • Optimize Scene Performance
  • Performance Statistics
  • Transformation Gizmo
  • Render to Disk
  • Camera Navigation
  • Isolated Objects
  • Manipulate Objects with Gizmos
  • Layer Editor
  • Common Layer Properties
  • IPP Effects
  • Color Correction FX
  • Distortion FX
  • Filter FX
  • Layer Editor Shortcuts
  • Hierarchy Editor
  • Working with Nodes
  • Containers
  • Find and Replace
  • Shortcuts Hierarchy Editor
  • Content Editor
  • Working with Nodes
  • Containers
  • Content Editor Shortcuts
  • Toolbox
  • Property Editor
  • Project Data and Scene Data
  • Property Groups
  • Shader Editor
  • Text Editor
  • Scene Tree
  • Message View
  • Stage Editor
  • Container Outline
  • Watches Editor
  • Animation Editor
  • Animation and State Engine
  • Templates
  • Template Engine
  • Shortcuts Animation Editor
  • Text Rendering
  • Text Editor
  • Character Sets
  • Geometry Import
  • Input Subsystem
  • Multitouch
  • TUIO Protocol
  • Open Sound Control
  • How to work with Head Mounted Displays
  • Cluster
  • Multi Display Setups and Shaping
  • Warping, Soft Edging and Masking
  • Available Nodes
  • Animation Nodes
  • Material&Color Nodes
  • Data Nodes
  • Geometry Nodes
  • Interaction Nodes
  • IO Nodes
  • Layers
  • Light Nodes
  • Logic Nodes
  • Render Option Nodes
  • Slides Nodes
  • Sound Nodes
  • Text Nodes
  • Texture Nodes
  • VR Nodes
  • World Nodes

Ventuz 6 Node Reference

ANIMATION
  • Mover
  • Alternator
  • Simple Control
  • Timeline Control
  • Anmation Rig
  • Keyframe Animation
  • Animation Group
COLOR/MATERIAL
  • Alpha
  • Fog
  • Ground Fog
  • Sky Box
  • Color to RGBA
  • HSLA to Color
  • RGBA to Color
  • Color Transformer
  • HLSL Shader
  • Color
  • Material
  • Color Picker
  • Substance Material
DATA
  • Database
  • Excel
  • JSON
  • RSS Feed
  • Resource Linker
  • Text File
  • XML
GEOMETRY
  • Rectangle
  • Rounded Rectangle
  • Gradient Rectangle
  • Overlay Rectangle
  • Cube
  • Circle
  • Sphere
  • Cylinder
  • Cone
  • Torus
  • Chart
  • Random Points
  • Mesh Loader
  • Geometry Import (Live)
  • Volume
  • Get Bounding Box
  • Arrow
  • Particle System
  • Path Renderer
  • Geometry Renderer
INTERACTION
  • Interaction Rect
  • Touch Button
  • Touch Excluder
  • Touch Marker
  • Touch Paint
  • Touch Pattern
  • Touch Proxy
  • Touch Ripples
  • Touch Transformations
  • Web Browser
  • Touch Teleport
  • Touch Simulator
INPUT/OUTPUT (I/O)
  • GPI
  • Joystick
  • Keyboard
  • MIDI
  • Mouse
  • Network
  • Open Sound Control
  • Serial
  • Timecode
  • DMX
LAYER
  • 3D Layers
  • 3D Layer Reference
  • 2D Layers
  • PSD Import Layer
  • Others
LIGHT
  • Light Sources
LOGIC
  • Array Processing
  • Convert To Text
  • Cluster Synchronization
  • Counter
  • Date Time
  • Directory
  • Dispatcher
  • Enumeration
  • Expressions
  • Invert
  • Log
  • Loop Breaker
  • Math Effects
  • Matrix Operations
  • Scene Event
  • Script
  • String Operations
  • System ID
  • Text Splitter
  • Timer
  • Toggle
  • URL
  • Value Switch
  • Value Buffer
  • Variables
  • Visual Indexer
RENDER OPTIONS
  • Alpha Blending
  • Color Write
  • Alpha Testing
  • Clip Plane
  • Filter
  • Mask
  • Mirror
  • Effect
  • Render Cube Map
  • Draw Modes
  • Stencil
  • ZTesting
SOUND
  • Audio Clip
  • Sound
  • Volume Control
  • Audio Analysis
SLIDES
  • Slide Manager
  • Slide
  • Slide Port
  • Pivot
TEXT
  • Text Effects
  • Text Layouts
  • Text Rendering
TEXTURE
  • Background
  • Hatch
  • Image
  • Texture
  • SVG Loader
  • Gradient Texture
  • Live Video
  • Movie Stream
  • Movie Frame
  • Movie Clip
  • Texture Loader
  • Snapshot
  • Snapshot Framebuffer
  • Texture Saver
  • Video Source Selector
  • VIO Input
  • Spout Receiver
  • NDI Receiver
  • Substance Loader
VR/AR
  • Tracked Devices
  • Draw Tracked Devices
WORLD
  • Axis
  • Billboard
  • GetWorld
  • SetWorld
  • Arrange
  • Ticker
  • Layout
  • Group
  • World Z Sort
  • YesNo
  • Switch
  • Spread
  • Filter Pass
  • Set Pass
  • Hierarchy Container
  • Scene Port
  • Content Container
  • Template Port
  • Container Info
  • Camera
  • Paths

Ventuz 6 Configuration Editor

  • Configuration
  • Machine Configuration
  • Video/Audio Configuration
  • Web Configuration Editor and License Manager
  • Render Setup Editor
  • Warping and Soft-Edging Editor
  • Supported Hardware
  • How to Setup a Cluster Render

Ventuz 6 Director

  • Application Settings
  • Assets
  • Channels
  • Command Line Options
  • Content References
  • Designing Templates
  • Environment
  • Glossary
  • Index
  • Introduction
  • Pages
  • Playlist
  • Plug-Ins
  • Project Data
  • Property Editor
  • Shortcuts
  • GPI Configuration
  • Shot Box
  • Show
  • Taking Action
  • Timeline
  • Topology
  • User Interface
  • Director Mode
  • Macros

How To

  • How to Run Ventuz
  • How to Work with Designer
  • Ventuz Designer Drag&Drop workflow
  • How to use Head Mounted Displays
  • How to work with Shadows
  • How to use Emoijs
  • How to Build a Template
  • How to use Newtek NDI
  • How to Create Visuals Loader Node
  • How to Remote Control with a Phone
  • How to Setup a Cluster Render
  • How to use a Mixed Frame Rate Cluster
  • How to use Tracking
  • How to work with 3D Reference Layers
  • How to create a Firework Particle System
  • How to use DDS with new Block Compression modes
  • How to setup Spout with Ventuz
  • How to use the Substance Integration

Keyboard Shortcuts

  • Summary Shortcuts
  • Layer Editor Shortcuts
  • Hierarchy Editor Shortcuts
  • Content Editor Shortcuts
  • Animation Editor Shortcuts
  • Director Shortcuts

Advanced and Development

  • Command Line Options
  • Remoting Overview
  • Remoting 4
  • Remoting 4 via Websockets
  • Deprecated Remoting
  • Ventuz IP Ports
  • Ventuz Machine Service
  • Remoting Machine Signature
  • TUIO
  • .NET Scripting
  • HLSL Shader Programming
  • Ventuz API and SDK
  • Ventuz VIO API
  • Ventuz File Format (VFF)
  • Ventuz Stream Out API

General Reference

  • Terminology
  • Manual Index

Miscellaneous

  • Presets
« Previous Article
» Index «
Next Article »

What is a Show?

Table of Contents

  1. Ventuz Project
  2. Creating a New Show
  3. Opening a Show
    1. Published Scenes
    2. Window Layouts
    3. Connection to Runtime
  4. Show Defaults
  5. Saving a Show

Everything in Director starts with a Show. The first thing an operator does when launching Director is to either open an existing show or create a new one. We have seen this in the Introduction, but what exactly is a show?

Ventuz Project

A show represents a single event where an operator uses Director to bring content on to a screen. As an example, imagine a TV news program that airs once a week. For the duration of the existence of the program, the general design and the available templates will often stay the same. Before the program airs for the very first time, the design department of the TV station (or an external contractor) develops a unique look and feel. Are over-the-shoulder graphics shown to the left or right of the talent? What's the main CI color? How flashy are transitions between different elements? This is all defined in a Ventuz Project and its scene files, both created using the Ventuz Designer application. Inside the templates, there are placeholders or rather variables that can be used to insert the specific content. Again, for an over-the-shoulder graphic the designer will not know what image will be placed there. That decision is made just before the graphic goes on air by the Director operator.

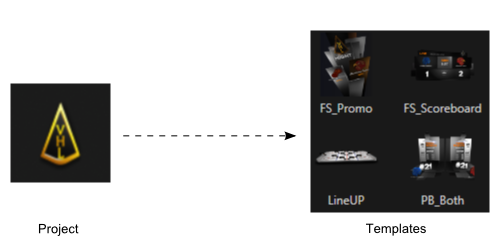
So if the Ventuz Project defines the look and feel, the Show defines the content of the program. Which graphic will be shown and in what order? How many machines will be used for rendering the content? If a breaking news graphics is put on air, what is the text in the headline? Since the content, timing and order changes each week, each airing of the news program would have its own Director Show file while all are based on the same Ventuz Project.

Creating a New Show

When launching Director, the window shows icons for the last three shows opened as well as three icons underneath to create a new show, browse for an existing one or opening the help. Press the create new show icon. As an alternative, choose File / New... from the main menu.

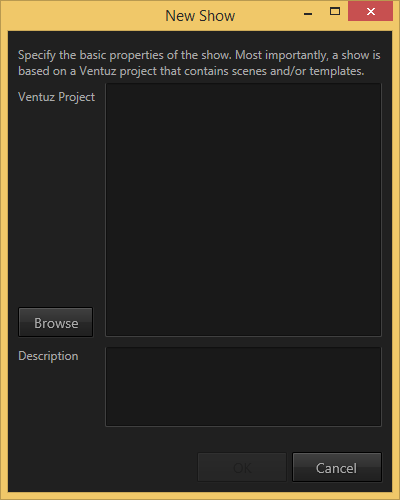
The most fundamental information of a show is the Ventuz Project it is based on. Without a project, a show simply would have no templates that it could use. So when creating a show, the operator is first greeted with a list of recently used projects. If the desired project is not already listed here, use the browse button to locate it and add it to the list.

The Ventuz project file (.vzp) has to be in Ventuz 4 or above format. A project created with Ventuz 3 Designer has to be opened and saved in Ventuz 4 Designer before it can be used with Ventuz Director.

Opening a Show

What happens next is dependent on how well a project is already set up for usage in Director. Starting with Ventuz 4.04, the project file can contain Director-specific information that makes it easy to deploy a project to Director machines.

If any errors occur, the log info icon (exclamation mark in the bottom right corner) will flush red. Click it to open the log window to get information on what specifically went wrong.

Published Scenes

A Ventuz Project file contains a list of scenes that have been marked as ready for usage in Director as opposed to work in progress or none-template scenes. If a show is opened and new scenes have been detected, the operator is presented with a dialog where he can mark the scenes that are ready for use.

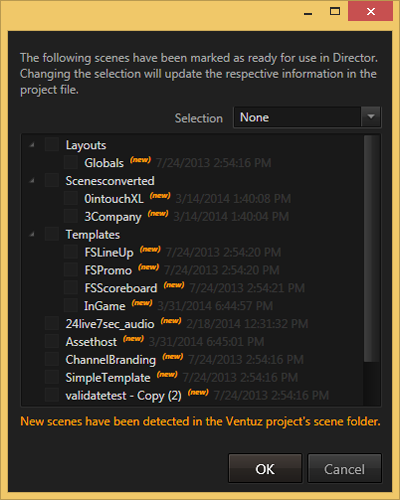
Changes made in this dialog are saved back to the project file so the dialog will not re-appear unless new scenes have been added. The same dialog can also be accessed via Show / Project / Published Scenes in the main menu.

Window Layouts

The Director user interface switches from the empty workbench to a docking window environment. The specific arrangement of windows will depend on the window layouts saved in the user-settings. Thus all shows for a project share the same set of window layouts. A detailed explanation of the individual components of a layout will be given in the chapter The User Interface.

For shows saved in V4.03 and before, window layouts were saved in each individual show file. If such a show is opened, a dialog will appear offering the operator the choice to either replace the show's layouts with those from the user settings or transfer the show's layouts to the user settings.

Connection to Runtime

Finally, Director will try to connect to all machines specified in the active topology. Director itself is only a control application while the actual rendering is done by the runtime. If neither a Runtime or a Designer is running (or the project does not match), a new instance of the Ventuz Runtime is launched.

Once the connection has been established, the preview and program render windows will show what the runtime is rendering at the moment (usually an empty, black rectangle until a template has been cued).

Show Defaults

As mentioned before, an operator can optionally embed his window layouts into the project file. This makes deployment easier as he only needs the Ventuz project when moving to another machine and not copy his user settings. When he creates a show based on that project, Director will automatically use the defaults embedded in the project file.

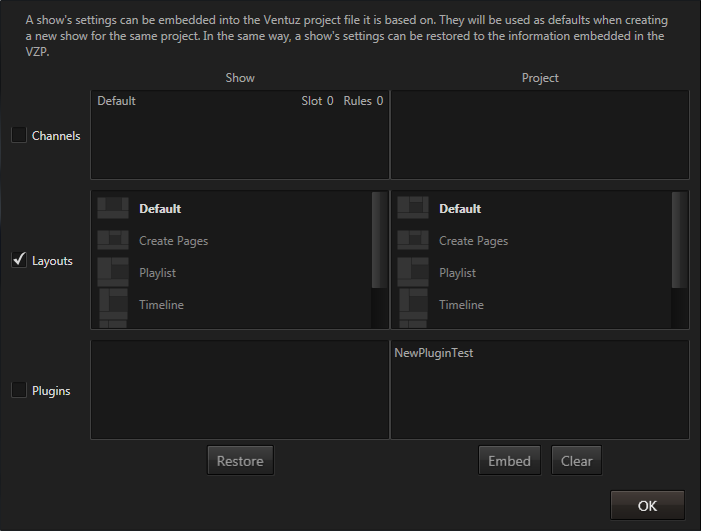
In a similar fashion, other attributes of a show that usually stay constant for a project can be embedded via Show / Project / Show Defaults in the main menu. Currently supported is the channel configuration (e.g. number of channels and where they are connected to), window layouts and plug-in configurations. Default window layouts will be used when there are no layouts for the project in the user settings and channel/plugin configuration whenever a new show is created for the project.

Changing show defaults values will not have an effect on any existing show since each show has its own copy of those value or stores them in the user settings. To set the show's values back to the defaults in the project file, use the revert button.

Saving a Show

A Director Show is stored in XML-format on your hard disk. While it can be in any arbitrary location, it usually makes sense to put all show files into a sub-folder inside the project or store all shows in one folder and store the project as a sub-folder of this show folder. In essence, it's a good idea to keep a show and project closely related. As far as possible, Director will store the file path leading to the project as a relative path.

As a general rule of thumb, a show file contains all aspects that are specific to a single event (e.g. the news show from last Monday) while all other aspects are stored such that they can be used across multiple shows.

Name Storage Location
Auto-Templates Ventuz Project File
Channel Configuration Show File
Pages Sub-folder inside Ventuz Project
Playlist Show File
Plug-In Configuration Show File
Timeline Show File
Window Layouts User Settings (one set per project)
« Previous Article
» Index «
Next Article »
Copyright 2020 Ventuz Technology