Toolbox and Repository
Table of Contents
The Toolbox contains all the Nodes that ship with Ventuz. Each node is either a Layer (brackets in all corners), a Hierarchy Node (brackets to the left and right of the icon) or a Content Node (brackets at the top and bottom of the icon) and belongs to exactly one category (i.e. World, Interaction, ...). Some of the entries shown in the Toolbox represent more than one node which is visualized by lines to the lower right that represent a stack underneath the icon. or click on those entries will show all nodes that belong to that set of similar nodes.
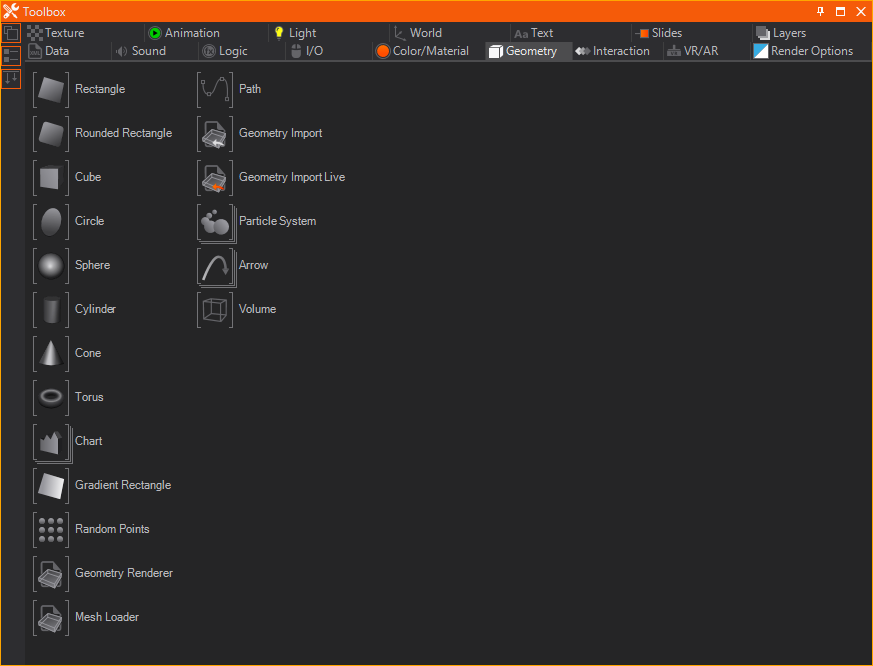
A node can be added to the scene by dragging it from the Toolbox to the appropriate editor, depending on the node type (Layer, Hierarchy or Content).
For some nodes, such as the Text node, dragging the set representative into the scene will activate a wizard that will ask for the desired provider type at the end of the drag & drop operation. The wizard will then create additional nodes which are necessary for correct operation. This is different from right-clicking the set representative and choosing the specialized node, which will only add that one node to the scene.
Descriptions of the individual nodes can be found here.
Surrogates
As described in the Nodes and Bindings page, the nodes in the toolbox visualize their intended usage with their brackets. Still there are nodes that can be placed in other editors as well. For example you can place a Rectangle node in the Hierarchy Editor, which will create a Geometry Renderer node with a Rectangle property group as source, or you can place it in the Content Editor to create Geometry Provider node instead.
See the List of Common and Useful Drag And Drop Operations page for more examples of this mechanic.
Fast Toolbox
The Fast Toolbox offers a faster way of accessing Toolbox nodes than by using the Toolbox window itself. The Fast Toolbox can be opened anywhere on the screen by pressing SPACE if the Hierarchy or Content Editor has the window focus. Ventuz offers two types of Fast Toolboxes. Which Fast Toolbox is used can be selected by clicking the wrench icon inside the Fast Toolbox or by pressing Ctrl + Space while the Fast Toolbox is open.
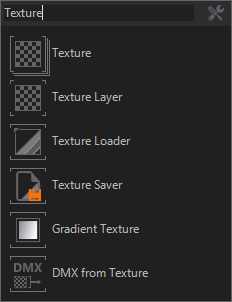
The Alphabetical Toolbox lists all nodes, sorted alphabetically. By entering characters, the nodes listed will be filtered. Nodes can be directly drag&dropped from the Alphabetical Fast Toolbox.
The Categorized Fast Toolbox lists all Toolbox Window tabs in a list. Nodes can be access from the toolbox by either clicking on a topic with the mouse or by pressing the keyboard shortcut displayed on the left side of a topic. This will open the appropriate sub menu listing all available nodes in that category.
Repository
Although each Ventuz scene is built from the individual nodes available in the Toolbox, there are often self-contained subtrees of functionality or reoccurring patterns. For example, a button may always use a certain texture, a certain animation when pressed and so on. The only thing that changes is the label and where it is positioned in the scene. The same button may even be used not only multiple times in a scene but also in multiple projects.
Storing common design elements in the repository will tremendously reduce the time required to build a scene.
The Repository window lets the user store either individual nodes or subtrees of nodes by dragging them into the Repository (for Content Nodes, press and hold CTRL while dragging them to the Repository). Each such combination of nodes can be given a new name and icon with which they will be represented in the Repository. The Repository is therefore very similar to the Toolbox in that it acts as a palette of design elements, just at a higher-level of abstraction and in a user-defined way. The former can, for example, be used as a common design repository which is shared throughout a company, or even used to sell customized Ventuz functionality to other parties.
There are three types of Repository:
- A Project Repository is stored inside the project folder structure. When a project is opened, Ventuz will automatically scan for any repository within the project folder and add it to the list of available repository in the main menu bar.
- A System Repository is stored within the Public Documents/Ventuz3/Repositories folder of the Windows installation. This folder is scanned in the same way as project repositories but due to its location is available to all users and all projects.
- A User Repository is stored somewhere outside the project. The user specifically has to browse and open this repository.
A repository can be opened by checking the respective menu entry under Repository in the main menu bar. Which Repositories have been opened will be stored as part of the Window Layout (see View/WindowLayout/Save Project Layout in the main menu bar).
Repository Item Properties
A Repository Item has some properties that can be adjusted and enable an easier workflow. When creating a Repository Item an Options Window will open and ask you to input some more information. In the General tab you can change the general description of the item. The Name will be displayed under the item's Icon. The Hint should be a small text that describes the node further and is shown when the mouse hovers over the item. When using a Category other than None the node will also appear in the Fast-Toolbox (available via Space) in the defined category.
In Description you can enter a more detailed description of your item and a Snapshot is a bigger image. Both will be shown while hovering over the item.
Keywords can be used to filter the Repository using the Search Keyword bar on the top right of the Repository Window.
Scene Templates
You may also add complete Scenes to the Repository. To do so click on the  Scene Root Icon on top of the Repository Window. You can again change the properties of the so created repository item. You cannot drag and drop a Scene Repository Item to use it. Instead you will see a new entry in the Scene->New... Dialog. It represents your Repository Item and creates a new Scene that looks the same as your scene when you added it to the repository. Note that only repository items of currently open repositories will be shown.
Interface References
A common way to use the repository is to create Interface Containers that then can be added to the repository as a new kind of node. The big advantage of using an Interface Container is that you are able to copy changes to the repository item very easily to other instances of the item.
Every Interface Container that you added to a Scene using a Repository Item will keep a reference to that item.
Make the changes you need to do in one of the scenes in which you used the item and drag and drop the Interface Container onto the Repository Item in your Repository Window. Now you can either change all instances you need to change by dragging the item from the Repository to every instance you want to be updated or click onto each instance of the Repository Item and click on Update. You may also update all containers referencing an item inside a repository by clicking the  Update-Icon on the top of the Repository Window. Note that only Interface Containers in currently opened Scenes will be updated.