Navigation

Ventuz 6 Quick Guide

  • Introduction
  • Getting Started
  • Ventuz Editions
  • Designer Overview
  • Ventuz System Requirements
  • Configuration
  • Video/Audio Configuration
  • Machine Configuration
  • GPI Configuration for Runtime or Director
  • Optimize Rendering Performance
  • Supported Formats
  • Supported Hardware
  • Multisampling / Anti-Aliasing
  • Input Subsystem
  • Ventuz Proprietary Files
  • What's new
  • FAQ
  • Common Mistakes
  • Deployment
  • Migration Guide
  • Ventuz 5 Migration Guide
  • Summary Shortcuts

Ventuz 6 Designer

  • Index
  • Getting Started
  • Designer Options
  • Designer Overview
Projects & Scenes
  • Projects and Scenes
  • Project Browser
  • Project Properties
  • Project Maintenance
  • Project and Scene Data
  • Scene Tree
  • Scene Management
  • Scene Statistics
  • Deployment
Interface
  • Designer Interface
  • Renderer Window
  • Realtime Rendering
  • Optimize Scene Performance
  • Performance Statistics
  • Transformation Gizmo
  • Render to Disk
  • Camera Navigation
  • Isolated Objects
  • Manipulate Objects with Gizmos
  • Layer Editor
  • Common Layer Properties
  • IPP Effects
  • Color Correction FX
  • Distortion FX
  • Filter FX
  • Layer Editor Shortcuts
  • Hierarchy Editor
  • Working with Nodes
  • Containers
  • Find and Replace
  • Shortcuts Hierarchy Editor
  • Content Editor
  • Working with Nodes
  • Containers
  • Content Editor Shortcuts
  • Toolbox
  • Property Editor
  • Project Data and Scene Data
  • Property Groups
  • Shader Editor
  • Text Editor
  • Scene Tree
  • Message View
  • Stage Editor
  • Container Outline
  • Watches Editor
  • Animation Editor
  • Animation and State Engine
  • Templates
  • Template Engine
  • Shortcuts Animation Editor
  • Text Rendering
  • Text Editor
  • Character Sets
  • Geometry Import
  • Input Subsystem
  • Multitouch
  • TUIO Protocol
  • Open Sound Control
  • How to work with Head Mounted Displays
  • Cluster
  • Multi Display Setups and Shaping
  • Warping, Soft Edging and Masking
  • Available Nodes
  • Animation Nodes
  • Material&Color Nodes
  • Data Nodes
  • Geometry Nodes
  • Interaction Nodes
  • IO Nodes
  • Layers
  • Light Nodes
  • Logic Nodes
  • Render Option Nodes
  • Slides Nodes
  • Sound Nodes
  • Text Nodes
  • Texture Nodes
  • VR Nodes
  • World Nodes

Ventuz 6 Node Reference

ANIMATION
  • Mover
  • Alternator
  • Simple Control
  • Timeline Control
  • Anmation Rig
  • Keyframe Animation
  • Animation Group
COLOR/MATERIAL
  • Alpha
  • Fog
  • Ground Fog
  • Sky Box
  • Color to RGBA
  • HSLA to Color
  • RGBA to Color
  • Color Transformer
  • HLSL Shader
  • Color
  • Material
  • Color Picker
  • Substance Material
DATA
  • Database
  • Excel
  • JSON
  • RSS Feed
  • Resource Linker
  • Text File
  • XML
GEOMETRY
  • Rectangle
  • Rounded Rectangle
  • Gradient Rectangle
  • Overlay Rectangle
  • Cube
  • Circle
  • Sphere
  • Cylinder
  • Cone
  • Torus
  • Chart
  • Random Points
  • Mesh Loader
  • Geometry Import (Live)
  • Volume
  • Get Bounding Box
  • Arrow
  • Particle System
  • Path Renderer
  • Geometry Renderer
INTERACTION
  • Interaction Rect
  • Touch Button
  • Touch Excluder
  • Touch Marker
  • Touch Paint
  • Touch Pattern
  • Touch Proxy
  • Touch Ripples
  • Touch Transformations
  • Web Browser
  • Touch Teleport
  • Touch Simulator
INPUT/OUTPUT (I/O)
  • GPI
  • Joystick
  • Keyboard
  • MIDI
  • Mouse
  • Network
  • Open Sound Control
  • Serial
  • Timecode
  • DMX
LAYER
  • 3D Layers
  • 3D Layer Reference
  • 2D Layers
  • PSD Import Layer
  • Others
LIGHT
  • Light Sources
LOGIC
  • Array Processing
  • Convert To Text
  • Cluster Synchronization
  • Counter
  • Date Time
  • Directory
  • Dispatcher
  • Enumeration
  • Expressions
  • Invert
  • Log
  • Loop Breaker
  • Math Effects
  • Matrix Operations
  • Scene Event
  • Script
  • String Operations
  • System ID
  • Text Splitter
  • Timer
  • Toggle
  • URL
  • Value Switch
  • Value Buffer
  • Variables
  • Visual Indexer
RENDER OPTIONS
  • Alpha Blending
  • Color Write
  • Alpha Testing
  • Clip Plane
  • Filter
  • Mask
  • Mirror
  • Effect
  • Render Cube Map
  • Draw Modes
  • Stencil
  • ZTesting
SOUND
  • Audio Clip
  • Sound
  • Volume Control
  • Audio Analysis
SLIDES
  • Slide Manager
  • Slide
  • Slide Port
  • Pivot
TEXT
  • Text Effects
  • Text Layouts
  • Text Rendering
TEXTURE
  • Background
  • Hatch
  • Image
  • Texture
  • SVG Loader
  • Gradient Texture
  • Live Video
  • Movie Stream
  • Movie Frame
  • Movie Clip
  • Texture Loader
  • Snapshot
  • Snapshot Framebuffer
  • Texture Saver
  • Video Source Selector
  • VIO Input
  • Spout Receiver
  • NDI Receiver
  • Substance Loader
VR/AR
  • Tracked Devices
  • Draw Tracked Devices
WORLD
  • Axis
  • Billboard
  • GetWorld
  • SetWorld
  • Arrange
  • Ticker
  • Layout
  • Group
  • World Z Sort
  • YesNo
  • Switch
  • Spread
  • Filter Pass
  • Set Pass
  • Hierarchy Container
  • Scene Port
  • Content Container
  • Template Port
  • Container Info
  • Camera
  • Paths

Ventuz 6 Configuration Editor

  • Configuration
  • Machine Configuration
  • Video/Audio Configuration
  • Web Configuration Editor and License Manager
  • Render Setup Editor
  • Warping and Soft-Edging Editor
  • Supported Hardware
  • How to Setup a Cluster Render

Ventuz 6 Director

  • Application Settings
  • Assets
  • Channels
  • Command Line Options
  • Content References
  • Designing Templates
  • Environment
  • Glossary
  • Index
  • Introduction
  • Pages
  • Playlist
  • Plug-Ins
  • Project Data
  • Property Editor
  • Shortcuts
  • GPI Configuration
  • Shot Box
  • Show
  • Taking Action
  • Timeline
  • Topology
  • User Interface
  • Director Mode
  • Macros

How To

  • How to Run Ventuz
  • How to Work with Designer
  • Ventuz Designer Drag&Drop workflow
  • How to use Head Mounted Displays
  • How to work with Shadows
  • How to use Emoijs
  • How to Build a Template
  • How to use Newtek NDI
  • How to Create Visuals Loader Node
  • How to Remote Control with a Phone
  • How to Setup a Cluster Render
  • How to use a Mixed Frame Rate Cluster
  • How to use Tracking
  • How to work with 3D Reference Layers
  • How to create a Firework Particle System
  • How to use DDS with new Block Compression modes
  • How to setup Spout with Ventuz
  • How to use the Substance Integration

Keyboard Shortcuts

  • Summary Shortcuts
  • Layer Editor Shortcuts
  • Hierarchy Editor Shortcuts
  • Content Editor Shortcuts
  • Animation Editor Shortcuts
  • Director Shortcuts

Advanced and Development

  • Command Line Options
  • Remoting Overview
  • Remoting 4
  • Remoting 4 via Websockets
  • Deprecated Remoting
  • Ventuz IP Ports
  • Ventuz Machine Service
  • Remoting Machine Signature
  • TUIO
  • .NET Scripting
  • HLSL Shader Programming
  • Ventuz API and SDK
  • Ventuz VIO API
  • Ventuz File Format (VFF)
  • Ventuz Stream Out API

General Reference

  • Terminology
  • Manual Index

Miscellaneous

  • Presets
« Previous Article
» Index «
Next Article »

Setting up the Environment

Table of Contents

  1. Channels
  2. Topology
  3. Ventuz Machine Service (VMS)
  4. Pipes
  5. Application Options

The Director is a control application that cannot create any 3D output by itself. Instead, it manages one or multiple Ventuz Presentation Runtimes and instructs them what to do. The Presentation Runtime interprets those commands and loads the required Ventuz scenes. Moreover it assets, plays animations and does the steps necessary to produce the proper 3D output. Therefore setting up the Ventuz environment and machine communication is of great importance.

Channels

The Director’s concept is built around the idea to work with separate channels; separate feeds of content. Much like an audio application can have separate channels (tracks) for vocals, guitars and drums, which mixed together produces a single song, the Director can provide multiple channels to manage separate content within a single show. A channel allows multiple machines to connect to the same stream of templates and/or to have multiple layers of content on the same machine. For example, a single operator may drive the content of a game show on a big screen wall in one channel, while also controlling other displays for the audience with a completely different feed in another channel.

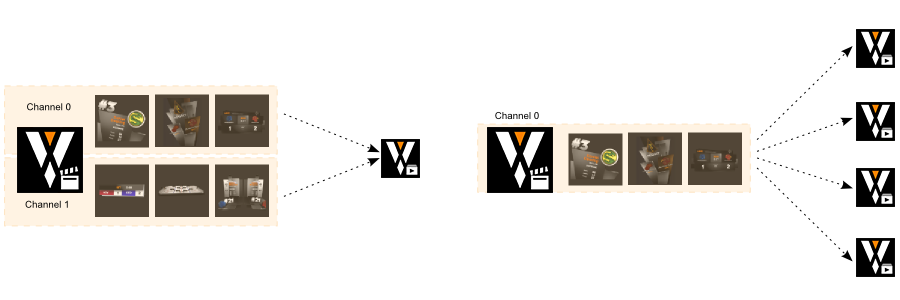
A typical Director show consists of a single channel. This is sufficient for the majority of applications and the reason why most of this documentation won't explicitly refer to multiple channels. All concepts of Director that are introduced in the following chapters extend to working with multiple channels and it is therefore left to the later chapters such as Topology or Channel Configuration to discuss the more advanced scenarios.

Topology

Which machines are actually attached to a channel is specified in the active Topology. A topology can be created, modified and saved via the Topology Editor which is usually done by the IT department managing the machines way before any show is run on a given setup. The Ventuz Director operator simply selects the correct topology from the empty workbench and launches his show.

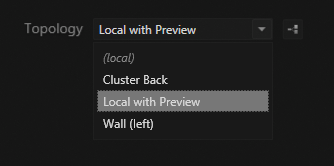
In addition to the topologies stored in the local machine's configuration folder, the list of available topologies always contains a simply default topology for the local machine called (local). This configuration is ideal for new users that want to learn Director, working with remote machines is discussed in a dedicated chapter.

Ventuz Machine Service (VMS)

Director talks to a Ventuz Runtime via the Ventuz Machine Service (VMS). This Windows service is installed during your Ventuz installation process and will be automatically started whenever the machine reboots. The main purpose of the VMS is to broadcast machine information onto the local network and allow Director to start an instance of the presentation runtime, even if Director is running on a different machine!

For Director to be able to talk to the VMS, any installed firewall has to allow TCP communication on the port 20405!

The user interface for the VMS is pretty minimal. By clicking on the VMS icon in the Windows system tray, the operator can specify project folders that should be made available via the VMS and trigger a re-scan of those folders. When Director tells a VMS to start the Ventuz Runtime, the VMS searches those folders for the required local copy of the project.

If Director reports an error as it failed to find a project, make sure your project is located in a folder (or sub-folder of) that is part of the VMS configuration list and trigger a manual scan of projects.

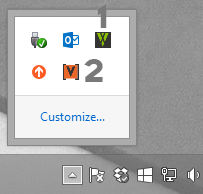
  1. VMS with a valid connection to a Ventuz Runtime (green status)
  2. A running Ventuz Runtime

The VMS provides much more functionality such as remote hardware configuration but for the scope of this manual, starting the Presentation Runtime and locating projects is its sole purposes. For more information on the VMS, see Ventuz Machine Service in the Ventuz Designer user manual.

Pipes

Each channel connects to two so-called pipes provided by the Ventuz Runtime: Program and Preview. Each pipe has an independent output and a template engine that controls the content shown on that pipe. Both can be configured inside the Audio/Video section of the Ventuz Machine Configuration Tool. The Program Pipe usually shows the final result the audience will see. The Preview Pipe is used to provide visual feedback to the operator while he is editing a template.

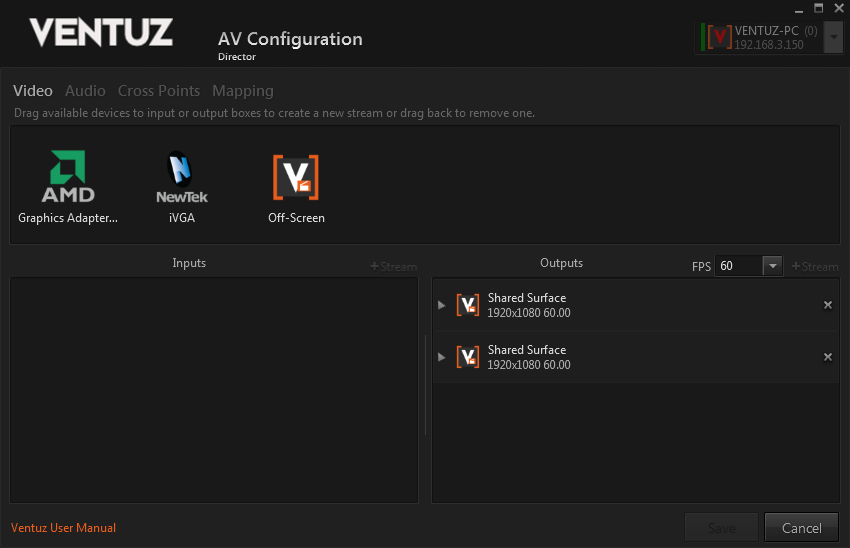
The output of a pipe can be one of three types:

  • An Off-Screen Surface (default): The Ventuz Runtime will render its output on to a texture that is shown right inside Director. The two output windows in the introduction for example were powered by two off-screen surfaces, one for the program and one for preview.
  • A Graphics Adapter: The output will not be available inside Director but appear as a separate full-screen window on the display attached to the graphics adapter.
  • An SDI output signal: If the pipe's output is configured to use an SDI board, the output will neither be available inside Director nor on-screen. Instead, it will be send to the output of the SDI board and from there to a TV screen. This is typically used in broadcasting environments.

For example, an operator sitting in a TV broadcast station might have the program pipe configured to use an SDI output which goes to the mixing desk. The preview will be an off-screen surface so the operator sees what he is editing or another SDI board if other people inside the broadcasting room are interested in that as well.

The default of having two off-screen surfaces is great for learning Director since the user has both a working program and preview window inside Director. However, a production configuration would at least assign the program pipe to either SDI or graphics adapter since otherwise, no one except the operator sees the output signal!

Application Options

Director has various options to configuration the application itself and adjust it to the work environment of the operator's workflow. For example, on a dedicated operator machine it might be advisable to have Director launched in fullscreen mode by default.

The application options can be accessed via Tools / Options in the main menu.

« Previous Article
» Index «
Next Article »
Copyright 2020 Ventuz Technology