Navigation

Ventuz 6 Quick Guide

  • Introduction
  • Getting Started
  • Ventuz Editions
  • Designer Overview
  • Ventuz System Requirements
  • Configuration
  • Video/Audio Configuration
  • Machine Configuration
  • GPI Configuration for Runtime or Director
  • Optimize Rendering Performance
  • Supported Formats
  • Supported Hardware
  • Multisampling / Anti-Aliasing
  • Input Subsystem
  • Ventuz Proprietary Files
  • What's new
  • FAQ
  • Common Mistakes
  • Deployment
  • Migration Guide
  • Ventuz 5 Migration Guide
  • Summary Shortcuts

Ventuz 6 Designer

  • Index
  • Getting Started
  • Designer Options
  • Designer Overview
Projects & Scenes
  • Projects and Scenes
  • Project Browser
  • Project Properties
  • Project Maintenance
  • Project and Scene Data
  • Scene Tree
  • Scene Management
  • Scene Statistics
  • Deployment
Interface
  • Designer Interface
  • Renderer Window
  • Realtime Rendering
  • Optimize Scene Performance
  • Performance Statistics
  • Transformation Gizmo
  • Render to Disk
  • Camera Navigation
  • Isolated Objects
  • Manipulate Objects with Gizmos
  • Layer Editor
  • Common Layer Properties
  • IPP Effects
  • Color Correction FX
  • Distortion FX
  • Filter FX
  • Layer Editor Shortcuts
  • Hierarchy Editor
  • Working with Nodes
  • Containers
  • Find and Replace
  • Shortcuts Hierarchy Editor
  • Content Editor
  • Working with Nodes
  • Containers
  • Content Editor Shortcuts
  • Toolbox
  • Property Editor
  • Project Data and Scene Data
  • Property Groups
  • Shader Editor
  • Text Editor
  • Scene Tree
  • Message View
  • Stage Editor
  • Container Outline
  • Watches Editor
  • Animation Editor
  • Animation and State Engine
  • Templates
  • Template Engine
  • Shortcuts Animation Editor
  • Text Rendering
  • Text Editor
  • Character Sets
  • Geometry Import
  • Input Subsystem
  • Multitouch
  • TUIO Protocol
  • Open Sound Control
  • How to work with Head Mounted Displays
  • Cluster
  • Multi Display Setups and Shaping
  • Warping, Soft Edging and Masking
  • Available Nodes
  • Animation Nodes
  • Material&Color Nodes
  • Data Nodes
  • Geometry Nodes
  • Interaction Nodes
  • IO Nodes
  • Layers
  • Light Nodes
  • Logic Nodes
  • Render Option Nodes
  • Slides Nodes
  • Sound Nodes
  • Text Nodes
  • Texture Nodes
  • VR Nodes
  • World Nodes

Ventuz 6 Node Reference

ANIMATION
  • Mover
  • Alternator
  • Simple Control
  • Timeline Control
  • Anmation Rig
  • Keyframe Animation
  • Animation Group
COLOR/MATERIAL
  • Alpha
  • Fog
  • Ground Fog
  • Sky Box
  • Color to RGBA
  • HSLA to Color
  • RGBA to Color
  • Color Transformer
  • HLSL Shader
  • Color
  • Material
  • Color Picker
  • Substance Material
DATA
  • Database
  • Excel
  • JSON
  • RSS Feed
  • Resource Linker
  • Text File
  • XML
GEOMETRY
  • Rectangle
  • Rounded Rectangle
  • Gradient Rectangle
  • Overlay Rectangle
  • Cube
  • Circle
  • Sphere
  • Cylinder
  • Cone
  • Torus
  • Chart
  • Random Points
  • Mesh Loader
  • Geometry Import (Live)
  • Volume
  • Get Bounding Box
  • Arrow
  • Particle System
  • Path Renderer
  • Geometry Renderer
INTERACTION
  • Interaction Rect
  • Touch Button
  • Touch Excluder
  • Touch Marker
  • Touch Paint
  • Touch Pattern
  • Touch Proxy
  • Touch Ripples
  • Touch Transformations
  • Web Browser
  • Touch Teleport
  • Touch Simulator
INPUT/OUTPUT (I/O)
  • GPI
  • Joystick
  • Keyboard
  • MIDI
  • Mouse
  • Network
  • Open Sound Control
  • Serial
  • Timecode
  • DMX
LAYER
  • 3D Layers
  • 3D Layer Reference
  • 2D Layers
  • PSD Import Layer
  • Others
LIGHT
  • Light Sources
LOGIC
  • Array Processing
  • Convert To Text
  • Cluster Synchronization
  • Counter
  • Date Time
  • Directory
  • Dispatcher
  • Enumeration
  • Expressions
  • Invert
  • Log
  • Loop Breaker
  • Math Effects
  • Matrix Operations
  • Scene Event
  • Script
  • String Operations
  • System ID
  • Text Splitter
  • Timer
  • Toggle
  • URL
  • Value Switch
  • Value Buffer
  • Variables
  • Visual Indexer
RENDER OPTIONS
  • Alpha Blending
  • Color Write
  • Alpha Testing
  • Clip Plane
  • Filter
  • Mask
  • Mirror
  • Effect
  • Render Cube Map
  • Draw Modes
  • Stencil
  • ZTesting
SOUND
  • Audio Clip
  • Sound
  • Volume Control
  • Audio Analysis
SLIDES
  • Slide Manager
  • Slide
  • Slide Port
  • Pivot
TEXT
  • Text Effects
  • Text Layouts
  • Text Rendering
TEXTURE
  • Background
  • Hatch
  • Image
  • Texture
  • SVG Loader
  • Gradient Texture
  • Live Video
  • Movie Stream
  • Movie Frame
  • Movie Clip
  • Texture Loader
  • Snapshot
  • Snapshot Framebuffer
  • Texture Saver
  • Video Source Selector
  • VIO Input
  • Spout Receiver
  • NDI Receiver
  • Substance Loader
VR/AR
  • Tracked Devices
  • Draw Tracked Devices
WORLD
  • Axis
  • Billboard
  • GetWorld
  • SetWorld
  • Arrange
  • Ticker
  • Layout
  • Group
  • World Z Sort
  • YesNo
  • Switch
  • Spread
  • Filter Pass
  • Set Pass
  • Hierarchy Container
  • Scene Port
  • Content Container
  • Template Port
  • Container Info
  • Camera
  • Paths

Ventuz 6 Configuration Editor

  • Configuration
  • Machine Configuration
  • Video/Audio Configuration
  • Web Configuration Editor and License Manager
  • Render Setup Editor
  • Warping and Soft-Edging Editor
  • Supported Hardware
  • How to Setup a Cluster Render

Ventuz 6 Director

  • Application Settings
  • Assets
  • Channels
  • Command Line Options
  • Content References
  • Designing Templates
  • Environment
  • Glossary
  • Index
  • Introduction
  • Pages
  • Playlist
  • Plug-Ins
  • Project Data
  • Property Editor
  • Shortcuts
  • GPI Configuration
  • Shot Box
  • Show
  • Taking Action
  • Timeline
  • Topology
  • User Interface
  • Director Mode
  • Macros

How To

  • How to Run Ventuz
  • How to Work with Designer
  • Ventuz Designer Drag&Drop workflow
  • How to use Head Mounted Displays
  • How to work with Shadows
  • How to use Emoijs
  • How to Build a Template
  • How to use Newtek NDI
  • How to Create Visuals Loader Node
  • How to Remote Control with a Phone
  • How to Setup a Cluster Render
  • How to use a Mixed Frame Rate Cluster
  • How to use Tracking
  • How to work with 3D Reference Layers
  • How to create a Firework Particle System
  • How to use DDS with new Block Compression modes
  • How to setup Spout with Ventuz
  • How to use the Substance Integration

Keyboard Shortcuts

  • Summary Shortcuts
  • Layer Editor Shortcuts
  • Hierarchy Editor Shortcuts
  • Content Editor Shortcuts
  • Animation Editor Shortcuts
  • Director Shortcuts

Advanced and Development

  • Command Line Options
  • Remoting Overview
  • Remoting 4
  • Remoting 4 via Websockets
  • Deprecated Remoting
  • Ventuz IP Ports
  • Ventuz Machine Service
  • Remoting Machine Signature
  • TUIO
  • .NET Scripting
  • HLSL Shader Programming
  • Ventuz API and SDK
  • Ventuz VIO API
  • Ventuz File Format (VFF)
  • Ventuz Stream Out API

General Reference

  • Terminology
  • Manual Index

Miscellaneous

  • Presets
« Previous Article
» Index «
Next Article »

How To Use a Cluster with Mixed Frame Rates

Table of Contents

  1. Cluster-Communication
  2. What is special about Mixed Frame Rates?
  3. Frame Rate Multiplier
  4. Timing Master and Interaction Master
  5. Performance Statistics
  6. Example

Under certain circumstances, machines in a Ventuz Cluster setup need to run with different frame rates. Or, looking at it the other way round, sometimes machines that run on different frame rates need to join a Ventuz Cluster to take advantage of its functionality.

This page describes why this is necessary and how to configure it.

Running machines with mixed frame rates in a cluster only works in DirectX Output Mode, including implemented Headmounted Displays.

Cluster-Communication

To make Ventuz render machines act like a Cluster, different data and information is shared between them like the Cluster Clock, the Input Subsystem or some cluster sensitive nodes.

The most important one is the Cluster Clock as it creates a common time base which is needed for rendering synchronization, but also other cluster communication relies on this time base.

What is special about Mixed Frame Rates?

As stated on this page: Cluster Clock - the timing master distributes the clock across the cluster and each machine uses its global fps setting to determine the current time. So if two machines run on different fps settings, the calculated time that drives animations, movers, determines when cluster data should be executed, is different. The results are discontinuous animations, animations that appear in different speeds, touch or other data that seems to be applied with a wrong timing etc...

The solution is to bring the cluster clock to the same logical value by using the Mixed Frame Rate multiplier.

Frame Rate Multiplier

To make a cluster with mixed frame rates work correctly, the cluster clock has to be matched. More specific, it has to be set to the least common multiple. The global FPS setting is used to calculate the local timing from the cluster clock, so the FPS setting has to match the graphic cards' refresh rate. Then the frame rate multiplier is used to bring it to the least common multiple of the machines.
The frame rate multiplier increases the steps of the cluster clock to a level that the machines have in common, so each machine can use the multiplier and the machines fps setting to calculate its correct local time base.

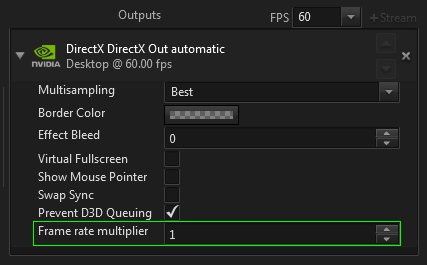
The frame rate multiplier is set in the output stream options.

Example: A cluster of two machines should be used. Machine one uses a VR headset that runs on 90Hz, as output. Machine two drives a display that can not run on 90Hz, but has to run on 60 Hz. The least common multiple of 90 and 60 is 180. So machine one has to be set to 2 x 90 Hz, Machine two has to be set to 3 x 60 Hz.

Increasing the cluster clock steps with the multiplier not only changes the value of the clock. It actually increases the internal validation steps in the render engine for it to be able to apply the correct timing. The rendering, of course, stays at the machines refresh rate, so in the above example, machine one renders 90 frames per second and machine two renders 60 frames per second.

Timing Master and Interaction Master

When input devices are involved, it is essential that the Interaction Master is also set to be the timing master. In general, it is not crucial whether the machine with the lowest or highest frame rate is the clusters' timing master.

Performance Statistics

When a frame rate multiplier larger than 1 is used, it is displayed in the performance statistics next to the framerate.

Example

An example for a setup that involves machines running at different frame rates but still a Cluster is needed was already introduced above. The HTC Vive and its controllers are used to create a VR Experience. A second machine runs a display wall so an audience can watch the happenings from a third person perspective. As the user interacts with the Ventuz scene using the Vive controllers, the touch information has to be passed to the machine that runs the display wall. The HTC Vive runs on 90Hz. Unless the involved display wall is capable of running on 90Hz, this results in a mixed frame rate setup. For this example, the display wall runs on 60Hz.

The FPS setting for each machine is set to the refresh rate of the output device. So for machine one, it is set to 90 fps, for machine two it is set to 60. The least common multiple of 60 and 90 is 180. So the multiplier on machine one is set to 2 (2x90fps), the other one to 3 (3x60fps).

When the user triggers touches in the scene, this information should be passed to the other machine via the Input Subsystem. So the machine that is connected to the HTC Vive is configured to be the Interaction Master.

As described in the section above, it is essential for the Interaction Master to be the Clusters' Timing Master. So this machines MachineID has to be configured to be the lowest in the Cluster - typically 1.

Tweak: The HTC Vive actually does not run on 90Hz, but around 89.5Hz. To assure stable synchronization, it is helpful to override the EDID with 90 Hz.

See also:
  • Cluster
  • How to Cluster Rendering

« Previous Article
» Index «
Next Article »
Copyright 2020 Ventuz Technology