The Shot Box
Table of Contents
A Ventuz Director operator will often find himself in situations where reaction time is crucial. Something unexpected happens and all advance planning suddenly is worth nothing. Now the only important thing is how fast can one get a certain information on screen.
Application-wide
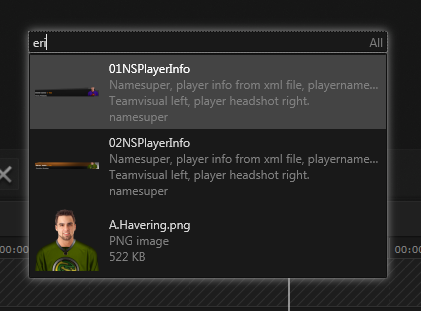
The answer to this is the Shot Box, a quick way to access all available templates, pages and assets. To open it, an operator can press + on the number pad regardless of what he is currently doing. A small text box will appear in the center of the application. Upon typing, the shotbox filters through the show's content and presents the first ten matches that contain the search string in their name. In the image below, the search string "eri" has been entered which yielded three matches:
- the 01NSPlayerInfo template
- the 02NSPlayerInfo template
- The headshot of a player called A.Havering
By using ▲, ▼, one can change the selection and by pressing Enter confirm it. Director will then replace whatever is currently cued and cue the selection instead. So within only a few key strokes, the content is ready to go.
Besides the name, templates and pages can be filtered by keywords, category and author. The following table shows the prefix to be used plus a respective example. There are multiple choices for each. They result in the same query.
| Name | All items that contains the entered name are shown |
| no prefix | 01NSPlayerInfo |
| name: | name:01NSPlayerInfo |
| Keyword | All items that have a keyword that matches the entered keyword are shown |
| $ | $namesuper |
| kw: | kw:namesuper |
| key: | key:namesuper |
| keyword: | keyword:namesuper |
| Category | All items which category starts with the entered text are shown |
| # | #sports |
| cat: | cat:sports |
| category: | category:sports |
| Author | All items which author starts with the entered text are shown |
| @ | @edward |
| author: | author:edward |
By default, the Shot Box is capable of browsing templates, pages and assets such as images. It can be extended via custom plugins.
Property Editor
Another place where the shot box can be used is inside the Property Editor to fill in content. All places where an asset (such as an image) or a sub-template can be inserted are represented by slots (i.e. rectangular boxes). clicking on such a slot opens up the shot box in filtered mode. The text on the right inside the shot box's text enter field will switch from "All" to the type of content than can be inserted into the slot (e.g. for a sub-template it will only list pages and templates). Otherwise, the behavior of the shot box is exactly the same.

Auto-Templates
A less obvious but tremendously powerful feature of the shot box is the use of auto-templates. The basic idea is simple: If one can already enter a search string inside the shot box, why not use parts of the entered text to pre-fill template data fields? This reduces the need to manually go to the property editor and makes getting content on the screen even faster.
On a technical level, auto-templates are defined by Regular Expressions that are matched against the search string. If the regular expression matches, it is shown as another entry in the shot box, marked by the bright orange "(Auto)" label.
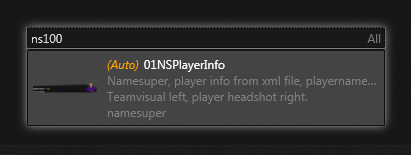
If a search string matches auto-templates and normal items, auto-templates are always presented first.
Auto-templates are stored in the Ventuz Project file and are shared among all shows based on a project. To see what auto-templates are available or to create new ones, go to the main menu Show / Project / Auto Templates... which will open the Auto Templates Editor. Let's take a closer look at the PB_Both auto-template that is currently selected in the following screenshot:
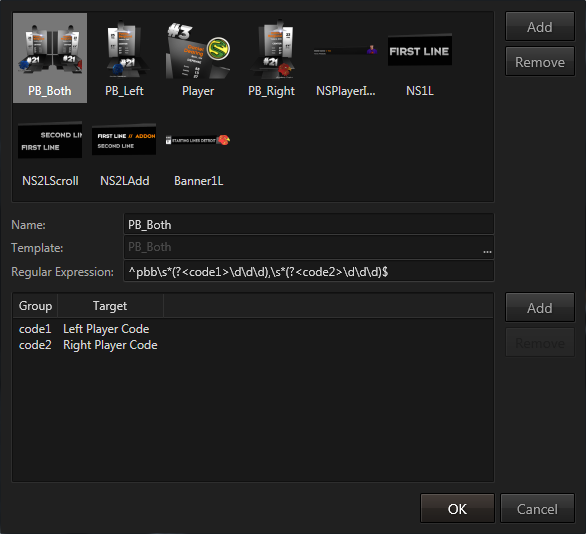
The top area of the Auto Templates Dialog shows the thumbnail of the template for which an auto-template is defined, here the PB_Both template. In the middle of the dialog is the regular expression text edit field. The bottom area of the dialog shows assignments of parts of the regular expression to data fields of the template itself.
To add a new template, simply press the add button in the top right corner and select a template, enter a regular expression and optionally connect parts of the regular expression by pressing the lower add button.
Regular Expressions
Regular Expressions are a very powerful technique to match strings and can handle quite complex cases. However, that expressiveness can unfortunately also make it quite confusing to learn their syntax. The following is a short summary of the most important concepts:
A regular expression defines a pattern of characters that is searched for anywhere in the string the user entered into the shot box. The simplest regular expression is an exact string:
xyz
This would for example match the text This is an xyz test or xyzabc but not xy. The characters in the regular expression have to appear anywhere in the text in precisely that order.
Regular expressions are case sensitive! The expression abc will not match the string ABC.
Special Characters
There are however a number of characters that have a special meaning inside a regular expression. The following are the most important ones:
| Character | Description | Example |
|---|---|---|
| . | Matches any single character. | |
| * | Matches the preceding character any number of times. | a*b matches ab but also aaaab. |
| + | Matches the preceding character at least one time. | a+b matches ab and aaaab but not b |
| ( and ) | Group | Brackets define a group of characters within an expression. For example, a(bc)*d would match abcbcd but not abccd since the * operator will be applied to the group defined within the brackets. |
| | | Option | The pipe character is used to express an option. a(bc|de|xy)f would match either abcf or adef or axyf but not abcdef. |
| [, ] | Collection | Defines as collection of characters from which exactly one is matched. So a[bcdef]g would match acg but not ahg or abcg. Note that collections allow ranges to be specified (e.g. [a-z]). A collection can be inverted by the ^ character (e.g. [^\d] would match any non-digit character). |
| ^ | The start of the text. | ^xyz would match xyzabc but not axyzbc. |
| $ | The end of the text. | xyz$ would match abcxyz but not abxyzc. |
| \s | A whitespace character | |
| \d | A digit | Matches 0-9, so \d-\d would match 2-9 but not 29 or 2-9. |
| \(, \), \[, \], \*, \+, \?, and more | Syntax characters | There are various characters that have a special meaning inside a regular expression. To match the literal character, such a character has to be escaped by a preceding backslash. |
| \\ | A backslash | Since the backslash is used to escape other characters, matching an actual backslash in the text requires \\ |
If a regular expression does not work as expected, it is often due to insufficient escaping of brackets or other syntax characters.
Named Groups
As we have seen above, opening and closing brackets can be used to group a set of characters. Such a group can be assigned a name by using the
(?<nameofgroup>pattern)
syntax. Naming of groups is important as it allows us to connect parts of the match string with template data fields. So let's revisit the example from the screenshot above:
^pbb\s*(?<code1>\d\d\d),\s*(?<code2>\d\d\d)$
- The ^ and $ mean that this expression has to match the complete string that is entered into the shot box, from start to end.
- pbb: are just three characters, so whatever the user enters it has to start with pbb or the auto-template will not match.
- \s*: After the characters pbb there can be any amount of white-space characters, even zero.
- (?<code1>\d\d\d): This now is a group named code1. It matches exactly three digits.
- ,\s*: After the three numbers, a comma must follow plus - optionally - an arbitrary number of white-space characters.
- (?<code2>\d\d\d): A second named group matching exactly three digits.
So the regular expression would match
pbb 102, 304
but
pbb 1 3
would fail (no comma between the two numbers and the numbers don't have three digits each).
Examples
| Pattern | Description |
|---|---|
| abc | Matches a string that contains the characters abc anywhere in the string. |
| ^abc$ | Matches only exactly the string abc. |
| ^pbl\s*(?<code>\d\d\d)$ | Matches a string that starts with pbl and is followed by a three digit number. Optionally the characters and the digits are separated by white-space characters. The value of the three digits is available as the named group code. |
| ^ns\s*(?<text1>[^\d][\w\s]*)$ | Matches a string that starts with ns and is then followed by a string that contains only letters, numbers and white-spaces and does not start with a digit. |