Ipp Effects: Color Corrections
Table of Contents
These are post-processing effects that you can add to any 2D or 3D layer. Currently available in this category are Grayscale, Color Grading, Color Correction and Gain.
Most of these color corrections operate by affecting different tonal ranges of the picture. In general there are three main areas which will be affected by different dedicated color correction effects, these are:
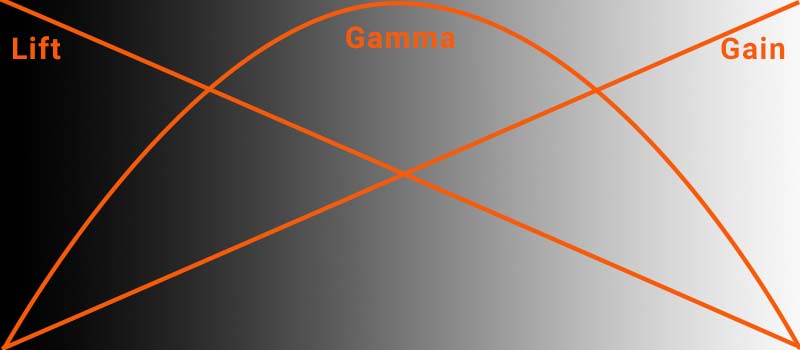
Color Correction in a Nutshell
Lift
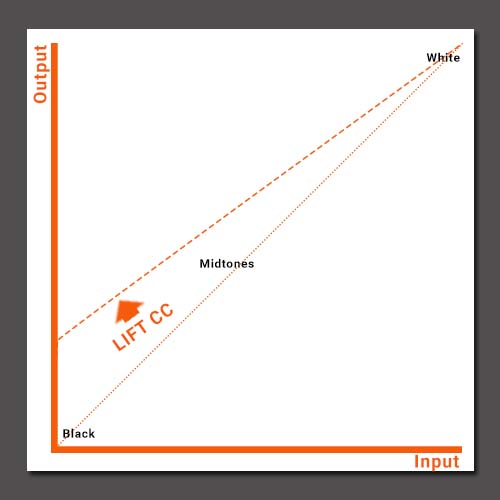
As you can see in the figure above, Lift affects mainly the darker and black tones of your picture.
Gamma
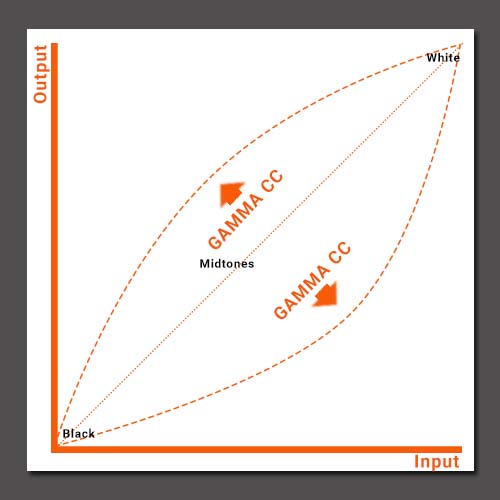
As you can see in the figure above, Gamma Color Correction affects mainly the midtones of your picture, leaving the blacks and whites mostly untouched.
Gain
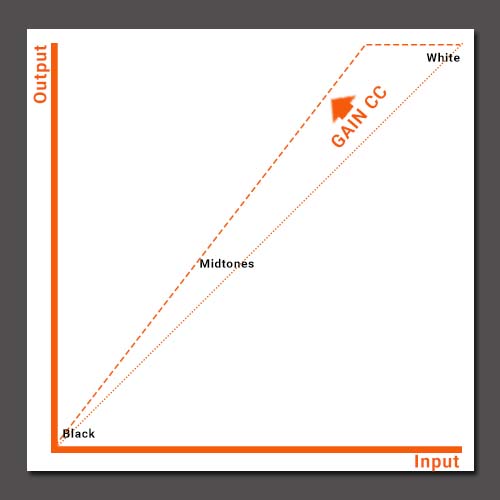
As you can see in the figure above, gain affects mainly the brighter and white tones of your picture.
Offset
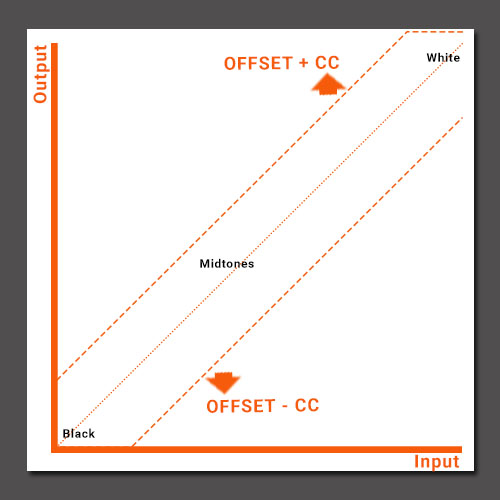
As you can see in the figure above, Offset just moves up or down the whole curve, so it darkens or lightens the whole picture; shadows, mid-tones and highlights.
Tonal Ranges
You can check this picture for a reference of the areas which will be affected for each color correction operation. These areas are often known as Tonal Ranges, and they can be described using different names like Blacks, Low Lights or Shadows for the darker areas, Midtones for the intermediate range, and Highlights or Whites for the lighter areas:
HSV Color Corrections
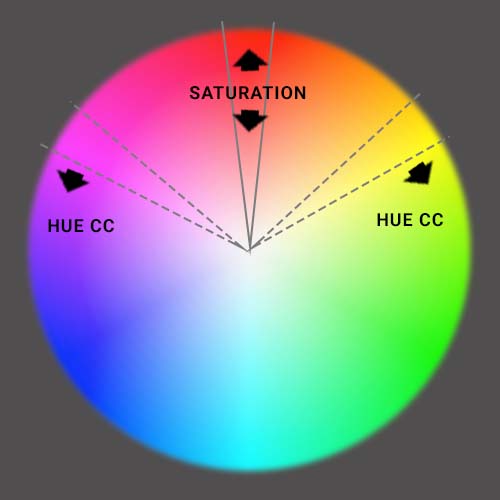
In the figure above, you can see the usual HSV Color Corrections and how they operate.
- Saturation Works by moving pixel values from the center to the edge of the Color wheel, meaning that decreasing the Saturation shifts the image values towards the center values - whiter and less saturated colors. While increasing the Saturation moves the values towards the edge of the wheel - more vibrant colors.
- Hue Color Correction works by turning the image colors around the color wheel, resulting in all image colors being shifted
Grayscale

A simple Grayscale effect that turns the layer colors to different shades of grey - in the picture you can see the color correction applied to the righ side and the original image on the left. RGB channels are balanced to follow the YUV standard color levels, but those default values can be changed in the parameters and some presets are available.
These are the Presets available:
- Gray: The default grayscale effect.
- Sepia: A grayscale image with some brownish tint, to look like old sepia photographs.
- Red/ Green/ Blue/ Alpha Only: Used to isolate just the color values of one of the channels.
These are the Parameters available:
- Amount: Controls how much of the original layer is turned into grayscale tones. The default 100% value means that the layer will be grayscale completely.
- R/G/B: Three sliders to control the amount of each color channel used to generate the grayscale image. The default values (21.61% Red, 71.52% Green and 7.22% Blue) keeps the same ratio used by standard video component formulas. Other presets change these values.
- A: Controls the Alpha channel
- Tint: A dropdown menu to select the color used to tint the grayscale image, the default is White.
Color Grading
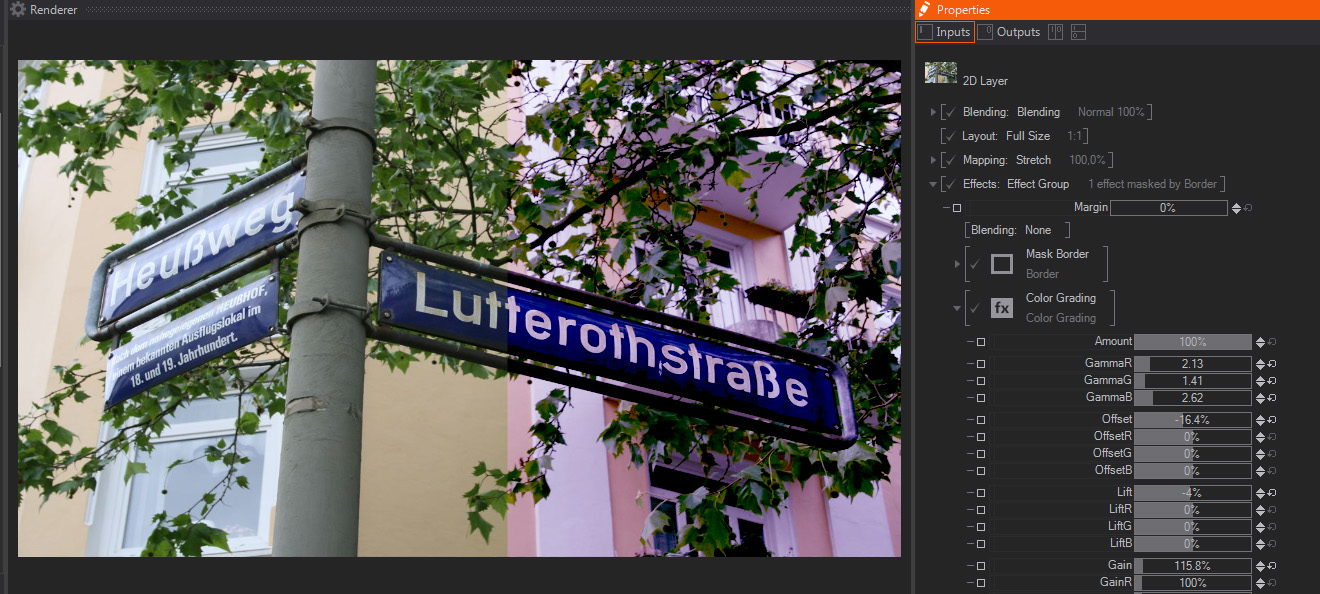
A color correction effect, featuring some of the standard color correction/color grading properties, mostly based on individual controls for each of the three RGB image channels - in the picture you can see the color correction applied to the righ side and the original image on the left.
These are the Parameters available:
- Amount: A slider to control how much the original layer is graded. The default 100% value means that the layer will be completely affected by the Color Grading Effect.
- Gamma R/G/B: Three sliders to control the gamma for each color channel independently, their default values are 1. The Gamma controls the curvature of the color response curve, meaning that mainly the mid-tones, i.e. the tones which are not close to either black or white values, will be affected. Higher values will give you a brighter, washed out picture, while smaller values will give you a darker, more contrasted result.
- Offset: As mentioned above it performs a general correction, with values under 0% darkening all areas of the picture and values over 0% lightening the whole picture.
- Offset R/G/B: Works in a similar way to the general Offset setting above but working on each channel individually. This means that values over 0% increase the channel intensity, and values below 0% turn the image towards the complementary color, in other words, values under 0% result in colors shifting to Cyan in the Red channel, to Magenta in the Green channel and to Yellow in the Blue channel.
- Lift: Performs a standard lift color correction, the default value is 0%. A lift color correction works by taking the black and darker values up or down in the color response curve, while keeping the brighter and white tones untouched (check picture). This results in the black and darker areas of the image being more affected, with influence decreasing in the midtones and almost no influence on the lighter and white pixels.
- Lift R/G/B: Control lift color correction on each of the three channels individually, the default values are 0%.
- Gain: Performs a standard Gain color correction, the default value is 100%. A Gain color correction works by displacing the brighter and whites side of the color curve, while keeping the black and darker tones untouched. The result is, in some respect, the inverse of the Lift control, with a greater effect on the white and brighter areas of the image, its influence decreasing in the midtones, until being completely without effect in the dark and black areas.
- Gain R/G/B: Control Gain color correction on each of the three channels individually, the default values are 100%.
Color Correction
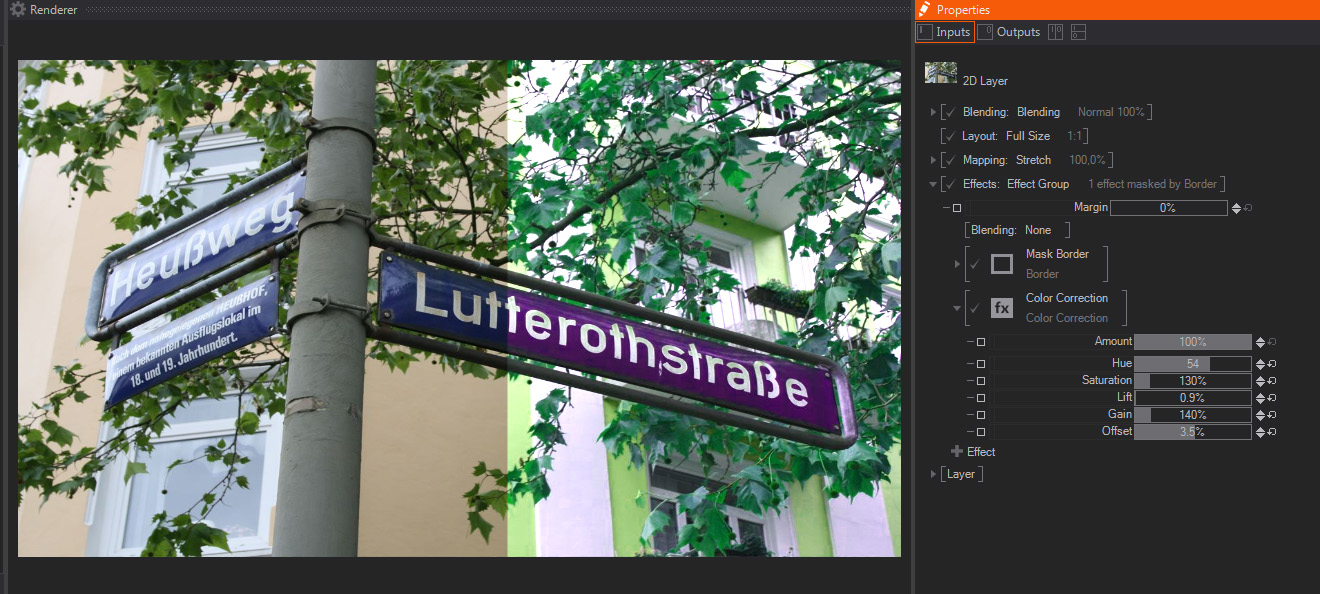
A color correction effect, featuring some of the standard color correction properties, very similar to Color Grading, but more focused on the HSL/HSV Color model (see above) - in the picture you can see the color correction applied to the righ side and the original image on the left.
These are the Parameters available:
- Amount: Controls how much of the original layer is color corrected. The default 100% value means that the layer will be totally affected by the Color Correction Effect.
- Hue: Controls the Layer Hue, or tone, with a default value of 0. Hue shifts the color values of all channels, effectively changing the overall color appearance of the image. Internally Hue is turning the color wheel clockwise or counter-clockwise. Therefore very high values, whether they are positive or negative, turn every color towards its complementary, i.e. red towards cyan, green towards magenta, and blue towards yellow/orange.
- Saturation: Controls the Layer Saturation, or color intensity, with a default value of 100%. Saturation controls how intense the color values of an image are, the lower the values, the more color values are shifted towards white in the color wheel, and the image colors look less intense. Higher saturation values imply moving the color values away from white, resulting in more intense colors.
- Lift: Performs a standard lift color correction, the default value is 0%. A lift color correction works by taking the black and darker values up or down in the color response curve, while keeping the brighter and white tones untouched (check picture). This results in the black and darker areas of the image being more affected, with influence decreasing in the midtones and almost no influence on the lighter and white pixels.
- Gain: Performs a standard Gain color correction, the default value is 100%. A Gain color correction works by displacing the brighter and white side of the color curve, while keeping the black and darker tones untouched. The result is, in some respect, the inverse of the Lift control, with a greater effect on the white and brighter areas of the image, its influence decreasing on the midtones, until being completely without effect in the dark and black areas.
- Offset: As mentioned above it performs a general correction, with values under 0% darkening all areas of the picture and values over 0% lightening the whole picture.
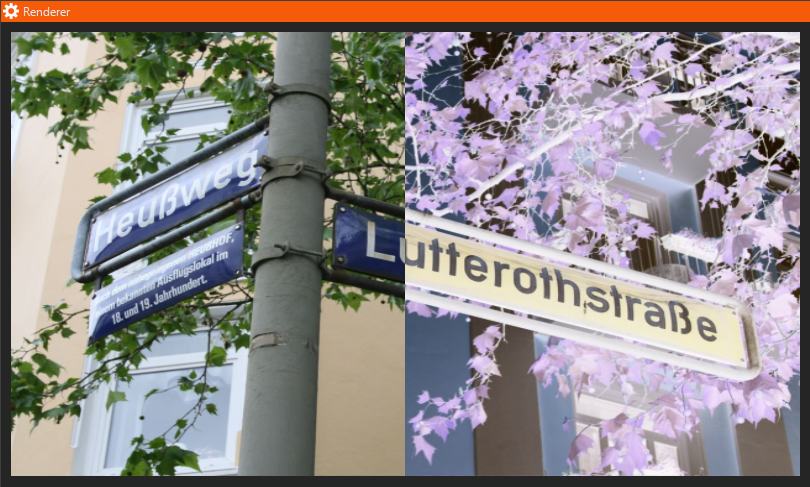
Gain
A quick Gain color correction effect, very similar to the Gain parameters shown above. - in the picture you can see the color correction applied to the righ side and the original image on the left.
It features these parameters:
- Amount: Controls how much of the original layer is color corrected. The default 100% value means that the layer will be totally affected by the Gain Effect.
- Gain: Performs a standard Gain color correction, the default value is 100%. A Gain color correction works by displacing the brighter and whites side of the color curve, while keeping the black and darker tones untouched. The result affects mainly the white and brighter areas of the image, its influence decreasing on the midtones, until being completely without effect in the dark and black areas.
- Tint A dropdown menu to select the color used to tint the gain areas of the image, the default is White.
Invert
A simple inversion of each Color and/or Alpha Channel. In the picture you can see the inversion applied to the right side and the original image on the left.
It features these Parameters:
- Amount: Controls how much of the original layer is color inverted. The default 100% value means that the layer will be totally affected by the Invert Effect.
- R,G,B,A: Controls which channels should be inverted.