Text Rendering
Table of Contents
 | Text 2D | This node renders text using pre-generated texture characters. |
 | Text Style 2D | Modify outlines and other effects for Text 2D |
 | Text 3D | This node renders text using pre-generated mesh characters. |
Text 2D
Text 2D is a Hierarchy Node for rendering flat text. The text can be positioned freely in 3D space, but can not be extruded in 3d. For that see Text 3D below.
A Text Layout node must be bound to the Text property to supply the text to display, the font to use and how the text is to be layout.
The Text 2D node can render a font in different styles. To specify the style, a Text Style 2D node can be bound to the Style property, or a predefined style can be selected from a drop-down list. The predefined styles can be modified. For experimenting with the styles binding a Text Style 2D node is preferred.
Styles define a plain layer and up to three effect layers. The plain layer will faithfully represent the font as it is designed, even when text is displayed very large. The quality is superior to traditional texture and vector fonts. The effect layers use a different technique that allows for blurring, enlarging and outlining, also at superior quality, but not as good as the plain layer.
Font Generation and Machine Config
When you first use a font, it has to converted into a special format. This process can take a while, but has to be done only once for each font, independent of size or style.
In the [MachineConfigurationMC#Extended Machine Configuration], glyphs for language families like Cyrillic, Greek or Arabic can be included or excluded in the font, reducing or increasing memory footprint and time needed to convert the font. The setting High Quality 2D Text Rendering will only affect the plain layer. High quality fonts are twice as large and a bit slower than normal quality, but look much better.
Any change to the machine config requires restarting Ventuz and might cause the fonts to be converted again to accommodate the changes.
Improve Transparency
A common problem arises with transparency and script fonts like Arabic. Where the letters touch, the two layers overlap and the region is too opaque.
For the plain layer, this problem can be resolved using the ImproveTransparency property. This needs the stencil buffer. So if you are using the stencil buffer, you need to clear it before using this property, and assume the stencil for the whole screen to be lost.
It will only work on the plain layer, and requires the High Quality 2D Text Rendering to be disabled in the machine config.
![]()
Example: Text displayed with alpha at 50%. Left without ImproveTransarency, right it's enabled.
Text Style 2D
Styles allow to add drop-shadows, outlines or more radical effects to fonts. Style properties can be changed in real-time or event animated.
Text 2D supports a plain layer and up to 3 effect layers. Each layer can be positioned with the XOffset and YOffset property. Effect layers also have a ZOffset property. This can be used for drop shadows.
By default, the plain layer is on top, followed by the three effect layers in that order. With the DrawIndex property the plain layer can be positioned between the effect layers.
The color of the plain layer is taken from Material or Color nodes in the hierarchy. The colors of effect layers can be set directly in the style
Effect Layer Styles
The Style property controls what the effect layers should do. The following styles are available:
None
This disables the effect layer.
Plain
This mimics the shape of the plain layer, but using the technique of the effect layer instead of the higher quality technique of the technique of the plain layer.
If you don't need the extra quality of the plain layer, you can use this mode and disable the plain layer. This saves memory, since the resources for the plain layer are not required.
This is also useful for drop-shadows.

Example Left: White plain layer with black drop-shadow using effect layer in plain mode. Right: the same at 1000 pixel size. See how the plain layer looks perfect while the effect layer shows artifacts. Still, the effect layer looks way better than ordinary texture fonts.
Ballon
With the StartOffset property, the text can be enlarged or shrunk. Blur will blur the contour.
This is usually rendered below the plain layer to get an outline that extends outside of the original glyph, preserving the sharp edges of the original glyph.
This is the preferred way to add an outline to the text.
Example: Three ballons with different StartOffset
Outline
Render just an outline. Strength controls the thickness of the outline, StartOffset moves the outline outside or inside, and Blur can be applied too.
This is usually rendered below the plain layer to get an outline that extends outside of the original glyph, preserving the sharp edges of the original glyph in the plain layer.

Example: Three thin outlines with different StartOffset
Halo
Renders a halo around the font. StartOffset controls where the halo starts, and Strength controls the thickness of the halo. Blur controls the falloff function. For best results, use values between 0.5 and 2.0.

Example: Halo used as drop-shadow, with Blur=1.5 and StartOffset=0.
Texturing
Every layer can have the most recent texture applied. This is controlled individually through the TextureMode property. It is useful to enable texture for the plain layer, but not for drop-shadows or outlines.
The Text 2D provides a uniform UV mapping so texture can be applied easily. There are some limitations:
- Only one texture is supported
- In the 2D Mapping node, Mode, Projected and Type are ignored, assuming the defaults.
- The shading and bump properties in the Texture node are ignored.
- With the Scroll Text node, only vertical (V) mapping works
If you don't see the texture, check if the U and V properties in the mapping node are set to wrap, not clamp.

Example: Texture applied to plain layer (left) or to effect layer (right).
Text 3D
Text 3D is a Hierarchy Node and is used to render two- and three-dimensional text. The characters displayed by this node are actual geometry consisting of triangles that form the shape of the character.
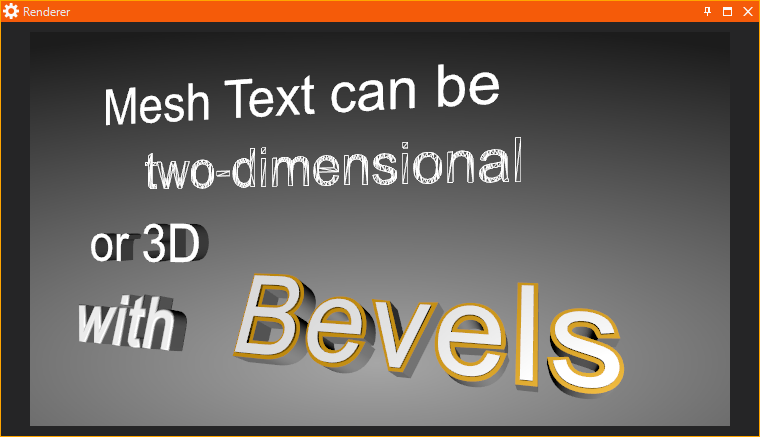
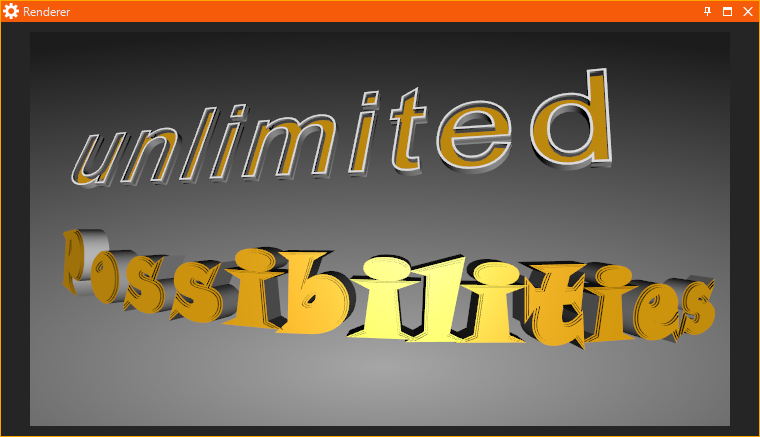
Like any other geometry, Text 3D can be used in combination with textures and shaders, regardless of the text being 2D or 3D. Bevels can be added to extruded mesh text to either soften the corners of the text or to create new designs. The individual parts of an extruded and beveled mesh font, such as front and back face, the extruded hull and the bevel itself can be individually controlled and combined in order to create custom styles and designs.
The mesh for every character comes from a set of pre-generated meshes. These meshes contain all (or subsets of) characters included in the selected font. The font meshes are generated and saved in the Ventuz Program Data folder. This happens when a font is used for the first time. If the same font is used again, it only must be loaded into memory. The generation of the complete Arial font, with about 1400 characters, can take 5 – 10 seconds. This depends on the hardware of your computer system.
The Style property lists all available Project Font Style presets. Presets can be modified and new ones can be created by selecting Edit... from the drop-down menu. The property Text takes the output of a Text Provider. Text Providers are Block Text, Enriched Block Text, Scroll Text and all Text Effects nodes.
Mesh Font Style Editor
Quality defines the number of vertices used to visualize the rounding of a glyph. Medium quality creates enough vertices for most regular applications. Low quality offers only a very low resolution and should only be used for very small texts. High quality offers very smooth rounding and can be used for most applications. The Very High quality setting renders extremely high resolution meshes and can be used even for very close shots. The Very High quality setting requires a lot of memory however and should therefore be used with caution.

Extrusion sets the depth of a mesh font. An extrusion of 0 will result in a plain 2D mesh. A value of 1 corresponds to the extrusion of Mesh Fonts in Ventuz 2006. Only styles with extrusion can be beveled.
If a Font is extruded, the user can choose which part of the mesh is to be displayed. Front and Back are the 2D Faces forming the shape of the mesh, Hull is the actual extrusion. If no face is selected only the Bevel itself is rendered.
Ventuz offers many predefined Bevel shapes. The bevel Size defines the scaling and size of the actual bevel. If both Font and Back bevel are calculated, the bevel size is restricted to half the extrusion in order to avoid corrupted meshes.
The bevel Mode determines whether the bevel is calculated outwards or inwards. Which bevel mode to use greatly depends on the font used and the general design. Outer bevel changes the font weight. The font appears bolder than it really is. The Inner bevel does not change the font weight but might produce glitches in the mesh and slightly overlapping polygons due to inconsistencies in calculation. A small outer bevel is generally the better recommendation as it produces perfect meshes and displays the font only slightly bolder as it actually is.
In order to set the Mesh Font Style by a Binding or via Remoting simply use a string value containing the string displayed in the Property Editor for the Style property.
Example: "Medium Mesh, 0.6, Hull, Outer, Step1, 0.1"
Improve Transparency
When using alpha blending the interior of the letters may become visible, which is often undesirable.
Enabling the ImproveTransparency property can solve this problem in many cases. This is done by rendering the object twice, first only in the depth buffer and then normally. So this is a bit more expensive. When alpha is at 100% doing this is not necessary and therefore skipped, so you only have to sacrifice performance when it matters. This also uses the stencil buffer as explained in Text 2D