Alpha Blending
Table of Contents
 | Color Write | Allows you to enable/disable the RGBA Channels separately. |
 | Blending | This node modifies the blending rules for superposed pixels with industry standard presets. |
The Color Write and Blending Nodes are Aliases of the Material Node. They change the blending of the following geometries to the background. The Material Node has other options that are documented on the respective pages (see table below for more information).
Alpha Blending is a technique used to specify how a pixel being drawn by a triangle and the pre-existing color value in the render output are mixed. It is commonly used to simulate transparency effects, see Introduction to Realtime Rendering.
When a fragment has passed all tests (see 3D Mask Nodes , Z-Testing Node, Alpha Testing Node, Stencil Nodes), its color is applied to the render output and overwrites any value previous set by other objects. With alpha blending, the final pixel color can be a combination of both the fragment (source) pixel color and alpha as well as the pixel color and alpha in the render output (destination).
General
The Material Node controls the appearance of the surface of each rendered Object placed as a child in the Hierarchy. It consists of several options that can be added to its list of properties to overwrite the according options. The options are available under Material Node's Tabs that are represented by the button bar on top of the Material Definition in the Property Editor.
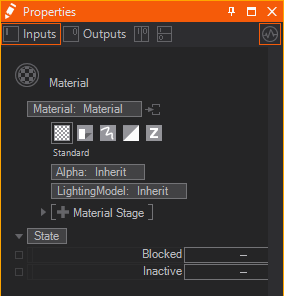
Generally these tabs exist:
| Standard | affects the overall transparency | |
|---|---|---|---|
changes how light affects the color of a surface | |||
adds textures and material stages that change the shading | |||
| Shadow Options | changes the shadow related behavior | |
| Drawing Style | applies a draw mode for geometries (lines, solid, sprites etc.) | |
| Blending | changes the write mode to specified color channels | |
adjusts the blending of geometries onto the background | |||
| Testing | applies a custom test against the object's alpha | |
defines a custom occlusion test for the geometry |


To show the options of a tab simply click on the according button. You can insert options by clicking on the Property Group's entry and choosing the wanted options from the dropdown.
All options that you do not adjust in a Material node are inherited by the Default Material or the Material node in front.
Icon and Decoration
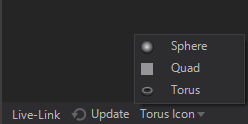
In general the Icon rendering can be changed by switching between Sphere, Quad and Torus at the bottom of the Properties Editor or via .
Based on the Property Groups that are used inside a Material Node the Icon may change.
| Rendered Preview | if only Property Group's in the Standard or Shadow Options tab are used. |
|---|---|---|
| Rendered Preview with light blue decoration | if Property Group's in the Standard or Shadow Options tab are used together with any other Option like a certain Draw Mode or a certain Blending |
| Dedicated Option Icon | every Material Option has it's own dedicated Icon, that is shown whenever no other Property Group in any other tab is used. |


Extraction
Material Definition
A Material node is a Hierarchy Node by nature. But it can serve as a Material Provider as well. This is useful whenever you want to use the same material in different locations of your hierarchy or once you have Hierarchy Nodes that need more materials than one applied to it (e.g. the Particle System Node). The below image shows both a Material Node and an extracted Material Node Provider together with a receiving Material Node.
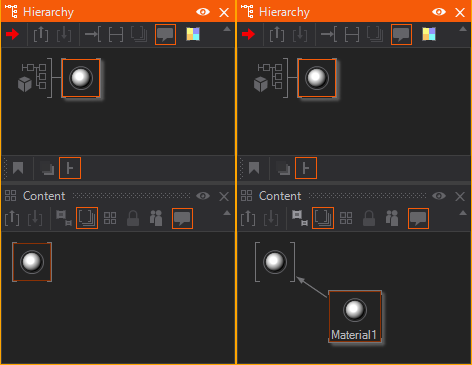
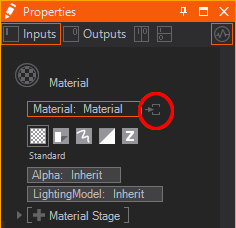
You can either place the Material node in the Content Editor to create an unbound Material Provider node. Or you can use the extract button  on any node that hosts a Material Definition to extract it to a provider that can be re-used on other nodes.
Material Options
Since a Material consists of several options sometimes you want to extract some of them to a seperate Hierarchy Node. This way you can apply single Material Options to other parts of the Hierarchy Tree when already added to the Material. Just use the extract buttons next to the Material Options.
Color Write
The Color Write options of the Material Node enable the user to choose which channels should be affected by the current fragment.
Alpha Blending Options
The Material Node has different ways of defining the blending of the current fragment. These can be changed with the according Property Groups. One is offering you very simple presets, the other will give you full control over the blending but is harder to handle.
Off
When set to Off the fragment will simply overwrite the destination.
Even when the Blending is set to Off the fragment will only be drawn if it has passed all tests before (occlusion test, alpha test etc.).
Simple
The Blending Node offers Presets for common used blend functions. Only a subset of the available Blending Modes on the Layer level is available inside a 3D Layer.
| Preset | Color Function | Alpha Function | Note |
|---|---|---|---|
| Overwrite | SourceColor | SourceAlpha | Same as setting the blending to off. |
| Normal | SourceColor + DestinationColor * (1-SourceAlpha) | SourceAlpha + DestinationAlpha * (1-SourceAlpha) | Blends the colors as usual - regarding the Alpha value of the current fragment. |
| LinearDodge (Add) | SourceColor + DestinationColor | SourceAlpha + DestinationAlpha * (1-SourceAlpha) | Adding the color to the destination which will effectively brighten the background linearly by the current fragment. |
| Screen | (SourceColor + DestinationColor) - (SourceColor * DestinationColor) | SourceAlpha + DestinationAlpha * (1-SourceAlpha) | This will multiply the inverses of color and alpha and invert it again. This results in a similar result as linear dodge as it produces a brighter image, but in contrast will not have results brighter than white. So it will not produce clamping like linear dodge (which still might make sense e.g. in HDR mode). |
| Subtract Rendering from Background | SourceColor - DestinationColor | SourceAlpha + DestinationAlpha * (1-SourceAlpha) | Like linear dodge it will linearly darken the image by subtracting the source fragment from the destination. |
| Subtract Background from Rendering | DestinationColor - SourceColor | SourceAlpha + DestinationAlpha * (1-SourceAlpha) | This is the reverse Subtraction that will darken the source fragment instead of the background. |
| Multiply | SourceColor * DestinationColor | SourceAlpha + DestinationAlpha * (1-SourceAlpha) | Multiplying two colors will always result in a darker image - this is the reverse operation of Screen blending as it will not create clamping below 0 (black). |
| Multiply X2 | SourceColor * DestinationColor * 2 | SourceAlpha + DestinationAlpha * (1-SourceAlpha) | Similar to multiply, but this will result in a darker color than the destination when the current source fragment is darker than mid-grey and in a lighter color if the source is lighter than mid-grey. Good for e.g. exaggerating bright and dark spots in the image. |
| Glow | SourceColor + DestinationColor | DestinationAlpha | Similar to linear dodging but completely ignores the source alpha. |
The shaders in Ventuz5 make sure the source color is pre-multiplied with the source alpha. This is why the formula for normal blending does not multiply the SourceColor with SourceAlpha, this has already happened in the shader. The same is true for all other blending modes.
Advanced
Compared to the Simple Property Group you have access to the full capability of the graphics card for greater flexibility. Both the source and destination color are treated as a 4-dimensional vector (red, green, blue, alpha) which is multiplied with a blend factor before applying the chosen operation.
color = (SourceColor * source_factor) op (DestinationColor * destination_factor)
The blend factors are selected with the Source and Destination properties:
- One: Multiply each component by one.
- Zero: All channels of the color are multiplied by zero
- BlendFactor: Multiply each component by the respective component of the color specified in the BlendFactor property.
- InverseBlendFactor: Multiply each component by the respective inverse component of the color specified in the BlendFactor property.
- BothInverseSourceAlpha: The source color is multiplied by one minus the source alpha and the destination color is multiplied by the source alpha
- SourceAlphaSaturated: The red, green and blue channel are multiplied with the min(alpha_source, 1 - alpha_destination), alpha is multiplied by one. This can only be used for Source and will override the value set in Destination.
- InverseDestinationColor: Multiply each component with one minus the respective component in the destination color.
- DestinationColor: Multiply each component with the respective component in the destination color.
- InverseDestinationAlpha: Multiply all channels with one minus the destination alpha.
- DestinationAlpha: Multiply all channels with the destination alpha.
- InverseSourceAlpha: Multiply all channels with one minus the source alpha.
- SourceAlpha: Multiply all channels with the source alpha.
- InverseSourceColor: Multiply each component with one minus the respective component in the source color.
- SourceColor: Multiply each component with the respective component in the source color.
The resulting vectors are combined with the Operation:
- Add: Result = Source + Destination
- Maximum: Result = MAX(Source, Destination)
- Minimum: Result = MIN(Source, Destination)
- ReverseSubstract: Result = Destination - Source
- Substract: Result = Source - Destination
When using Maximum or Minimum as an operator, blend factors are ignored.
When SeparateAlpha is activated, a set of blend factors and operation can be used for the alpha channel that differs from the color channel. If SeparateAlpha is disabled RGB and A are using the same BlendFunction.
To recreate the presets from the Simple Blending, enable SeparateAlpha and use these settings. They are also available as presets for the Advanced Blending:
| Preset | Color Function | Alpha Function |
|---|---|---|
| Overwrite | (SourceColor * One) ADD (DestinationColor * Zero) | (SourceAlpha * One) ADD (DestinationAlpha * Zero) |
| Normal | (SourceColor * One) ADD (DestinationColor * InverseSourceAlpha) | (SourceAlpha * One) ADD (DestinationAlpha * InverseSourceAlpha) |
| LinearDodge (Add) | (SourceColor * One) ADD (DestinationColor * One) | (SourceAlpha * One) ADD (DestinationAlpha * InverseSourceAlpha) |
| Screen | (SourceColor * InverseDestinationColor) ADD (DestinationColor * One) | (SourceAlpha * One) ADD (DestinationAlpha * InverseSourceAlpha) |
| Substract Rendering from Background | (SourceColor * One) ReverseSubtract (DestinationColor * One) | (SourceAlpha * One) ADD (DestinationAlpha * InverseSourceAlpha) |
| Substract Background from Rendering | (SourceColor * One) Subtract (DestinationColor * One) | (SourceAlpha * One) ADD (DestinationAlpha * InverseSourceAlpha) |
| Multiply | (SourceColor * DestinationColor) ADD (DestinationColor * Zero) | (SourceAlpha * One) ADD (DestinationAlpha * InverseSourceAlpha) |
| Multiply X2 | (SourceColor * DestinationColor) ADD (DestinationColor * SourceColor) | (SourceAlpha * One) ADD (DestinationAlpha * InverseSourceAlpha) |
| Glow | (SourceColor * Onw) ADD (DestinationColor * One) | (SourceAlpha * Zero) ADD (DestinationAlpha * One) |