Lightsources
Table of Contents
 | Directional | Directional light source |
 | Point | Point light source |
 | Spot | Spot light source |
 | Lighting Group | Define a group of light sources |
Lighting in Realtime Rendering is a very efficient approximation of real life lighting. There are no global effects like one object casting a shadow onto another or light bouncing of one surface and lighting another. It is therefore often called direct lighting opposed to global lighting as used by raytracing software.
A triangle can be lit by one or multiple light sources. The final color of a pixel in a triangle is dependent on the shape of the objects surface, the characteristics of the light sources, the Material applied to the object as well as the Engine-Settings in the Layer Root of the 3D Layer. For each light source, a number of terms is calculated:
- Ambient: This term is independent of the light source and the viewer position. It simulates the ambient light that exists in the background and from bouncing off other surfaces and is usually rather weak.
- Diffuse: Varies the brightness of the surface based on the light direction and the surface normal. This gives an object its characteristic shape, brighter towards the light source and darker on the back side.
- Specular: Simulates the bright highlight that occurs where the reflection of the light source is visible in the surface. Note that this will only be visible on objects that have a Material defining a specularity.
When there is no light source node in the scene, Ventuz uses an internal default light source. This so called head light is positioned at the exact position of the camera, therefore shiny objects (with a high specular amount) can appear completely white. To disable the default lighting set the DefaultLight to "none" in the 3D Layer Root Node
Both the light source and the material have a color assigned to all of these terms. In addition, the material of an object can have an Emissive term that simulates light coming from the object itself.
Standard Engine vs HDR mode
Light Attenuation
This is about how light gets darker with distance. We use different formulas for different engine modes. Below is an explanation for the formulas. You can skip the math, but remember the following:
- When changing the falloff model (by changing the engine mode), all lights need to be adjusted for the new model
- With legacy falloff, light-sources do not scale with the world. With the other models, light sources will scale correctly with the world as long as the scaling is uniform in x, y and z.
Every light source now has a gain property. Gain 0 will not change the light, every positive step will double the intensity of the light and every negative step will half it. So a gain of 3 will increase the intensity by a factor of 8. This is especially useful to adjust HDR lights.
HDR
In reality, light intensity decreases with the square of the distance: I = I0 * 1 / d2. Doubling the distance will quarter the light intensity.
Ventuz light-sources define a maximum radius. If the simply cut the light at a distance, we might see the cut-off point. To avoid this, we subtract the amount of light at the maximum distance (dmax), the corrected formula is:
- I = I0 * ( 1 / d2 - 1 / dmax2 )
This is the formula we use in HDR.
Standard Linear Falloff
If we do not render in HDR, we do light calculation with gamma 2.2 colors. Unfortunately, with this the physically correct formula produces bad results, as it only applies to linear colors. Instead, we use a simple linear falloff formula: The light is just faded out by distance :
- I = I0 * (1-d/dmax)
This produces good results and naturally has no cut-off point at the maximum light range.
Legacy Falloff
In legacy mode and advanced legacy we use the DirectX fixed function falloff mechanism, which gives 3 parameters to tweak lights:
- I = I0 / (attn0 + attn1*d + attn2*d2)
Most people agree that this is a horrible formula that is hard to tweak. Also it does not provide a clean cut-off point and can not be scaled with the world.
Types of Lightsources
In order to make lighting calculation feasible, the travel of light rays through a scene cannot be simulated. Instead the terms above try to simulate the variation of brightness on a surface. The role of the light source is to specify from what direction the light falls on to the surface.
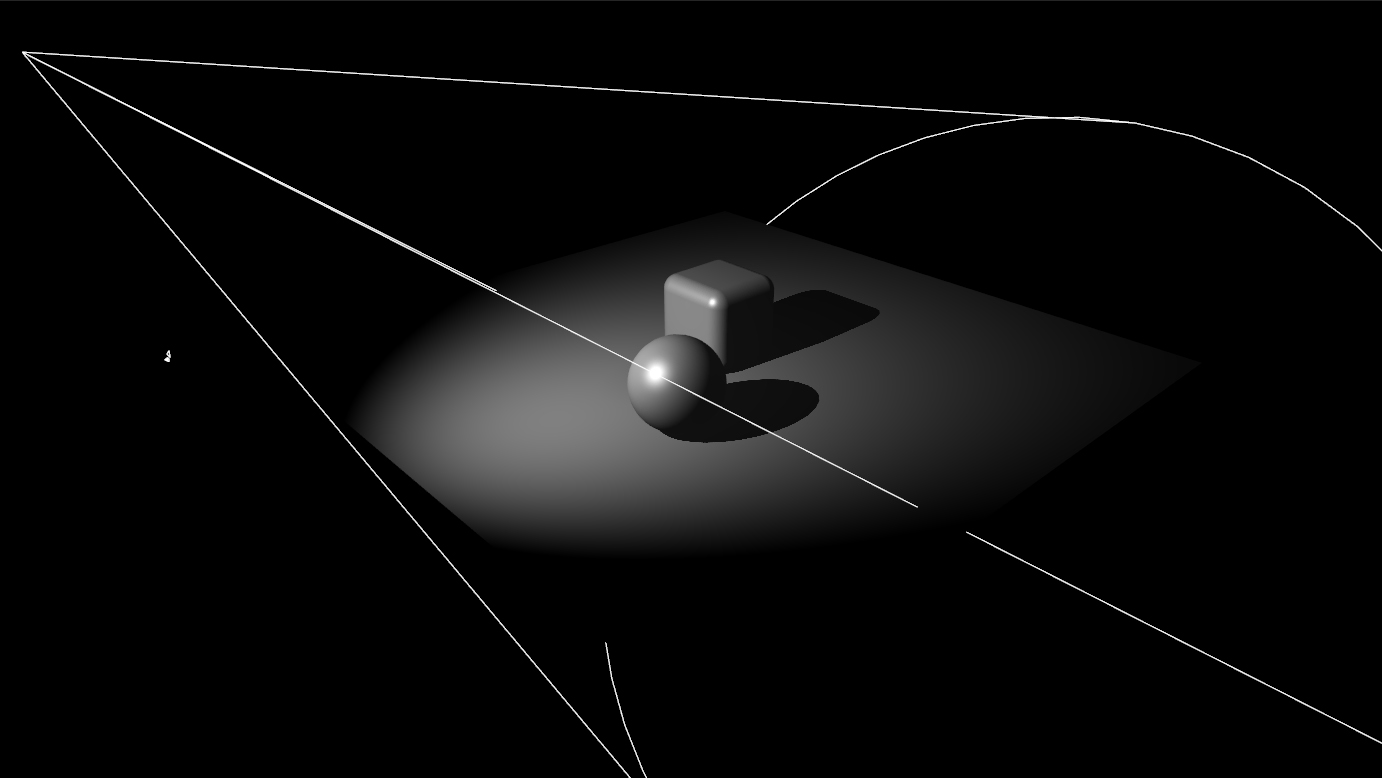
Lightsources are immaterial and therefore no geometry is rendered for them. To see the orientation and shape of a light source activate the show non-render objects.
The Directional light represents a light source that is so far away that the light rays are completely parallel to each other and the actual position of the light source becomes irrelevant. The most prominent analogy is the sun.
The Point light represent a lamp that is infinitely small in size. It emits rays into all directions, originating from a single point in space. Same as the Directional light, it has no surface area to simplify the calculation. The direction of light for a point light at any given point on a surface is equal to the vector from the point lights position to that point on the surface. A rough analogy might be a light bulb or a candle.
The Spot light differs from the point light in that it only emits light in a cone shaped volume instead of all directions uniformly. The InnerCone specifies the radius of the region that is lit at full intensity which then decreases to the OuterCone radius where the light influence of the spot ends. It also simulates brightness decreasing the farther away something is from the spot (Attenuation) and the more it is offset from the center axis of the spot towards the boundary (FallOff).
All lightsources have the Gain parameter in common. If your lightsources appear to dark while using the HDR mode, you can adjust and boost the gain of the intensity here.
An additional way of lighting your scene is by using the Sky Box and an HDRI/Irradiance Map as a lightsource.
The example below shows the same scene lit by a Direction light coming hard from the left, a Point light above the scene and a Spot light coming from the right.

If ApplyAxis is active, the light source will be transformed by the World Matrix as for example influenced by Axis Nodes.
Using Multiple Lightsources
Multiple lightsources can be added to a scene, for example as main and fill lights as often used in a photo shoot. However, they can also be used to light separate parts of a scene differently. For example, a spot light may be used to light only one object but not affect another object, although it would theoretically be in the cone of the spot. Instead the second object could be rendered using a completely different light setup.
Lightsources are special in that they affect all nodes that are rendered after them, not just their child nodes. They are not deactivated once their subtree has been processed.
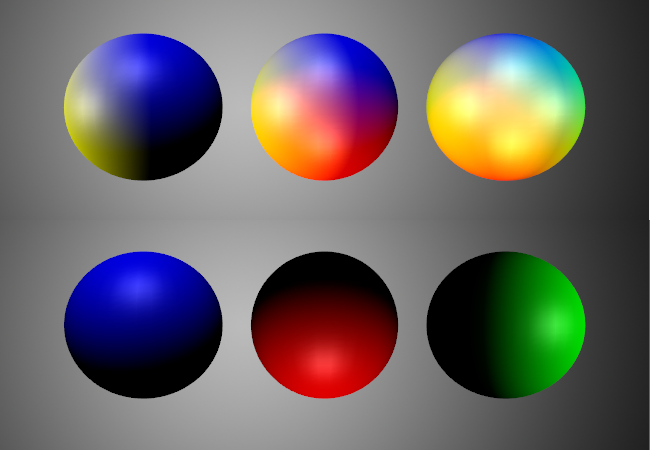
Each light source has an Input Property Index which specifies whether the light should be used in addition to existing lights (Next) or should replace the last activated light (Override). To limit the effect of light sources to certain parts of a scene, Lighting Group nodes can be used. If their Inherit property is deactivated, lights defined outside the lighting group will have no effect on the objects rendered within the lighting group. The example below shows a scene with four differently colored light sources. In the top row, each light source illuminates each sphere that comes after it in the rendering order. In the bottom row, Lighting Groups have been used to isolate each sphere together with one light source in a separate group.
Shadows
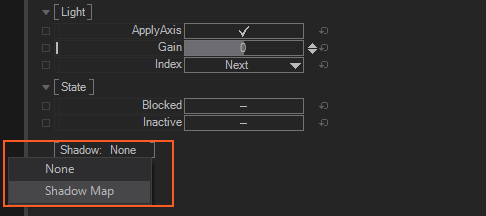
For each lightsource you can enable shadows. Shadows in Ventuz are based on Shadowmaps.
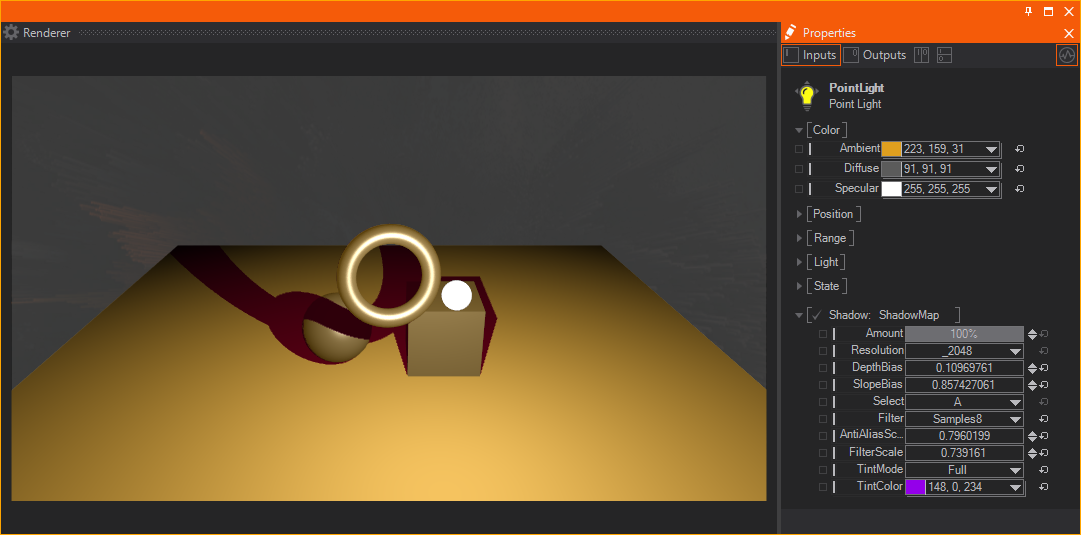
Click the Shadow drop down menu in the Lightsource Properties and select Shadowmap to enable Shadows.
You can adjust the Properties for each lightsource individually.
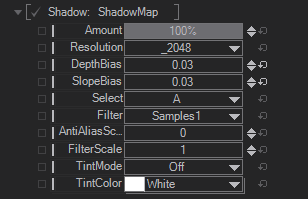
The Amount is the overall intensity of the shadows. Resolution is the shadowmap resolution and should be as small as possible. With the DepthBias and SlopeBias you adjust the sampling of the shadowmap (see How To Use Shadows for more details). You can define to have the shadows in a group by the Select drop down menu. You can set the Shadowmap in the A or B group or have it off any group. The grouping works together with the Shadow Filter. The Filter drop down menu affects the shadowmap filtering and you can select between Samples 1, Samples 4 and Samples 8. When Samples 4 or Samples 8 is selected you can also adjust the quality of the sampling by changing the AntiAliasScale and FilterScale. If the values for the Scales is 0 and not bound, the sampling scale is completely turned off in the shader and therefor the performance increases.
The Pointlight needs to render one shadowmap for each of its six sides. This can affect the performance a lot! The shadowmap resolution becomes even more critical here!
With the help of the Tint properties you can tint your shadows. This will apply the specified TintColor to the BaseColor of the affected objects after multiplying it with the AmbientColor of your light. The TintMode defines how the Tint should be applied: Full will apply the Tint Color everywhere in the same amount. Attenuated will linearly fade out the amount of the Tint over the distance to the light source.
Since Shadows are working in conjunction with Lightsource as Source, Object as Shadowcaster and at least one receiver to apply the shadow to (except for selfshadowing) you should read the See Also sections as well.