Navigation

Ventuz 6 Quick Guide

  • Introduction
  • Getting Started
  • Ventuz Editions
  • Designer Overview
  • Ventuz System Requirements
  • Configuration
  • Video/Audio Configuration
  • Machine Configuration
  • GPI Configuration for Runtime or Director
  • Optimize Rendering Performance
  • Supported Formats
  • Supported Hardware
  • Multisampling / Anti-Aliasing
  • Input Subsystem
  • Ventuz Proprietary Files
  • What's new
  • FAQ
  • Common Mistakes
  • Deployment
  • Migration Guide
  • Ventuz 5 Migration Guide
  • Summary Shortcuts

Ventuz 6 Designer

  • Index
  • Getting Started
  • Designer Options
  • Designer Overview
Projects & Scenes
  • Projects and Scenes
  • Project Browser
  • Project Properties
  • Project Maintenance
  • Project and Scene Data
  • Scene Tree
  • Scene Management
  • Scene Statistics
  • Deployment
Interface
  • Designer Interface
  • Renderer Window
  • Realtime Rendering
  • Optimize Scene Performance
  • Performance Statistics
  • Transformation Gizmo
  • Render to Disk
  • Camera Navigation
  • Isolated Objects
  • Manipulate Objects with Gizmos
  • Layer Editor
  • Common Layer Properties
  • IPP Effects
  • Color Correction FX
  • Distortion FX
  • Filter FX
  • Layer Editor Shortcuts
  • Hierarchy Editor
  • Working with Nodes
  • Containers
  • Find and Replace
  • Shortcuts Hierarchy Editor
  • Content Editor
  • Working with Nodes
  • Containers
  • Content Editor Shortcuts
  • Toolbox
  • Property Editor
  • Project Data and Scene Data
  • Property Groups
  • Shader Editor
  • Text Editor
  • Scene Tree
  • Message View
  • Stage Editor
  • Container Outline
  • Watches Editor
  • Animation Editor
  • Animation and State Engine
  • Templates
  • Template Engine
  • Shortcuts Animation Editor
  • Text Rendering
  • Text Editor
  • Character Sets
  • Geometry Import
  • Input Subsystem
  • Multitouch
  • TUIO Protocol
  • Open Sound Control
  • How to work with Head Mounted Displays
  • Cluster
  • Multi Display Setups and Shaping
  • Warping, Soft Edging and Masking
  • Available Nodes
  • Animation Nodes
  • Material&Color Nodes
  • Data Nodes
  • Geometry Nodes
  • Interaction Nodes
  • IO Nodes
  • Layers
  • Light Nodes
  • Logic Nodes
  • Render Option Nodes
  • Slides Nodes
  • Sound Nodes
  • Text Nodes
  • Texture Nodes
  • VR Nodes
  • World Nodes

Ventuz 6 Node Reference

ANIMATION
  • Mover
  • Alternator
  • Simple Control
  • Timeline Control
  • Anmation Rig
  • Keyframe Animation
  • Animation Group
COLOR/MATERIAL
  • Alpha
  • Fog
  • Ground Fog
  • Sky Box
  • Color to RGBA
  • HSLA to Color
  • RGBA to Color
  • Color Transformer
  • HLSL Shader
  • Color
  • Material
  • Color Picker
  • Substance Material
DATA
  • Database
  • Excel
  • JSON
  • RSS Feed
  • Resource Linker
  • Text File
  • XML
GEOMETRY
  • Rectangle
  • Rounded Rectangle
  • Gradient Rectangle
  • Overlay Rectangle
  • Cube
  • Circle
  • Sphere
  • Cylinder
  • Cone
  • Torus
  • Chart
  • Random Points
  • Mesh Loader
  • Geometry Import (Live)
  • Volume
  • Get Bounding Box
  • Arrow
  • Particle System
  • Path Renderer
  • Geometry Renderer
INTERACTION
  • Interaction Rect
  • Touch Button
  • Touch Excluder
  • Touch Marker
  • Touch Paint
  • Touch Pattern
  • Touch Proxy
  • Touch Ripples
  • Touch Transformations
  • Web Browser
  • Touch Teleport
  • Touch Simulator
INPUT/OUTPUT (I/O)
  • GPI
  • Joystick
  • Keyboard
  • MIDI
  • Mouse
  • Network
  • Open Sound Control
  • Serial
  • Timecode
  • DMX
LAYER
  • 3D Layers
  • 3D Layer Reference
  • 2D Layers
  • PSD Import Layer
  • Others
LIGHT
  • Light Sources
LOGIC
  • Array Processing
  • Convert To Text
  • Cluster Synchronization
  • Counter
  • Date Time
  • Directory
  • Dispatcher
  • Enumeration
  • Expressions
  • Invert
  • Log
  • Loop Breaker
  • Math Effects
  • Matrix Operations
  • Scene Event
  • Script
  • String Operations
  • System ID
  • Text Splitter
  • Timer
  • Toggle
  • URL
  • Value Switch
  • Value Buffer
  • Variables
  • Visual Indexer
RENDER OPTIONS
  • Alpha Blending
  • Color Write
  • Alpha Testing
  • Clip Plane
  • Filter
  • Mask
  • Mirror
  • Effect
  • Render Cube Map
  • Draw Modes
  • Stencil
  • ZTesting
SOUND
  • Audio Clip
  • Sound
  • Volume Control
  • Audio Analysis
SLIDES
  • Slide Manager
  • Slide
  • Slide Port
  • Pivot
TEXT
  • Text Effects
  • Text Layouts
  • Text Rendering
TEXTURE
  • Background
  • Hatch
  • Image
  • Texture
  • SVG Loader
  • Gradient Texture
  • Live Video
  • Movie Stream
  • Movie Frame
  • Movie Clip
  • Texture Loader
  • Snapshot
  • Snapshot Framebuffer
  • Texture Saver
  • Video Source Selector
  • VIO Input
  • Spout Receiver
  • NDI Receiver
  • Substance Loader
VR/AR
  • Tracked Devices
  • Draw Tracked Devices
WORLD
  • Axis
  • Billboard
  • GetWorld
  • SetWorld
  • Arrange
  • Ticker
  • Layout
  • Group
  • World Z Sort
  • YesNo
  • Switch
  • Spread
  • Filter Pass
  • Set Pass
  • Hierarchy Container
  • Scene Port
  • Content Container
  • Template Port
  • Container Info
  • Camera
  • Paths

Ventuz 6 Configuration Editor

  • Configuration
  • Machine Configuration
  • Video/Audio Configuration
  • Web Configuration Editor and License Manager
  • Render Setup Editor
  • Warping and Soft-Edging Editor
  • Supported Hardware
  • How to Setup a Cluster Render

Ventuz 6 Director

  • Application Settings
  • Assets
  • Channels
  • Command Line Options
  • Content References
  • Designing Templates
  • Environment
  • Glossary
  • Index
  • Introduction
  • Pages
  • Playlist
  • Plug-Ins
  • Project Data
  • Property Editor
  • Shortcuts
  • GPI Configuration
  • Shot Box
  • Show
  • Taking Action
  • Timeline
  • Topology
  • User Interface
  • Director Mode
  • Macros

How To

  • How to Run Ventuz
  • How to Work with Designer
  • Ventuz Designer Drag&Drop workflow
  • How to use Head Mounted Displays
  • How to work with Shadows
  • How to use Emoijs
  • How to Build a Template
  • How to use Newtek NDI
  • How to Create Visuals Loader Node
  • How to Remote Control with a Phone
  • How to Setup a Cluster Render
  • How to use a Mixed Frame Rate Cluster
  • How to use Tracking
  • How to work with 3D Reference Layers
  • How to create a Firework Particle System
  • How to use DDS with new Block Compression modes
  • How to setup Spout with Ventuz
  • How to use the Substance Integration

Keyboard Shortcuts

  • Summary Shortcuts
  • Layer Editor Shortcuts
  • Hierarchy Editor Shortcuts
  • Content Editor Shortcuts
  • Animation Editor Shortcuts
  • Director Shortcuts

Advanced and Development

  • Command Line Options
  • Remoting Overview
  • Remoting 4
  • Remoting 4 via Websockets
  • Deprecated Remoting
  • Ventuz IP Ports
  • Ventuz Machine Service
  • Remoting Machine Signature
  • TUIO
  • .NET Scripting
  • HLSL Shader Programming
  • Ventuz API and SDK
  • Ventuz VIO API
  • Ventuz File Format (VFF)
  • Ventuz Stream Out API

General Reference

  • Terminology
  • Manual Index

Miscellaneous

  • Presets
« Previous Article
» Index «
Next Article »

Isolate Mode

Table of Contents

  1. Isolate Hierarchy subtrees
  2. Isolate a Layer
  3. Camera Shortcuts
The isolate Mode is basically the Render Point functionality. Doubleclick  doubleclick any object in the Render Window. This will set a Render Point for the selected Object, all other parts of the scene tree are ignored. The navigation and shortcuts are listed below. Doubleclick  doubleclick the selected object again to leave the Isolate Mode

Isolate Hierarchy subtrees

Selecting a node and pressing CTRL + R will set the Render Point to that Node. Additionally you can activate the Render Point in the Hierarchy/- Toolbar or select the Set Render Point from the context menu with a  click on the selected Node. The Render Point defines teh isolated subtree in the Hierarchy. For the following screenshot it means the V_Mesh02 is isolated and centered in your Rendering Window.

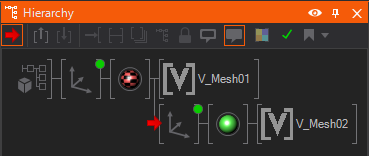
As you can see in the screenshot above, other meshes are skipped but Materials, Transformations, Lights are still applied to your isolated mesh or subtree.

In contrast to Ventuz 4 or earlier versions the render engine is not starting to traverse the scene tree at the selected node. The whole tree is traversed but meshes outside the isolated subtree are skipped.

Isolate a Layer

To isolate a Layer from its composition select it and press CTRL + R. You can also press the Isolate button on the Layer Tool Bar. It allows you to view and edit the Layer outside the context of your already finished composition without changing the actual surrounded logic.


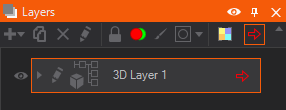
It becomes a mandatory tool when you start working with OffScreen Layers that are already applied somewhere else but you need to check the actual outputted Texture without destroying your surrounding logic.

Camera Shortcuts

Applying a Render Point inside a 3D Layer allows you to orbit around the isolated mesh or subtree. Please note that this is not possible for isolated Layers.

Use the mouse in combination with some modifier key to change the viewing parameters:

Move the camera:

 drag Rotate object
ALT +  drag Orbit around object
 drag Rotate camera
Ctrl + ALT + drag Roll camera
ALT +  drag Pan camera
ALT +  drag Zoom camera
 doubleclick Leave Isolation Mode / Remove Render Point

See also:
  • Layer Editor
  • Hierarchy Editor
  • Camera Navigation

« Previous Article
» Index «
Next Article »
Copyright 2020 Ventuz Technology