Navigation

Ventuz 6 Quick Guide

  • Introduction
  • Getting Started
  • Ventuz Editions
  • Designer Overview
  • Ventuz System Requirements
  • Configuration
  • Video/Audio Configuration
  • Machine Configuration
  • GPI Configuration for Runtime or Director
  • Optimize Rendering Performance
  • Supported Formats
  • Supported Hardware
  • Multisampling / Anti-Aliasing
  • Input Subsystem
  • Ventuz Proprietary Files
  • What's new
  • FAQ
  • Common Mistakes
  • Deployment
  • Migration Guide
  • Ventuz 5 Migration Guide
  • Summary Shortcuts

Ventuz 6 Designer

  • Index
  • Getting Started
  • Designer Options
  • Designer Overview
Projects & Scenes
  • Projects and Scenes
  • Project Browser
  • Project Properties
  • Project Maintenance
  • Project and Scene Data
  • Scene Tree
  • Scene Management
  • Scene Statistics
  • Deployment
Interface
  • Designer Interface
  • Renderer Window
  • Realtime Rendering
  • Optimize Scene Performance
  • Performance Statistics
  • Transformation Gizmo
  • Render to Disk
  • Camera Navigation
  • Isolated Objects
  • Manipulate Objects with Gizmos
  • Layer Editor
  • Common Layer Properties
  • IPP Effects
  • Color Correction FX
  • Distortion FX
  • Filter FX
  • Layer Editor Shortcuts
  • Hierarchy Editor
  • Working with Nodes
  • Containers
  • Find and Replace
  • Shortcuts Hierarchy Editor
  • Content Editor
  • Working with Nodes
  • Containers
  • Content Editor Shortcuts
  • Toolbox
  • Property Editor
  • Project Data and Scene Data
  • Property Groups
  • Shader Editor
  • Text Editor
  • Scene Tree
  • Message View
  • Stage Editor
  • Container Outline
  • Watches Editor
  • Animation Editor
  • Animation and State Engine
  • Templates
  • Template Engine
  • Shortcuts Animation Editor
  • Text Rendering
  • Text Editor
  • Character Sets
  • Geometry Import
  • Input Subsystem
  • Multitouch
  • TUIO Protocol
  • Open Sound Control
  • How to work with Head Mounted Displays
  • Cluster
  • Multi Display Setups and Shaping
  • Warping, Soft Edging and Masking
  • Available Nodes
  • Animation Nodes
  • Material&Color Nodes
  • Data Nodes
  • Geometry Nodes
  • Interaction Nodes
  • IO Nodes
  • Layers
  • Light Nodes
  • Logic Nodes
  • Render Option Nodes
  • Slides Nodes
  • Sound Nodes
  • Text Nodes
  • Texture Nodes
  • VR Nodes
  • World Nodes

Ventuz 6 Node Reference

ANIMATION
  • Mover
  • Alternator
  • Simple Control
  • Timeline Control
  • Anmation Rig
  • Keyframe Animation
  • Animation Group
COLOR/MATERIAL
  • Alpha
  • Fog
  • Ground Fog
  • Sky Box
  • Color to RGBA
  • HSLA to Color
  • RGBA to Color
  • Color Transformer
  • HLSL Shader
  • Color
  • Material
  • Color Picker
  • Substance Material
DATA
  • Database
  • Excel
  • JSON
  • RSS Feed
  • Resource Linker
  • Text File
  • XML
GEOMETRY
  • Rectangle
  • Rounded Rectangle
  • Gradient Rectangle
  • Overlay Rectangle
  • Cube
  • Circle
  • Sphere
  • Cylinder
  • Cone
  • Torus
  • Chart
  • Random Points
  • Mesh Loader
  • Geometry Import (Live)
  • Volume
  • Get Bounding Box
  • Arrow
  • Particle System
  • Path Renderer
  • Geometry Renderer
INTERACTION
  • Interaction Rect
  • Touch Button
  • Touch Excluder
  • Touch Marker
  • Touch Paint
  • Touch Pattern
  • Touch Proxy
  • Touch Ripples
  • Touch Transformations
  • Web Browser
  • Touch Teleport
  • Touch Simulator
INPUT/OUTPUT (I/O)
  • GPI
  • Joystick
  • Keyboard
  • MIDI
  • Mouse
  • Network
  • Open Sound Control
  • Serial
  • Timecode
  • DMX
LAYER
  • 3D Layers
  • 3D Layer Reference
  • 2D Layers
  • PSD Import Layer
  • Others
LIGHT
  • Light Sources
LOGIC
  • Array Processing
  • Convert To Text
  • Cluster Synchronization
  • Counter
  • Date Time
  • Directory
  • Dispatcher
  • Enumeration
  • Expressions
  • Invert
  • Log
  • Loop Breaker
  • Math Effects
  • Matrix Operations
  • Scene Event
  • Script
  • String Operations
  • System ID
  • Text Splitter
  • Timer
  • Toggle
  • URL
  • Value Switch
  • Value Buffer
  • Variables
  • Visual Indexer
RENDER OPTIONS
  • Alpha Blending
  • Color Write
  • Alpha Testing
  • Clip Plane
  • Filter
  • Mask
  • Mirror
  • Effect
  • Render Cube Map
  • Draw Modes
  • Stencil
  • ZTesting
SOUND
  • Audio Clip
  • Sound
  • Volume Control
  • Audio Analysis
SLIDES
  • Slide Manager
  • Slide
  • Slide Port
  • Pivot
TEXT
  • Text Effects
  • Text Layouts
  • Text Rendering
TEXTURE
  • Background
  • Hatch
  • Image
  • Texture
  • SVG Loader
  • Gradient Texture
  • Live Video
  • Movie Stream
  • Movie Frame
  • Movie Clip
  • Texture Loader
  • Snapshot
  • Snapshot Framebuffer
  • Texture Saver
  • Video Source Selector
  • VIO Input
  • Spout Receiver
  • NDI Receiver
  • Substance Loader
VR/AR
  • Tracked Devices
  • Draw Tracked Devices
WORLD
  • Axis
  • Billboard
  • GetWorld
  • SetWorld
  • Arrange
  • Ticker
  • Layout
  • Group
  • World Z Sort
  • YesNo
  • Switch
  • Spread
  • Filter Pass
  • Set Pass
  • Hierarchy Container
  • Scene Port
  • Content Container
  • Template Port
  • Container Info
  • Camera
  • Paths

Ventuz 6 Configuration Editor

  • Configuration
  • Machine Configuration
  • Video/Audio Configuration
  • Web Configuration Editor and License Manager
  • Render Setup Editor
  • Warping and Soft-Edging Editor
  • Supported Hardware
  • How to Setup a Cluster Render

Ventuz 6 Director

  • Application Settings
  • Assets
  • Channels
  • Command Line Options
  • Content References
  • Designing Templates
  • Environment
  • Glossary
  • Index
  • Introduction
  • Pages
  • Playlist
  • Plug-Ins
  • Project Data
  • Property Editor
  • Shortcuts
  • GPI Configuration
  • Shot Box
  • Show
  • Taking Action
  • Timeline
  • Topology
  • User Interface
  • Director Mode
  • Macros

How To

  • How to Run Ventuz
  • How to Work with Designer
  • Ventuz Designer Drag&Drop workflow
  • How to use Head Mounted Displays
  • How to work with Shadows
  • How to use Emoijs
  • How to Build a Template
  • How to use Newtek NDI
  • How to Create Visuals Loader Node
  • How to Remote Control with a Phone
  • How to Setup a Cluster Render
  • How to use a Mixed Frame Rate Cluster
  • How to use Tracking
  • How to work with 3D Reference Layers
  • How to create a Firework Particle System
  • How to use DDS with new Block Compression modes
  • How to setup Spout with Ventuz
  • How to use the Substance Integration

Keyboard Shortcuts

  • Summary Shortcuts
  • Layer Editor Shortcuts
  • Hierarchy Editor Shortcuts
  • Content Editor Shortcuts
  • Animation Editor Shortcuts
  • Director Shortcuts

Advanced and Development

  • Command Line Options
  • Remoting Overview
  • Remoting 4
  • Remoting 4 via Websockets
  • Deprecated Remoting
  • Ventuz IP Ports
  • Ventuz Machine Service
  • Remoting Machine Signature
  • TUIO
  • .NET Scripting
  • HLSL Shader Programming
  • Ventuz API and SDK
  • Ventuz VIO API
  • Ventuz File Format (VFF)
  • Ventuz Stream Out API

General Reference

  • Terminology
  • Manual Index

Miscellaneous

  • Presets
« Previous Article
» Index «
Next Article »

Path Nodes

Table of Contents

  1. Path Providers
    1. Select Path Segment
    2. Subdivide Path
  2. Property Groups
    1. Path Loader
  3. 3D Presets
    1. Path Property
  4. Path Axis
  5. Path Matrix
  6. Ventuz Path File Specification

Path Loader Provides a path that was loaded from a file.
Select Path Segment Selects segments of a given Path.
Subdivide Path Subdivides a Path into equally long parts.
Path Axis Adds the Transformation of a position on a given Path to the Hierarchy.
Path Matrix Outputs the Transformation of a position on a given Path.

The Path Nodes handle 3D Paths imported from other programs. They can be ultimately used by several Nodes that either render them (Geometry Renderer or Path Arrow) or use them for positioning (Path Axis or Particle System).

Path Providers

The Path Loader, Path Segment and Subdivide Path Nodes all Output a Path for further usage in the Scene Logic. Their Inputs depend on the chosen Source Property Group. You can load paths or modify them by chosing segments or performing a subdivision.

Select Path Segment

The Select Path Segment property group returns a path with only the chosen segments. The range is defined by the indices of the First- and LastSegment.

The source path can be either a Path Loader or a Path Property.
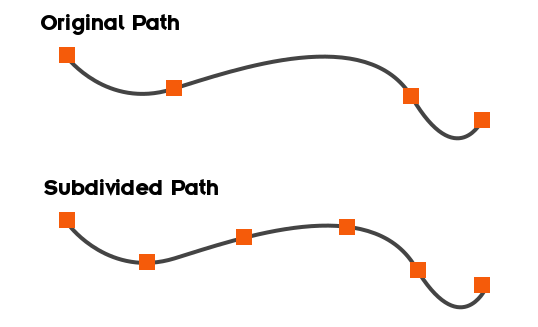
Subdivide Path

Subdivide Path takes a path and re-arranges its points so that even distances between them are created. This is mainly used to create a constant speed along the whole path - e.g. for animations along it. You can see a simple visualization of the original path and the result in the image below.

Property Groups

Each Path Provider passes a Path to the consisting node. Except on the Path Provider Node there are only two available Property Groups.

Path Loader

The Path Loader will load a path that was saved in a Ventuz Path File (.VPATH}) or an .SVG file. To import a Path to Ventuz and thus create a Ventuz Path File please see the Geometry Import Live Node.

Imported paths have points in 3D space and segments as defined in the software they are coming from. Paths from SVG Files have points in 2D space and each segment represents a <path>-element in that SVG File. All non-path elements of the SVG are ignored.

The units given in the loaded path file will by default directly apply to Ventuz units when not applying any scaling to the path.

If the AutoUpdate flag is turned on the Path Loader will automatically update the node whenever the loaded path file was changed.

The Path Loader provides several Presets for faster and easier usage.

Path Presets

3D Presets

These presets are used by Geometry Nodes like the Path Loader.

Geometry

Description

Internal resource name

Geometry

Description

Internal resource name

3D Helix

internal://Geometries/helix3d.vpath

2D Flower

internal://Geometries/flower2d.vpath

2D Ventuz Text

internal://Geometries/ventuz2d.vpath

Path Property

The Path Property is used to reference any path that is present in the Scene's Logic. Using this option enables you to first apply any kind of logic to the given path before using it on the corresponding node.

Path Axis

Path Axis works similar to the Axis in that it provides the upcoming subtree of the hierarchy with a transformation. You can again choose the Source of the Path which can either be a directly loaded path or a path from the scene's logic.

With the Segment property you can choose the used segment for the evaluation. The Position is used to determine the current point on that segment in percent. You can also turn on and of whether to use the current tangent as a rotation with the WithDirection boolean. If ConstantVelocity is enabled, the position on the path is calculated such that it is proportional to the Position property change.

Path Matrix

Path Matrix outputs the transformation matrix on the given point. Segment again chooses the used segment for that evaluation and Position determines the exact point on that segment. The Source can be either a Path Loader or a Path Property bound to any other Path Property in the Scene's Logic.

You can then further use the transformation matrix in your scene's logic before applying it somewhere. Additionally the node returns the position as XYZ values.

Ventuz Path File Specification

You can create custom .VPATH files in other software by building a JSON that follows the specifications defined in this chapter.

Ventuz stores 3D paths in a JSON file with .vpath extension. A Ventuz Path consists of one or more segments, each of which is a path of spline curves that can be open or closed.

What's following is a pseudocode description of the used JSON format in a C-link language that should be easy to translate to the language of your choice:

/* 
* VPATH JSON file format (pseudocode), Version 1.0
* Copyright 2019 Ventuz Technology AG
*/

// Top-level JSON structure
struct VPathFile
{
    // this needs to come first for Ventuz to identify the file format
    string @ = "http://ventuz.com/SplinePath/1.0";
   
    PathDef Path;
}

// Each path object consists of a number of independent segments,
// e.g. the inner and outer outline of the letter "A".
struct PathDef
{
    PathSegment[] segments;
}

// Each path segment consists of a number of control points and 
// whether the path is closed (the last point loops back to the first).
struct PathSegment
{
    PathPoint[] points;
    bool isClosed;
}

// Each point consists of a number of attributes
struct PathPoint
{
    // Position of the point. Most important.
    Vector3WithTangents pos;
    
    // "Up" auxiliary vector. Needed to construct a proper matrix from
    // the position and the spline direction. Make sure this is never 
    // collinear with the spline direction, e.g. if your spline is in the XY
    // plane, just use x=0, y=0, z=1 for "up".
    Vector3WithTangents up;
    
    // Point color. X is red, Y green, Z blue and W is alpha. Used in 
    // the Geometry Renderer.
    Vector4WithTangents color;
    
    // Point "size". Can be used in particle systems.
    ValueWithTangents size;
}

// 4-component vector structure
struct Vector4WithTangents
{
    ValueWithTangents x,y,z,w;
}

// 3-component vector structure
struct Vector3WithTangents
{
    ValueWithTangents x,y,z;
}

// Value with tangents, a.k.a explicit derivatives 
struct ValueWithTangents 
{
    // Actual value
    double value;
    
    // "Left" tangent, a.k.a. the derivative of the function towards the preceding point
    // (ignored for first point of open path)
    double tanL; 
    
    // "Right" tangent, a.k.a. the derivative of the function towards the succeeding point
    // (ignored for last point of open path)  
    double tanR;
}

Notes:

  • Non-specified fields will be filled with zeroes
  • Extraneous fields not specified in the file format will be ignored
  • The tangents specify the derivative of the spline function assuming the difference between the points' t is 1.0. If you deal with Bezier control points p0, p1, p2, and p3, convert to two spline points a and b component-wise like this:
    a.value = p0;
    a.tanR = (p1-p0)*3;
    b.tanL = (p2-p3)*3;
    b.value = p3;
    

Likewise, a linear spline segment is best expressed as a.tanR = b-a; b.tanL = a-b; Leaving the tangents at zero will result in a linear but poorly weighted segment affecting the speed along the resulting spline.

See also:
  • Path Renderer
  • Particle System
  • Arrow

« Previous Article
» Index «
Next Article »
Copyright 2020 Ventuz Technology