Navigation

Ventuz 6 Quick Guide

  • Introduction
  • Getting Started
  • Ventuz Editions
  • Designer Overview
  • Ventuz System Requirements
  • Configuration
  • Video/Audio Configuration
  • Machine Configuration
  • GPI Configuration for Runtime or Director
  • Optimize Rendering Performance
  • Supported Formats
  • Supported Hardware
  • Multisampling / Anti-Aliasing
  • Input Subsystem
  • Ventuz Proprietary Files
  • What's new
  • FAQ
  • Common Mistakes
  • Deployment
  • Migration Guide
  • Ventuz 5 Migration Guide
  • Summary Shortcuts

Ventuz 6 Designer

  • Index
  • Getting Started
  • Designer Options
  • Designer Overview
Projects & Scenes
  • Projects and Scenes
  • Project Browser
  • Project Properties
  • Project Maintenance
  • Project and Scene Data
  • Scene Tree
  • Scene Management
  • Scene Statistics
  • Deployment
Interface
  • Designer Interface
  • Renderer Window
  • Realtime Rendering
  • Optimize Scene Performance
  • Performance Statistics
  • Transformation Gizmo
  • Render to Disk
  • Camera Navigation
  • Isolated Objects
  • Manipulate Objects with Gizmos
  • Layer Editor
  • Common Layer Properties
  • IPP Effects
  • Color Correction FX
  • Distortion FX
  • Filter FX
  • Layer Editor Shortcuts
  • Hierarchy Editor
  • Working with Nodes
  • Containers
  • Find and Replace
  • Shortcuts Hierarchy Editor
  • Content Editor
  • Working with Nodes
  • Containers
  • Content Editor Shortcuts
  • Toolbox
  • Property Editor
  • Project Data and Scene Data
  • Property Groups
  • Shader Editor
  • Text Editor
  • Scene Tree
  • Message View
  • Stage Editor
  • Container Outline
  • Watches Editor
  • Animation Editor
  • Animation and State Engine
  • Templates
  • Template Engine
  • Shortcuts Animation Editor
  • Text Rendering
  • Text Editor
  • Character Sets
  • Geometry Import
  • Input Subsystem
  • Multitouch
  • TUIO Protocol
  • Open Sound Control
  • How to work with Head Mounted Displays
  • Cluster
  • Multi Display Setups and Shaping
  • Warping, Soft Edging and Masking
  • Available Nodes
  • Animation Nodes
  • Material&Color Nodes
  • Data Nodes
  • Geometry Nodes
  • Interaction Nodes
  • IO Nodes
  • Layers
  • Light Nodes
  • Logic Nodes
  • Render Option Nodes
  • Slides Nodes
  • Sound Nodes
  • Text Nodes
  • Texture Nodes
  • VR Nodes
  • World Nodes

Ventuz 6 Node Reference

ANIMATION
  • Mover
  • Alternator
  • Simple Control
  • Timeline Control
  • Anmation Rig
  • Keyframe Animation
  • Animation Group
COLOR/MATERIAL
  • Alpha
  • Fog
  • Ground Fog
  • Sky Box
  • Color to RGBA
  • HSLA to Color
  • RGBA to Color
  • Color Transformer
  • HLSL Shader
  • Color
  • Material
  • Color Picker
  • Substance Material
DATA
  • Database
  • Excel
  • JSON
  • RSS Feed
  • Resource Linker
  • Text File
  • XML
GEOMETRY
  • Rectangle
  • Rounded Rectangle
  • Gradient Rectangle
  • Overlay Rectangle
  • Cube
  • Circle
  • Sphere
  • Cylinder
  • Cone
  • Torus
  • Chart
  • Random Points
  • Mesh Loader
  • Geometry Import (Live)
  • Volume
  • Get Bounding Box
  • Arrow
  • Particle System
  • Path Renderer
  • Geometry Renderer
INTERACTION
  • Interaction Rect
  • Touch Button
  • Touch Excluder
  • Touch Marker
  • Touch Paint
  • Touch Pattern
  • Touch Proxy
  • Touch Ripples
  • Touch Transformations
  • Web Browser
  • Touch Teleport
  • Touch Simulator
INPUT/OUTPUT (I/O)
  • GPI
  • Joystick
  • Keyboard
  • MIDI
  • Mouse
  • Network
  • Open Sound Control
  • Serial
  • Timecode
  • DMX
LAYER
  • 3D Layers
  • 3D Layer Reference
  • 2D Layers
  • PSD Import Layer
  • Others
LIGHT
  • Light Sources
LOGIC
  • Array Processing
  • Convert To Text
  • Cluster Synchronization
  • Counter
  • Date Time
  • Directory
  • Dispatcher
  • Enumeration
  • Expressions
  • Invert
  • Log
  • Loop Breaker
  • Math Effects
  • Matrix Operations
  • Scene Event
  • Script
  • String Operations
  • System ID
  • Text Splitter
  • Timer
  • Toggle
  • URL
  • Value Switch
  • Value Buffer
  • Variables
  • Visual Indexer
RENDER OPTIONS
  • Alpha Blending
  • Color Write
  • Alpha Testing
  • Clip Plane
  • Filter
  • Mask
  • Mirror
  • Effect
  • Render Cube Map
  • Draw Modes
  • Stencil
  • ZTesting
SOUND
  • Audio Clip
  • Sound
  • Volume Control
  • Audio Analysis
SLIDES
  • Slide Manager
  • Slide
  • Slide Port
  • Pivot
TEXT
  • Text Effects
  • Text Layouts
  • Text Rendering
TEXTURE
  • Background
  • Hatch
  • Image
  • Texture
  • SVG Loader
  • Gradient Texture
  • Live Video
  • Movie Stream
  • Movie Frame
  • Movie Clip
  • Texture Loader
  • Snapshot
  • Snapshot Framebuffer
  • Texture Saver
  • Video Source Selector
  • VIO Input
  • Spout Receiver
  • NDI Receiver
  • Substance Loader
VR/AR
  • Tracked Devices
  • Draw Tracked Devices
WORLD
  • Axis
  • Billboard
  • GetWorld
  • SetWorld
  • Arrange
  • Ticker
  • Layout
  • Group
  • World Z Sort
  • YesNo
  • Switch
  • Spread
  • Filter Pass
  • Set Pass
  • Hierarchy Container
  • Scene Port
  • Content Container
  • Template Port
  • Container Info
  • Camera
  • Paths

Ventuz 6 Configuration Editor

  • Configuration
  • Machine Configuration
  • Video/Audio Configuration
  • Web Configuration Editor and License Manager
  • Render Setup Editor
  • Warping and Soft-Edging Editor
  • Supported Hardware
  • How to Setup a Cluster Render

Ventuz 6 Director

  • Application Settings
  • Assets
  • Channels
  • Command Line Options
  • Content References
  • Designing Templates
  • Environment
  • Glossary
  • Index
  • Introduction
  • Pages
  • Playlist
  • Plug-Ins
  • Project Data
  • Property Editor
  • Shortcuts
  • GPI Configuration
  • Shot Box
  • Show
  • Taking Action
  • Timeline
  • Topology
  • User Interface
  • Director Mode
  • Macros

How To

  • How to Run Ventuz
  • How to Work with Designer
  • Ventuz Designer Drag&Drop workflow
  • How to use Head Mounted Displays
  • How to work with Shadows
  • How to use Emoijs
  • How to Build a Template
  • How to use Newtek NDI
  • How to Create Visuals Loader Node
  • How to Remote Control with a Phone
  • How to Setup a Cluster Render
  • How to use a Mixed Frame Rate Cluster
  • How to use Tracking
  • How to work with 3D Reference Layers
  • How to create a Firework Particle System
  • How to use DDS with new Block Compression modes
  • How to setup Spout with Ventuz
  • How to use the Substance Integration

Keyboard Shortcuts

  • Summary Shortcuts
  • Layer Editor Shortcuts
  • Hierarchy Editor Shortcuts
  • Content Editor Shortcuts
  • Animation Editor Shortcuts
  • Director Shortcuts

Advanced and Development

  • Command Line Options
  • Remoting Overview
  • Remoting 4
  • Remoting 4 via Websockets
  • Deprecated Remoting
  • Ventuz IP Ports
  • Ventuz Machine Service
  • Remoting Machine Signature
  • TUIO
  • .NET Scripting
  • HLSL Shader Programming
  • Ventuz API and SDK
  • Ventuz VIO API
  • Ventuz File Format (VFF)
  • Ventuz Stream Out API

General Reference

  • Terminology
  • Manual Index

Miscellaneous

  • Presets
« Previous Article
» Index «
Next Article »

Table of Contents

  1. Light Sources
  2. Shadow Casters
  3. Shadow Receivers

How To use Shadows

You are able to add Dynamic Shadows in Ventuz very easily and still have good options to affect the exact behavior. This page will explain how to create shadows and what to keep in mind while working with them.

First of all, you will need to enable your light sources in the scene to cast shadows on their respective Nodes. By default, all Objects in the Scene that are affected by its lighting will now cast and receive shadows. In Ventuz this is done with the help of Shadow Maps that are rendered for each Light and then applied to all objects that receive shadows.

Light Sources

The Light Source Nodes are the starting point for creating dynamic shadows. You can cast shadows with every type of Light Source. As soon as you change the Property Group Shadows from None to Shadow Map everything affected by that light will also cast and receive shadows. Now you can make a lot of adjustments to how the shadows of this light should be cast.

Point Lights use up most performance regarding Shadowing. This is because it needs to render one shadow map for each direction resulting in six extra rendering processes for each shadowing point light.

Directional Lights adjust the size of their frustum of the shadow map based on the maximum distance between the objects in your scene. The quality of the shadow map will be drastically affected by the size of your scene.

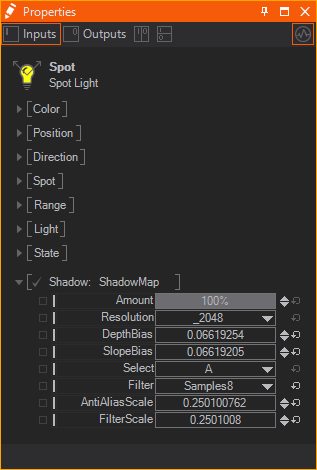
Amount will change the intensity of the shadow. Resolution changes the size of the used Render Target for the Shadow Map. The higher the resolution the more detailed the results but the higher the performance and memory consumption.

Always keep the Resolution as low as possible as that may save a lot of performance.

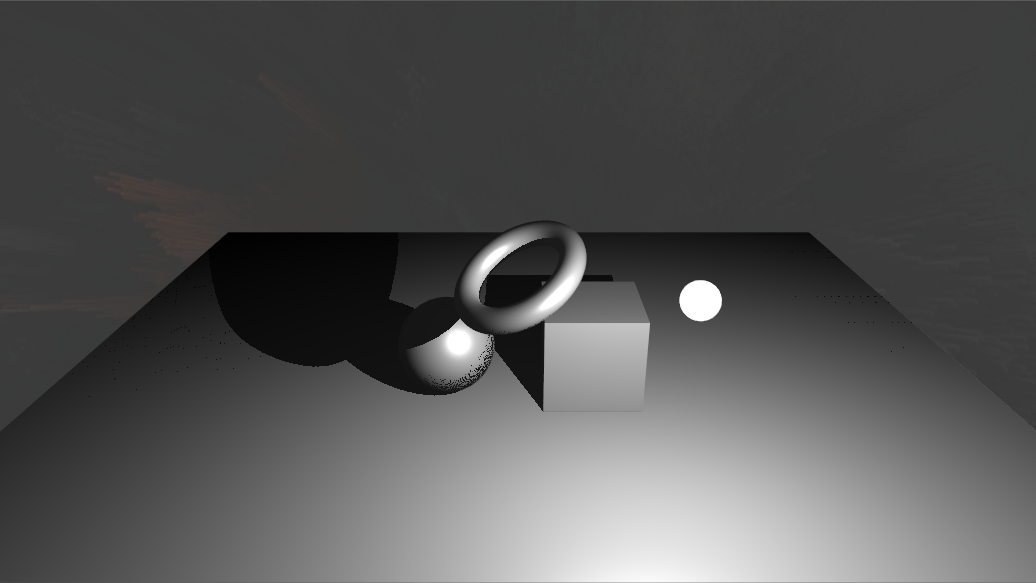
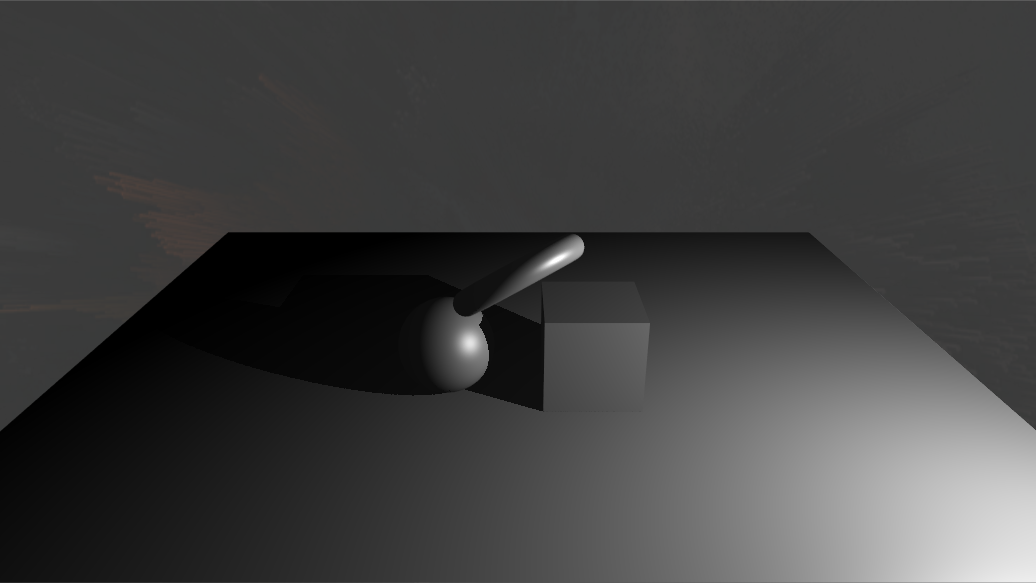
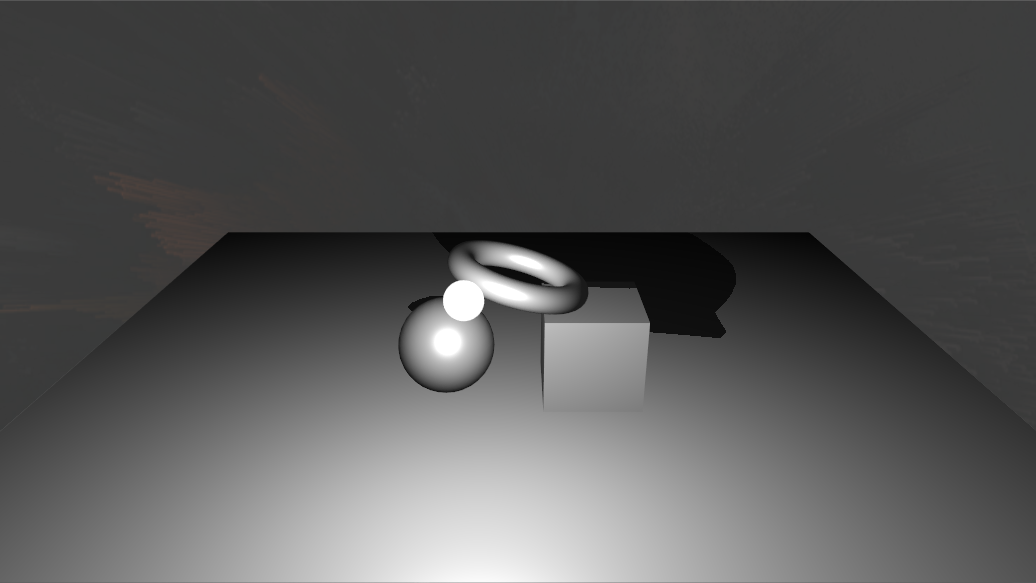
The Biases change how exactly the Shadow Map will be applied to the receiving objects in your scene. This can be used to remove artifacts (e.g. shadow acne) that appear through false self-shadowing of surfaces. This happens when the shader compares several depths against the same texel on the Shadow Map (see the Sphere on the left screenshot in the below table). The Depth Bias adds a Bias to that comparison to let it fail more often. The Slope Bias adjusts the depth bias based on the angle of the light hitting the surface. This reduces Shadow Acne even more on very flat angles. Most of the time you will need to adjust both values to get rid of these artifacts. It is trial and error for each light as too high values will prevent the shadow from rendering where the viewer would expect it (called peter panning).

No Bias
Shadow Acne

With Bias

Too Much Bias
Peter Panning

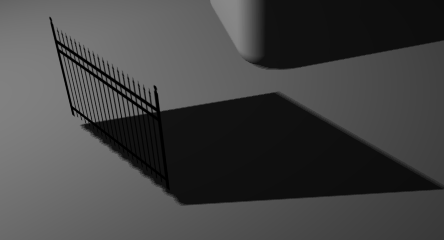
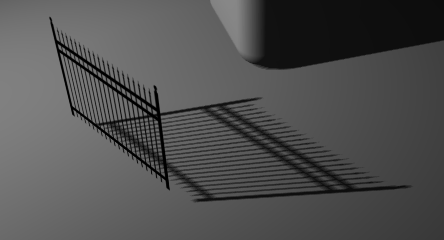
With the Select Property you can use one of two different Groups for the shadow casting - shadows by this light will then only be cast by objects in the same group (see Shadow Casters). Lastly, you have some Filtering Options to create better effects in exchange for performance. You can either sample 1, 4 or 8 times adjustable in the Filter property. The more samples you use, the smoother the result and the more performance it will take to sample from the shadow map. If using 4 or 8 samples you can also change the Anti Aliasing and Filter Scaling to adjust the results. The Anti Aliasing and Filter Scaling values are represented in Pixels. If you adjust the Anti Aliasing to have a size of 1 it means the Anti Aliasing will have a radius of 1 pixel - independent from the resolution, it will always be 1 pixel. The same goes for the Filter Scaling.

Shadow Casters

By default, all objects in the scene that are affected by shadow casting light will also cast and receive shadows. If this is not desirable or the shadowing is the bottleneck of your current performance and you want to save performance, you can change which objects should cast or receive shadows.

To exclude an object from casting shadows you can use the Shadow Filter Node. With its Condition property, you can change in which pass the following objects should be rendered. Model Only will ignore them during the shadowing process so that they do not cast any shadows anymore. Shadow Only will ignore it during the normal rendering so that they cast shadows but are not visible otherwise. Model and Shadow which is the default option will draw the objects in both.

To adjust of which group of lights the following objects should cast shadows you can use the Select property (see Light Sources).

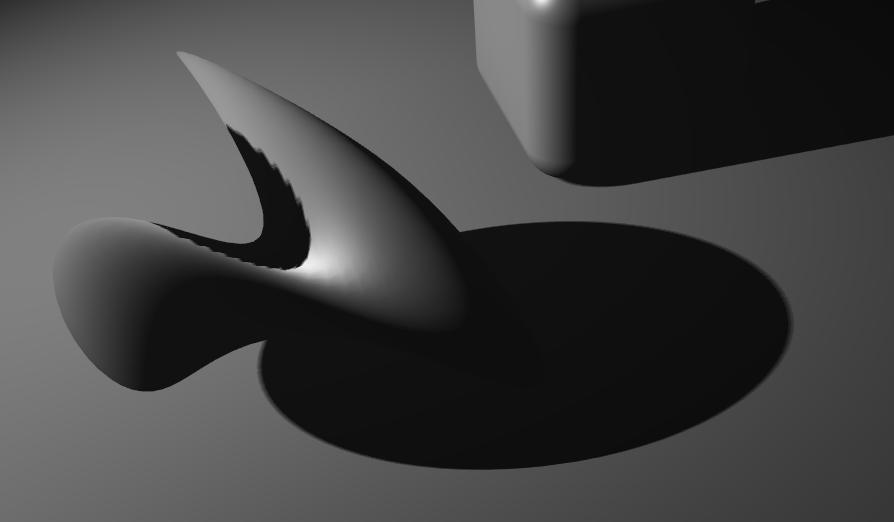
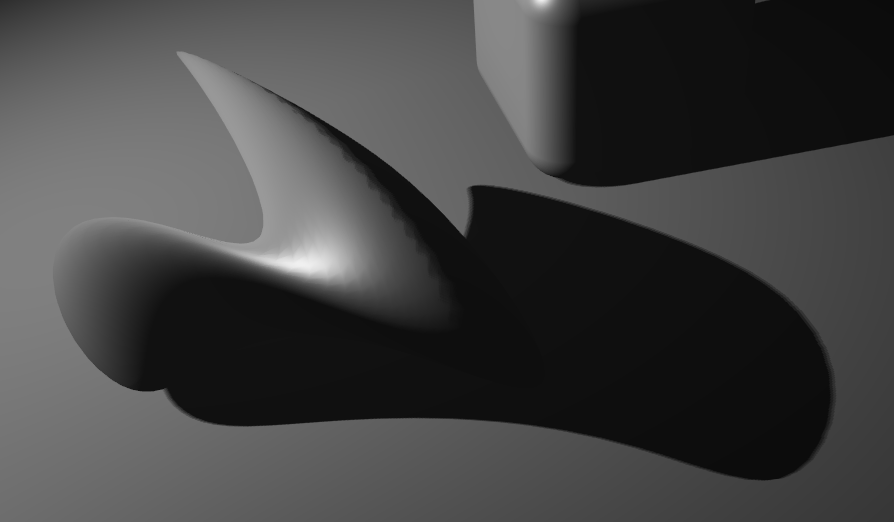
To adjust the way the shadows of an object are cast you can use a Material Node and its Shadow Options Property Group. Change it from None to either Shadow Options or Shadow Options with Fade. For shadow casters only the Simple Caster Shader Property is of interest because the rest regards the way an object receives shadows (see Shadow Receivers). With this property you can change whether or not to cast shadows in a simplified way. The Simple Caster Shader ignores the Alpha Channel of the surface and also vertices displaced by shaders are not regarded - in exchange it saves some performance. The effects can be seen below. In the first column you can see the results with simple shading while in the second column you see the results with normal shading. In the first row you see a geometry with vertices displaced by a vertex noise shader and in the second row you see a simple rectangle with an alpha texture.

SimpleCasterShadow ON
(default)

SimpleCasterShadow OFF

Shadow Receivers

Lastly, you can change the way shadows are received by objects using the Material Node. Like on shadow casters you need to turn the Shadow Options Property Group from None to Shadow Options or Shadow Options with Fade.

The Receive flag turns on and off whether or not to receive shadows. This can be turned off for each geometry that does not receive shadows and to save performance.

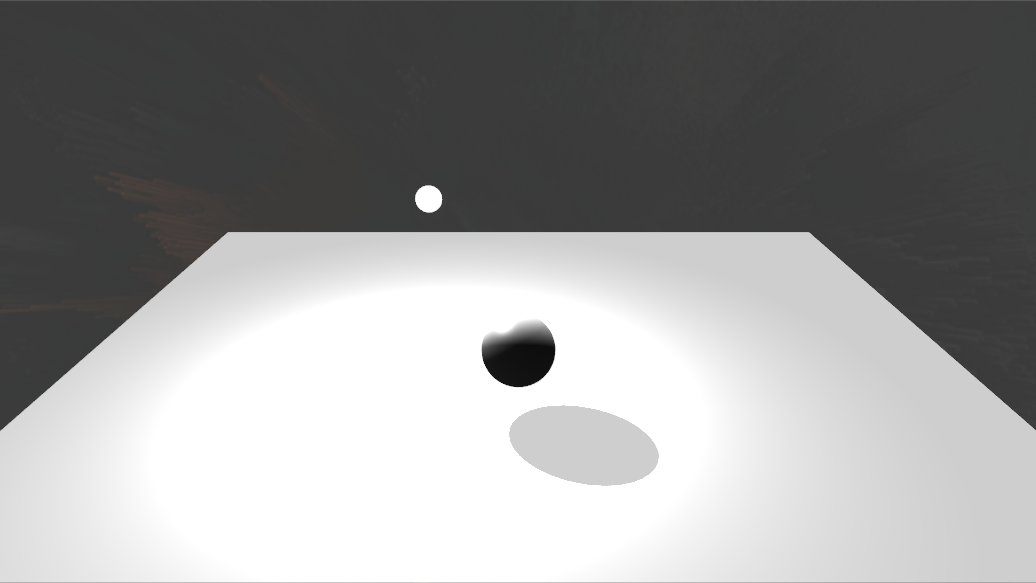
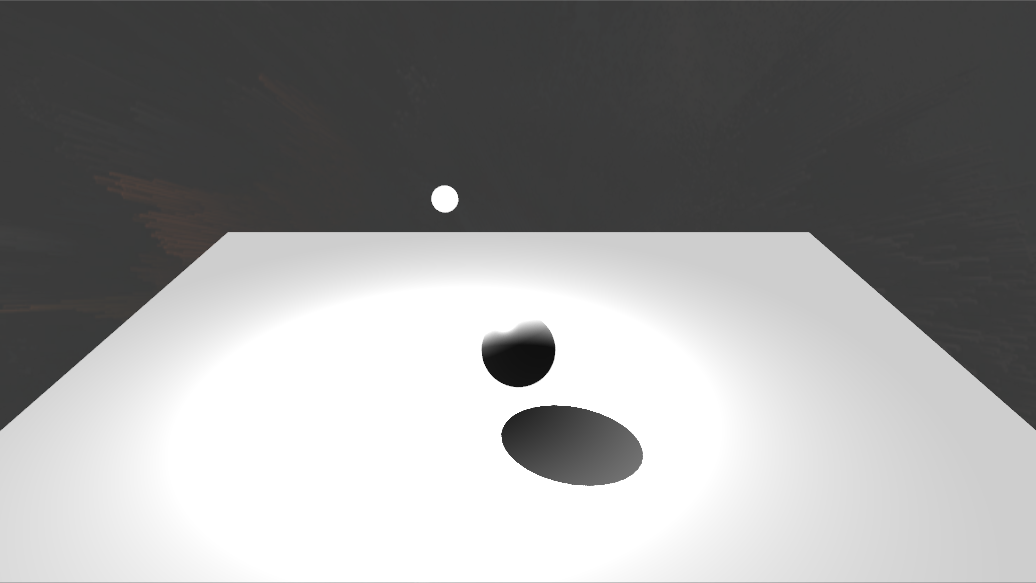
The FadeDiffuse, FadeSpecular and FadeAmbient affect how much each channel of the Material fades out the Material. By default, all of these are set to 1. If one of these is turned down, the shadow is not affected anymore if the channel is affected other than through the shadowing light. In the screenshots below you can see a Sphere that is casting a shadow onto a rectangle that was cast by the spotlight above it. The Rectangle is also lighted by a Directional Light which is affecting the Rectangle's Diffuse Channel. On the left you see that scene with a FadeDiffuse value of 1 and on the right you see the same scene with a FadeDiffuse of 0. As you can see, the shadow is not as intense on the left as on the right, because it is affected by the Diffuse Channel of the Rectangle.

FadeDiffuse = 1
(default)

FadeDiffuse = 0

See also:
  • Light Source Nodes
  • Shadow Filter Node
  • Material
  • ​MSDN: Common Techniques to Improve Shadow Depth Maps

« Previous Article
» Index «
Next Article »
Copyright 2020 Ventuz Technology