Navigation

Ventuz 6 Quick Guide

  • Introduction
  • Getting Started
  • Ventuz Editions
  • Designer Overview
  • Ventuz System Requirements
  • Configuration
  • Video/Audio Configuration
  • Machine Configuration
  • GPI Configuration for Runtime or Director
  • Optimize Rendering Performance
  • Supported Formats
  • Supported Hardware
  • Multisampling / Anti-Aliasing
  • Input Subsystem
  • Ventuz Proprietary Files
  • What's new
  • FAQ
  • Common Mistakes
  • Deployment
  • Migration Guide
  • Ventuz 5 Migration Guide
  • Summary Shortcuts

Ventuz 6 Designer

  • Index
  • Getting Started
  • Designer Options
  • Designer Overview
Projects & Scenes
  • Projects and Scenes
  • Project Browser
  • Project Properties
  • Project Maintenance
  • Project and Scene Data
  • Scene Tree
  • Scene Management
  • Scene Statistics
  • Deployment
Interface
  • Designer Interface
  • Renderer Window
  • Realtime Rendering
  • Optimize Scene Performance
  • Performance Statistics
  • Transformation Gizmo
  • Render to Disk
  • Camera Navigation
  • Isolated Objects
  • Manipulate Objects with Gizmos
  • Layer Editor
  • Common Layer Properties
  • IPP Effects
  • Color Correction FX
  • Distortion FX
  • Filter FX
  • Layer Editor Shortcuts
  • Hierarchy Editor
  • Working with Nodes
  • Containers
  • Find and Replace
  • Shortcuts Hierarchy Editor
  • Content Editor
  • Working with Nodes
  • Containers
  • Content Editor Shortcuts
  • Toolbox
  • Property Editor
  • Project Data and Scene Data
  • Property Groups
  • Shader Editor
  • Text Editor
  • Scene Tree
  • Message View
  • Stage Editor
  • Container Outline
  • Watches Editor
  • Animation Editor
  • Animation and State Engine
  • Templates
  • Template Engine
  • Shortcuts Animation Editor
  • Text Rendering
  • Text Editor
  • Character Sets
  • Geometry Import
  • Input Subsystem
  • Multitouch
  • TUIO Protocol
  • Open Sound Control
  • How to work with Head Mounted Displays
  • Cluster
  • Multi Display Setups and Shaping
  • Warping, Soft Edging and Masking
  • Available Nodes
  • Animation Nodes
  • Material&Color Nodes
  • Data Nodes
  • Geometry Nodes
  • Interaction Nodes
  • IO Nodes
  • Layers
  • Light Nodes
  • Logic Nodes
  • Render Option Nodes
  • Slides Nodes
  • Sound Nodes
  • Text Nodes
  • Texture Nodes
  • VR Nodes
  • World Nodes

Ventuz 6 Node Reference

ANIMATION
  • Mover
  • Alternator
  • Simple Control
  • Timeline Control
  • Anmation Rig
  • Keyframe Animation
  • Animation Group
COLOR/MATERIAL
  • Alpha
  • Fog
  • Ground Fog
  • Sky Box
  • Color to RGBA
  • HSLA to Color
  • RGBA to Color
  • Color Transformer
  • HLSL Shader
  • Color
  • Material
  • Color Picker
  • Substance Material
DATA
  • Database
  • Excel
  • JSON
  • RSS Feed
  • Resource Linker
  • Text File
  • XML
GEOMETRY
  • Rectangle
  • Rounded Rectangle
  • Gradient Rectangle
  • Overlay Rectangle
  • Cube
  • Circle
  • Sphere
  • Cylinder
  • Cone
  • Torus
  • Chart
  • Random Points
  • Mesh Loader
  • Geometry Import (Live)
  • Volume
  • Get Bounding Box
  • Arrow
  • Particle System
  • Path Renderer
  • Geometry Renderer
INTERACTION
  • Interaction Rect
  • Touch Button
  • Touch Excluder
  • Touch Marker
  • Touch Paint
  • Touch Pattern
  • Touch Proxy
  • Touch Ripples
  • Touch Transformations
  • Web Browser
  • Touch Teleport
  • Touch Simulator
INPUT/OUTPUT (I/O)
  • GPI
  • Joystick
  • Keyboard
  • MIDI
  • Mouse
  • Network
  • Open Sound Control
  • Serial
  • Timecode
  • DMX
LAYER
  • 3D Layers
  • 3D Layer Reference
  • 2D Layers
  • PSD Import Layer
  • Others
LIGHT
  • Light Sources
LOGIC
  • Array Processing
  • Convert To Text
  • Cluster Synchronization
  • Counter
  • Date Time
  • Directory
  • Dispatcher
  • Enumeration
  • Expressions
  • Invert
  • Log
  • Loop Breaker
  • Math Effects
  • Matrix Operations
  • Scene Event
  • Script
  • String Operations
  • System ID
  • Text Splitter
  • Timer
  • Toggle
  • URL
  • Value Switch
  • Value Buffer
  • Variables
  • Visual Indexer
RENDER OPTIONS
  • Alpha Blending
  • Color Write
  • Alpha Testing
  • Clip Plane
  • Filter
  • Mask
  • Mirror
  • Effect
  • Render Cube Map
  • Draw Modes
  • Stencil
  • ZTesting
SOUND
  • Audio Clip
  • Sound
  • Volume Control
  • Audio Analysis
SLIDES
  • Slide Manager
  • Slide
  • Slide Port
  • Pivot
TEXT
  • Text Effects
  • Text Layouts
  • Text Rendering
TEXTURE
  • Background
  • Hatch
  • Image
  • Texture
  • SVG Loader
  • Gradient Texture
  • Live Video
  • Movie Stream
  • Movie Frame
  • Movie Clip
  • Texture Loader
  • Snapshot
  • Snapshot Framebuffer
  • Texture Saver
  • Video Source Selector
  • VIO Input
  • Spout Receiver
  • NDI Receiver
  • Substance Loader
VR/AR
  • Tracked Devices
  • Draw Tracked Devices
WORLD
  • Axis
  • Billboard
  • GetWorld
  • SetWorld
  • Arrange
  • Ticker
  • Layout
  • Group
  • World Z Sort
  • YesNo
  • Switch
  • Spread
  • Filter Pass
  • Set Pass
  • Hierarchy Container
  • Scene Port
  • Content Container
  • Template Port
  • Container Info
  • Camera
  • Paths

Ventuz 6 Configuration Editor

  • Configuration
  • Machine Configuration
  • Video/Audio Configuration
  • Web Configuration Editor and License Manager
  • Render Setup Editor
  • Warping and Soft-Edging Editor
  • Supported Hardware
  • How to Setup a Cluster Render

Ventuz 6 Director

  • Application Settings
  • Assets
  • Channels
  • Command Line Options
  • Content References
  • Designing Templates
  • Environment
  • Glossary
  • Index
  • Introduction
  • Pages
  • Playlist
  • Plug-Ins
  • Project Data
  • Property Editor
  • Shortcuts
  • GPI Configuration
  • Shot Box
  • Show
  • Taking Action
  • Timeline
  • Topology
  • User Interface
  • Director Mode
  • Macros

How To

  • How to Run Ventuz
  • How to Work with Designer
  • Ventuz Designer Drag&Drop workflow
  • How to use Head Mounted Displays
  • How to work with Shadows
  • How to use Emoijs
  • How to Build a Template
  • How to use Newtek NDI
  • How to Create Visuals Loader Node
  • How to Remote Control with a Phone
  • How to Setup a Cluster Render
  • How to use a Mixed Frame Rate Cluster
  • How to use Tracking
  • How to work with 3D Reference Layers
  • How to create a Firework Particle System
  • How to use DDS with new Block Compression modes
  • How to setup Spout with Ventuz
  • How to use the Substance Integration

Keyboard Shortcuts

  • Summary Shortcuts
  • Layer Editor Shortcuts
  • Hierarchy Editor Shortcuts
  • Content Editor Shortcuts
  • Animation Editor Shortcuts
  • Director Shortcuts

Advanced and Development

  • Command Line Options
  • Remoting Overview
  • Remoting 4
  • Remoting 4 via Websockets
  • Deprecated Remoting
  • Ventuz IP Ports
  • Ventuz Machine Service
  • Remoting Machine Signature
  • TUIO
  • .NET Scripting
  • HLSL Shader Programming
  • Ventuz API and SDK
  • Ventuz VIO API
  • Ventuz File Format (VFF)
  • Ventuz Stream Out API

General Reference

  • Terminology
  • Manual Index

Miscellaneous

  • Presets
« Previous Article
» Index «
Next Article »

How To 3D Layer Reference

Table of Contents

  1. Introduction
  2. 3D Layer Reference - Game Show
  3. Multi Camera Angles
  4. Limitations

This HowTo chapter will guide you trough the steps that are necessary for working with a 3D Layer Reference Node.

Introduction

The 3D Layer Reference is very useful if you want to reuse a 3D Layer and want to publish it on another screen, but with a slightly different content.

One of the use-cases we will discuss in this HowTo will be a gameshow. Let's say you need the same Content, Layout, etc. for the Game-Show-Master as well as the Guest. The only difference is that the Game Show Master has also the correct answers already marked. He might even have some hints that he is allowed to mention appearing on his screen aswell. In this case, all you would need is to filter out the content for the Guest.

Additionally to the first example, another use-case for the 3D Layer Reference is the possibility of using the same 3D Layer but with different camera angles to display on different monitors. The Advantage with the 3D Layer Reference is to have a unique layer effect for each reference.

Please keep in mind, only the MAIN is touchable! There are a few limitations which will be listed in the end.

3D Layer Reference - Game Show

Let's assume you have already created the layout for your Game Show and the Question - and Answer fields are in their position. Additionally, you have created a panel for the Game Show Master which can contain hints for the Guest. The render setup has been configured for two screens, one for the Game Show Master (Main) and one for the Guest.

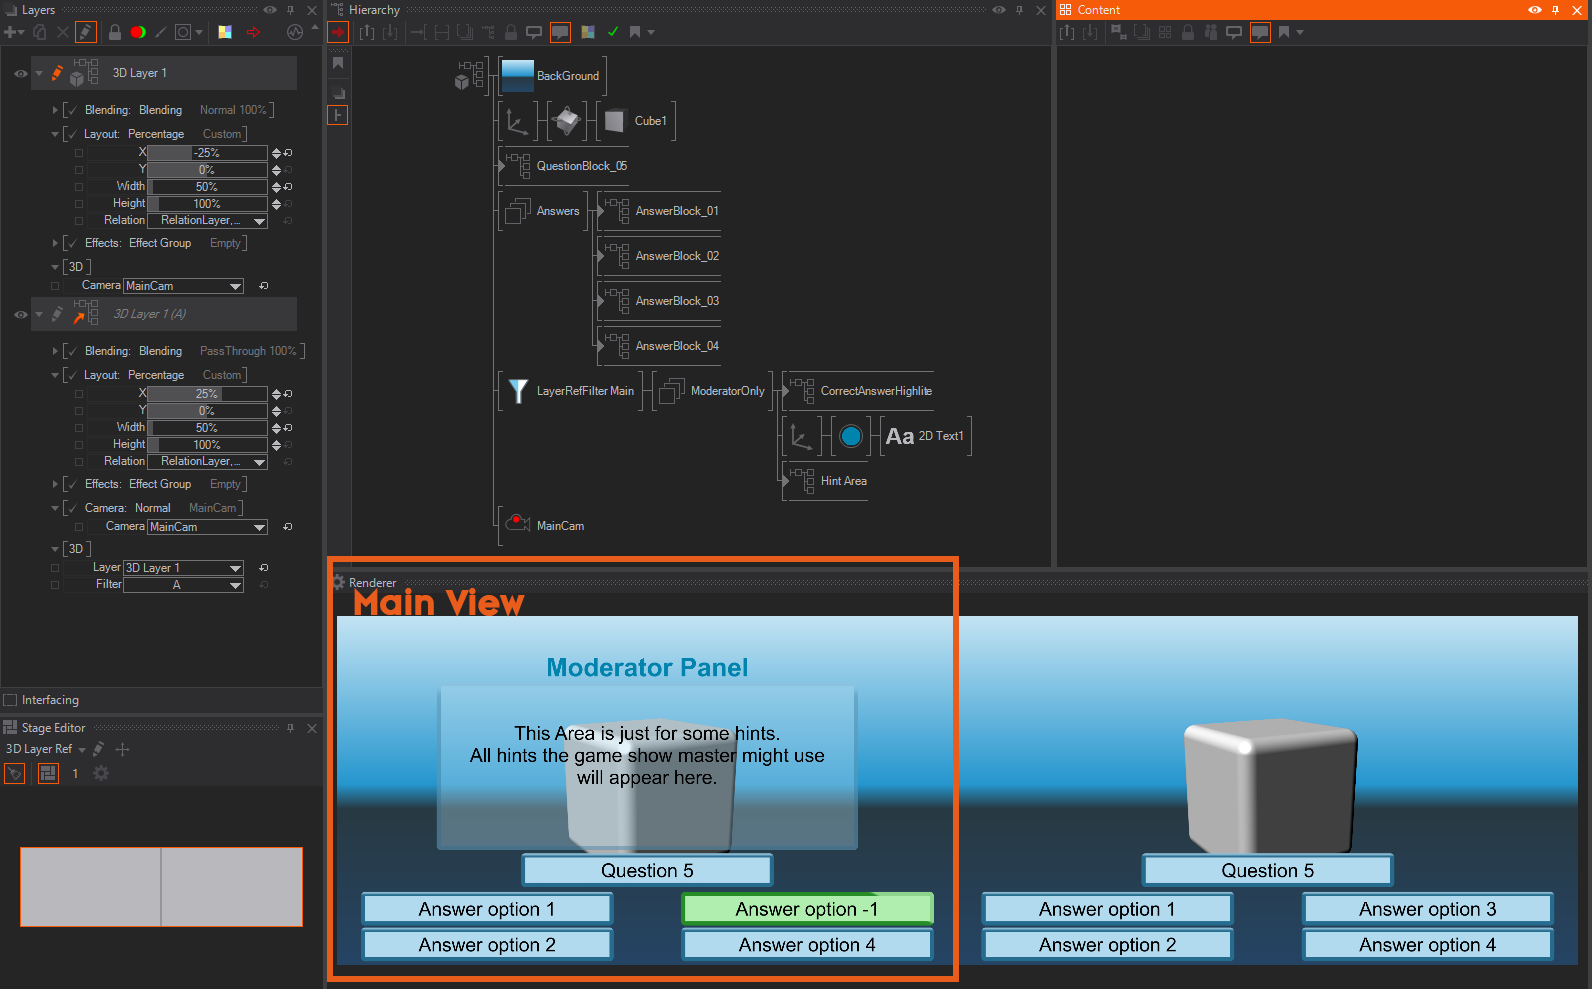
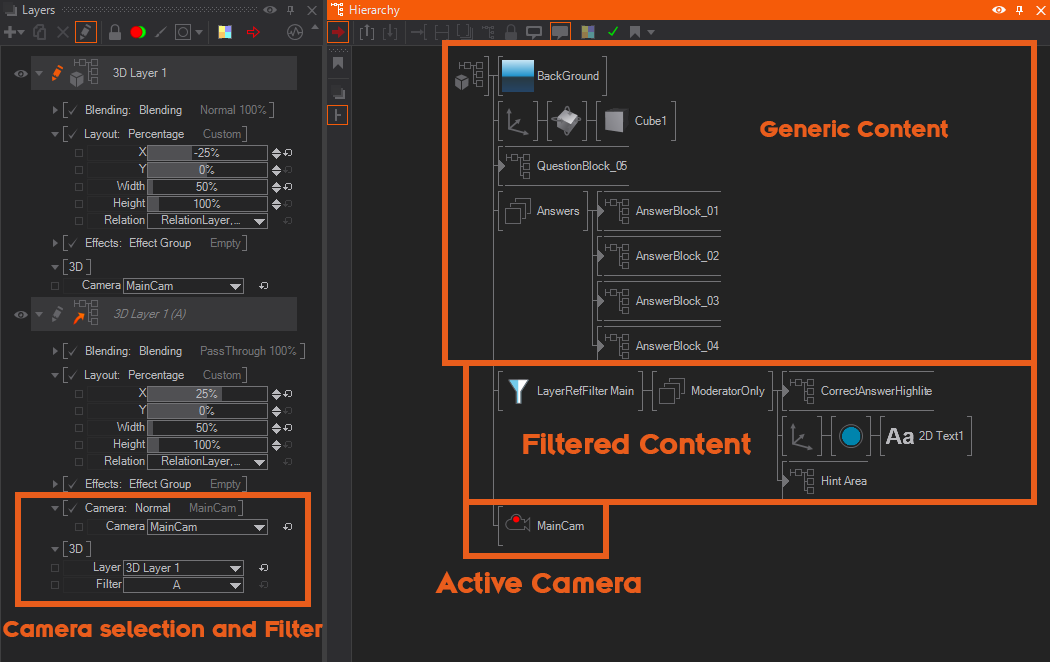
In the screenshot below we have marked the Area as Generic Content, this content is visible for both: the Game Show Master and the Guest. The Content in the Filtered Content Area is ONLY visible to the Game Show Master since it has the LayerRefFilter node in front and is set to be only visible in Main.

Create a new 3D Layer Reference. All you need to do now is select which layer you want as the reference. You can find the according setting in the 3D section under Layer. Select your 3D Layer and under Filter set your filter to A (you would need to uncheck all other filter groups). With that, it will show all Unfiltered Content as well as the content which is in the Filtergroup A.

Furthermore we also want to use the original MainCam from the 3D Layer 1. Use the Camera drop-down menu and switch from (default) to Normal. Now select the Camera, in this case, the renamed MainCam from the Camera drop-down menu.

You can resize and reposition your layers to your needs. In our case, we have a 2x1 layout configuration and therefore we can split the render view in half. Moreover, our Main view / Original 3D Layer is on the left and the Guest View is positioned to the right. To do so, change the Layout of each layer.

Select the 3D Layer 1 and all the content that you want to filter out. The Guest view should be placed behind the LayerRefFilter. Now select the LayerRefFilter and in the Filter property Main should be checked (you might have to uncheck all other filter groups).

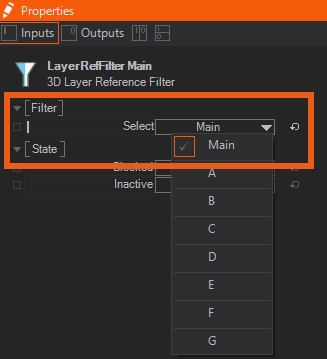
Since we set the Filter in the 3D Layer Reference already to A the content should be filtered correctly. Everything that is now behind the LayerRefFilter node will be ONLY shown in the MAIN view.

Multi Camera Angles

A great advantage to Ventuz is the possibility to have different cameras inside a 3D Layer and use those camera views for the 3DLayerReference layers. You can achieve a so called Multicamera View. Furthermore, each Layer can have their own effects applied. Next to that, you can use the LayerRefFilter node to filter specific content out of individual referenced 3D Layers.

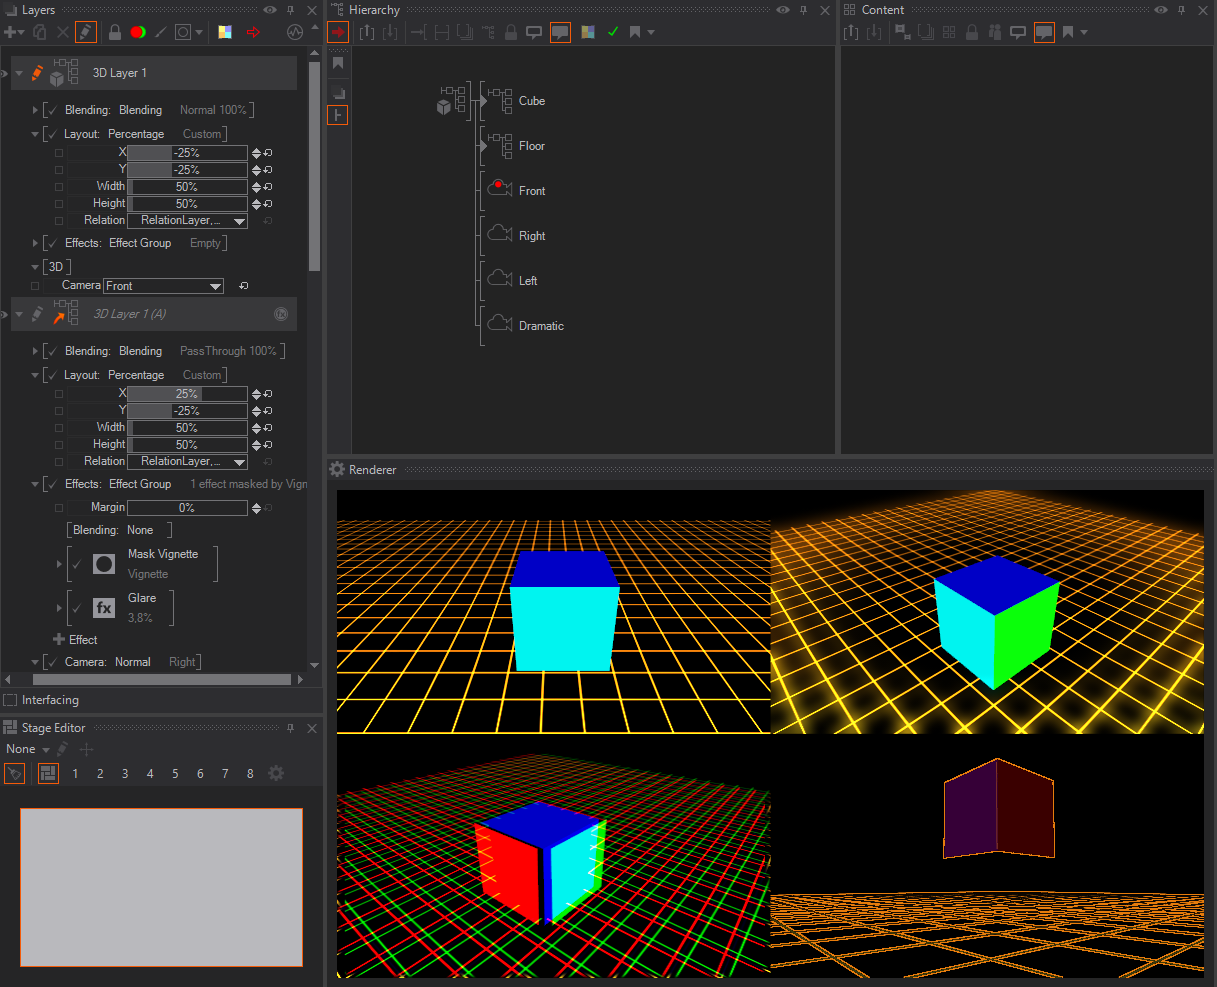
To make use of the Multicamera angles you need to setup more than one camera inside your 3D Layer. In our example, we wanted to have 4 Camera views. Therefore we created 4 cameras and assigned individual positions for each camera. You should also consider renaming the cameras to make your selection later on easier.

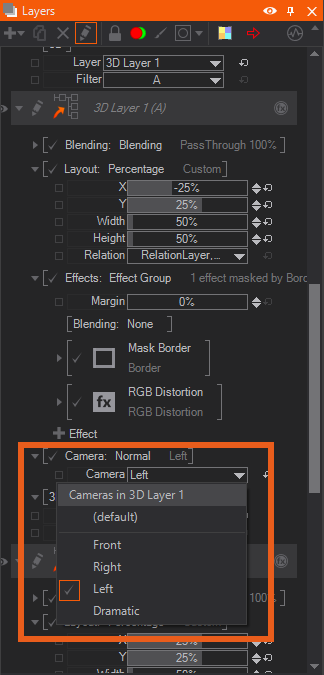
Since the original 3D Layer 1 is already used for one of the four camera angles, we only needed to add 3 more 3D Layer Reference layers. Each 3D Layer Reference will represent one camera view. Inside the 3D Layer Reference properties select for the 3D - Layer the 3D Layer 1 which is the layer we wanted to use as reference.

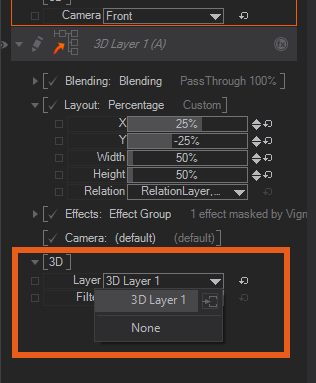
The next step is to change the Camera for each 3D Layer Reference. Select for each of the RefLayer one of the Cameras. In the example we used the Front Camera for the Main - 3D Layer One, Right, Left, Dramatic for each RefLayer. To do that, you need to select the Camera property group and switch from (default) to Normal. Change the Camera property to any of the other available Cameras. Since we have already defined the layer we want to reference from, we get a list of available cameras.

You should also use the Layout to align all the different layers on the screen. In our example, we are using the Percentage and split our screen into four sections by changing the Width and Height to 50% and reposition each view by using the X/Y. Main / 3D Layer 1 is the top left, Right in the upper right, Left to the bottom left and the Dramatic is assigned to the lower right section of our screen.

You should now have your screen split into 4 Sections or Areas. Each of them should show your 3D Layer 1 content from a different angle or should be viewed by a different camera.

In addition to that, you can add individual effects to each 3D Layer Reference.

Limitations

Due to its technical background, the 3D Layer Reference comes with some limitations that one needs to keep in mind while working with it.

  • Billboards will always orient towards the original Camera of the 3D Layer instead of the new Camera of the Reference.
  • Interaction does only apply to the original 3D Layer and is not applied to any 3D Layer Reference. Changes of the transformation of objects by Touch Transformation Nodes are applied though.
  • Shadows and Cube Maps work in the referenced Layers but are only rendered in the Main 3D Layer. Therefore Filtered objects produce wrong shadows or are visible erroneously on Cube Maps respectively.
  • Render Sprites are visible, but note that their sizes are provided in pixels. This will produce different results if the 3D Layer has a different Layer Size than its reference.

« Previous Article
» Index «
Next Article »
Copyright 2020 Ventuz Technology