Working with Playlists
Table of Contents
A Playlist is one way to plan ahead in Ventuz Director. It is a simple list of templates or Pages the operator can step through in order or jump around. To cue an entry, it is activated by double clicking on the entry. What makes the Playlist a very powerful tool is a feature called Auto-Cue: If the operator takes the activated item on air, the Playlist detects this and will automatically cue the next entry in the list. So after activating the first entry, an operator can run a complete show by just doing Takes whenever the next entry should come on air! At any point in the show, the operator can jump around in the playlist by simply activating another item and continue auto-cueing from there.
Playlists are hosted inside the Playlist docking window. The playlist is part of the default window layout but hidden by default. To make it visible, go to Window / Playlist in the main menu. If there is no such entry in the current layout, it can be added via the Window Management.
Filling the Playlist
Each Channel in a Show has its own playlist. There are two ways to add entries to the Playlist:
- Drag templates or pages to the playlist window. If the window is docked behind another window, drag the templates/pages over the docking window layout and a box around it will appear. Drop the content and it will be added to the playlist.
- Use the Add to Playlist button in the footer of the Property Editor.
To remove an entry, select it by clicking on it and pressing Delete. To re-arrange entries, again select them and then drag them to their now position.
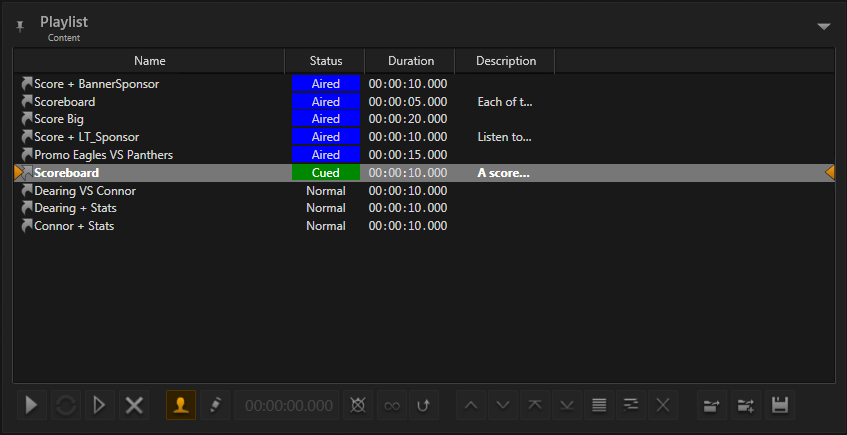
Status
Each playlist entry has a status:
- Normal: The item has not been on-air yet.
- Cueing: The template is being loaded.
- Cued: The template is ready to go.
- On Air: The template is currently on-air.
- Aired: The entry has been on-air at some previous point in time.
The status of a playlist entry - especially the Aired state - can be reset by selecting entries and then choosing Playlist / Reset Status from the main menu.
Loop Mode
The button at the bottom of the control activates loop mode. Ordinary, when the last entry on the playlist goes on air, the cue remains empty so that the next take will perform a final take out. When loop mode is activated, the first entry is activated instead so that the next take will start the playlist all over again.
Automation
Each playlist entry can have an optional duration that specifies how long the entry should be on air. Once that duration is reached, Director performs a take which - in combination with the auto-cue feature - brings the next entry on air. By activating the loop mode, this is a very comfortable way to produce Digital Signage setups where the same set of pre-filled templates is shown over and over again. For example, imagine a conference where displays in the halls show the program of the conference, paging between different tracks and showing sponsor pages every few minutes. If the current on-air item's duration is tracked, the remaining on-air time will be shown in the time code field in the Playlist's toolbar.
To cancel this self-driving cycle of auto-cue and automation takes, either perform a clear or toggle the Ignore Duration Values button in the playlist's toolbar. If this button is activated, Director stops tracking on-air duration for playlist entries. This can for example be used to temporarily interrupt automated playlists to keep a template longer than expected on air while changing the playlist.
The on-air duration of an entry is counted from the moment it is taken to air - so including its in-animation. If the specified duration is smaller than the time it takes to perform the in-animation, Director will wait until the animation is done. Specifically, it re-checks every 100ms if it can perform the take. The behavior for playlist entries which have a duration that is shorter than the in-transition it takes to bring them on air is currently undefined and subject to change. At the time of writing, with deactivated Timeline, the on air item will stay on air until the in-transition is complete, even if this means going over the duration. With activated Timeline, the next playlist entry's on air duration will effectively be reduced by the overtime of the problematic playlist entry
Multi-take templates are currently not supported for automation. For those, the second take will be performed after the duration expires if the timeline is deactivated or a take out after the first take if it is activated.
Playlist Control
The toolbar at the bottom of the playlist window contains various operations that can be performed. Which buttons are shown can be customized via the docking window configuration options to fit workflow needs.

Take, Update & Clear
These buttons function exactly the same as those in the Show Control. However, they only affect the channel this playlist window is bound to.
Editing & Operation
These buttons affect the actual usage of the playlist:
- User-Interaction: When this button is not highlighted, the channel will not listen to user-interaction such as pressing F1 to do a take or the take button in the Show Control. Deactivate it if for example the channel is automated via a plug-in or the Automation feature described above.
- Edit: Edit the description and other properties of a playlist entry.
- Remaining Duration: If a playlist entry has a fixed duration specified, this will count down to the point when it will go off air again.
- Ignore Duration: When a playlist entry has a fixed duration, it will be taken off air once its duration has been reached. However, with this button the automation can be deactivated while still preserving the values on the individual entries.
- Loop Mode: When the last entry goes off air, restart at the first entry of the playlist.
- Reverse Mode: Changes the auto-cueing to use the previous item instead of the next one.
- Move Up: Move all selected items one row up. Ctrl + Shift + Up
- Move Down: Move all selected items one row down. Ctrl + Shift + Down
- Move Top: Move all selected items to the top of the playlist. Alt + Ctrl + Shift + Up
- Move Bottom: Move all selected items to the bottom of the playlist. Alt + Ctrl + Shift + Down
- Select All: Select all playlist items. Ctrl + A
- Invert Selection: Invert the current selection Ctrl + I
- Delete: Delete selected items. Delete
Loading & Saving
A channel's Playlist is stored as part of the Show file. However, the Playlist can also be exported to/imported from a separate playlist file.
- Append: Adds the entries from the file to the current playlist
- Load: Replaces the current playlist by the content of the file
- Save: Saves the current playlist to a file.
Remote Playlist
Running a Remote Playlist allows you to decide between two sync-modes or even change to any other playlist that is available for the same context.
- Load Remote Playlist: Opens the Remote Playist Dialog.
- Automatic: Updates the Playlist from the Remote Playlist whenever an update is available.
- Manual: The button will be switched on as soon as updates are available. To apply the updates to the active playlist the button needs to be pressed.
Playlists with Automatic Sync enabled cannot be modified by the user. When the Automatic mode is disabled, changes can be applied but get lost as soon as the Autoatic mode gets re-enabled!
Options
The Window Options allow you to enable and disable certain sections and buttons of the Toolbar and select the columns you want to see in your playlist.
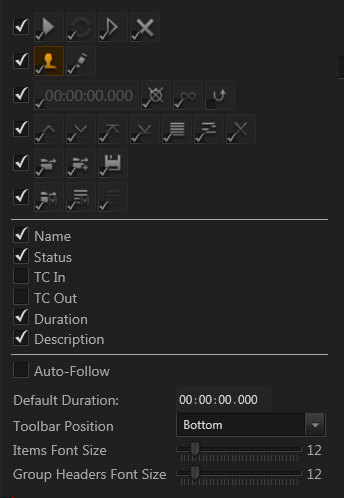
Columns:
- Name: Name of the playlist item
- Status: Status of the playlist item. Check the Status section for more information.
- TC In: A timecode field that can come with an item of a remote playist to add useful information to the operator. It is not used for automating a playlist!
- TC Out: A timecode field that can come with an item of a remote playist to add useful information to the operator. It is not used for automating a playlist!
- Description: Name of the playlist item
Misc:
- Default Duration: Defines the default duration of new items added to the playlist.
- Auto Follow: Keeps the On-Air item always in the center of the playlist.
- Toolbar Position: The toolbar positition can be set to Left, Top, Right, Bottom to better fit your desired window layout.
- Items Font Size: Changes the scaling of the playlist items.
- Group Headers Font Size: Changes the scaling of the item groups. (Only available in combination with a Remote Playlist)