Navigation

Ventuz 6 Quick Guide

  • Introduction
  • Getting Started
  • Ventuz Editions
  • Designer Overview
  • Ventuz System Requirements
  • Configuration
  • Video/Audio Configuration
  • Machine Configuration
  • GPI Configuration for Runtime or Director
  • Optimize Rendering Performance
  • Supported Formats
  • Supported Hardware
  • Multisampling / Anti-Aliasing
  • Input Subsystem
  • Ventuz Proprietary Files
  • What's new
  • FAQ
  • Common Mistakes
  • Deployment
  • Migration Guide
  • Ventuz 5 Migration Guide
  • Summary Shortcuts

Ventuz 6 Designer

  • Index
  • Getting Started
  • Designer Options
  • Designer Overview
Projects & Scenes
  • Projects and Scenes
  • Project Browser
  • Project Properties
  • Project Maintenance
  • Project and Scene Data
  • Scene Tree
  • Scene Management
  • Scene Statistics
  • Deployment
Interface
  • Designer Interface
  • Renderer Window
  • Realtime Rendering
  • Optimize Scene Performance
  • Performance Statistics
  • Transformation Gizmo
  • Render to Disk
  • Camera Navigation
  • Isolated Objects
  • Manipulate Objects with Gizmos
  • Layer Editor
  • Common Layer Properties
  • IPP Effects
  • Color Correction FX
  • Distortion FX
  • Filter FX
  • Layer Editor Shortcuts
  • Hierarchy Editor
  • Working with Nodes
  • Containers
  • Find and Replace
  • Shortcuts Hierarchy Editor
  • Content Editor
  • Working with Nodes
  • Containers
  • Content Editor Shortcuts
  • Toolbox
  • Property Editor
  • Project Data and Scene Data
  • Property Groups
  • Shader Editor
  • Text Editor
  • Scene Tree
  • Message View
  • Stage Editor
  • Container Outline
  • Watches Editor
  • Animation Editor
  • Animation and State Engine
  • Templates
  • Template Engine
  • Shortcuts Animation Editor
  • Text Rendering
  • Text Editor
  • Character Sets
  • Geometry Import
  • Input Subsystem
  • Multitouch
  • TUIO Protocol
  • Open Sound Control
  • How to work with Head Mounted Displays
  • Cluster
  • Multi Display Setups and Shaping
  • Warping, Soft Edging and Masking
  • Available Nodes
  • Animation Nodes
  • Material&Color Nodes
  • Data Nodes
  • Geometry Nodes
  • Interaction Nodes
  • IO Nodes
  • Layers
  • Light Nodes
  • Logic Nodes
  • Render Option Nodes
  • Slides Nodes
  • Sound Nodes
  • Text Nodes
  • Texture Nodes
  • VR Nodes
  • World Nodes

Ventuz 6 Node Reference

ANIMATION
  • Mover
  • Alternator
  • Simple Control
  • Timeline Control
  • Anmation Rig
  • Keyframe Animation
  • Animation Group
COLOR/MATERIAL
  • Alpha
  • Fog
  • Ground Fog
  • Sky Box
  • Color to RGBA
  • HSLA to Color
  • RGBA to Color
  • Color Transformer
  • HLSL Shader
  • Color
  • Material
  • Color Picker
  • Substance Material
DATA
  • Database
  • Excel
  • JSON
  • RSS Feed
  • Resource Linker
  • Text File
  • XML
GEOMETRY
  • Rectangle
  • Rounded Rectangle
  • Gradient Rectangle
  • Overlay Rectangle
  • Cube
  • Circle
  • Sphere
  • Cylinder
  • Cone
  • Torus
  • Chart
  • Random Points
  • Mesh Loader
  • Geometry Import (Live)
  • Volume
  • Get Bounding Box
  • Arrow
  • Particle System
  • Path Renderer
  • Geometry Renderer
INTERACTION
  • Interaction Rect
  • Touch Button
  • Touch Excluder
  • Touch Marker
  • Touch Paint
  • Touch Pattern
  • Touch Proxy
  • Touch Ripples
  • Touch Transformations
  • Web Browser
  • Touch Teleport
  • Touch Simulator
INPUT/OUTPUT (I/O)
  • GPI
  • Joystick
  • Keyboard
  • MIDI
  • Mouse
  • Network
  • Open Sound Control
  • Serial
  • Timecode
  • DMX
LAYER
  • 3D Layers
  • 3D Layer Reference
  • 2D Layers
  • PSD Import Layer
  • Others
LIGHT
  • Light Sources
LOGIC
  • Array Processing
  • Convert To Text
  • Cluster Synchronization
  • Counter
  • Date Time
  • Directory
  • Dispatcher
  • Enumeration
  • Expressions
  • Invert
  • Log
  • Loop Breaker
  • Math Effects
  • Matrix Operations
  • Scene Event
  • Script
  • String Operations
  • System ID
  • Text Splitter
  • Timer
  • Toggle
  • URL
  • Value Switch
  • Value Buffer
  • Variables
  • Visual Indexer
RENDER OPTIONS
  • Alpha Blending
  • Color Write
  • Alpha Testing
  • Clip Plane
  • Filter
  • Mask
  • Mirror
  • Effect
  • Render Cube Map
  • Draw Modes
  • Stencil
  • ZTesting
SOUND
  • Audio Clip
  • Sound
  • Volume Control
  • Audio Analysis
SLIDES
  • Slide Manager
  • Slide
  • Slide Port
  • Pivot
TEXT
  • Text Effects
  • Text Layouts
  • Text Rendering
TEXTURE
  • Background
  • Hatch
  • Image
  • Texture
  • SVG Loader
  • Gradient Texture
  • Live Video
  • Movie Stream
  • Movie Frame
  • Movie Clip
  • Texture Loader
  • Snapshot
  • Snapshot Framebuffer
  • Texture Saver
  • Video Source Selector
  • VIO Input
  • Spout Receiver
  • NDI Receiver
  • Substance Loader
VR/AR
  • Tracked Devices
  • Draw Tracked Devices
WORLD
  • Axis
  • Billboard
  • GetWorld
  • SetWorld
  • Arrange
  • Ticker
  • Layout
  • Group
  • World Z Sort
  • YesNo
  • Switch
  • Spread
  • Filter Pass
  • Set Pass
  • Hierarchy Container
  • Scene Port
  • Content Container
  • Template Port
  • Container Info
  • Camera
  • Paths

Ventuz 6 Configuration Editor

  • Configuration
  • Machine Configuration
  • Video/Audio Configuration
  • Web Configuration Editor and License Manager
  • Render Setup Editor
  • Warping and Soft-Edging Editor
  • Supported Hardware
  • How to Setup a Cluster Render

Ventuz 6 Director

  • Application Settings
  • Assets
  • Channels
  • Command Line Options
  • Content References
  • Designing Templates
  • Environment
  • Glossary
  • Index
  • Introduction
  • Pages
  • Playlist
  • Plug-Ins
  • Project Data
  • Property Editor
  • Shortcuts
  • GPI Configuration
  • Shot Box
  • Show
  • Taking Action
  • Timeline
  • Topology
  • User Interface
  • Director Mode
  • Macros

How To

  • How to Run Ventuz
  • How to Work with Designer
  • Ventuz Designer Drag&Drop workflow
  • How to use Head Mounted Displays
  • How to work with Shadows
  • How to use Emoijs
  • How to Build a Template
  • How to use Newtek NDI
  • How to Create Visuals Loader Node
  • How to Remote Control with a Phone
  • How to Setup a Cluster Render
  • How to use a Mixed Frame Rate Cluster
  • How to use Tracking
  • How to work with 3D Reference Layers
  • How to create a Firework Particle System
  • How to use DDS with new Block Compression modes
  • How to setup Spout with Ventuz
  • How to use the Substance Integration

Keyboard Shortcuts

  • Summary Shortcuts
  • Layer Editor Shortcuts
  • Hierarchy Editor Shortcuts
  • Content Editor Shortcuts
  • Animation Editor Shortcuts
  • Director Shortcuts

Advanced and Development

  • Command Line Options
  • Remoting Overview
  • Remoting 4
  • Remoting 4 via Websockets
  • Deprecated Remoting
  • Ventuz IP Ports
  • Ventuz Machine Service
  • Remoting Machine Signature
  • TUIO
  • .NET Scripting
  • HLSL Shader Programming
  • Ventuz API and SDK
  • Ventuz VIO API
  • Ventuz File Format (VFF)
  • Ventuz Stream Out API

General Reference

  • Terminology
  • Manual Index

Miscellaneous

  • Presets
« Previous Article
» Index «
Next Article »

Macros

Table of Contents

  1. Defining Macros
    1. Actions
      1. Cue
      2. Take
      3. Cue&Take
      4. Take Out
      5. Clear
      6. Project Data
      7. Group
      8. Sequence
      9. Delay
  2. Managing Macros
  3. Using Macros
  4. Macro Plugin

Macros allow the user to trigger predefined actions via shortcuts - like cueing a specific Template or modifying a Project Data Value. You can edit Macros using the Dialog found in the Menu Bar in Tools->Macros .... Once defined you will have to assign your Macros Shortcuts.

Defining Macros

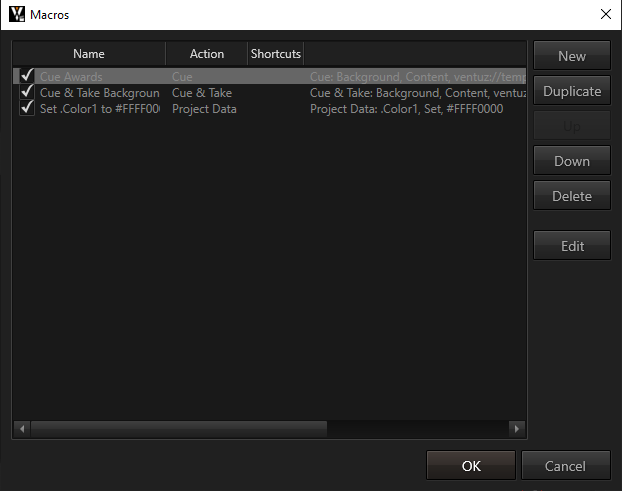
The Macros Editor Window will give you an overview of all currently defined macros. You can create a new macro by  clicking the New Button on the top right of the window.

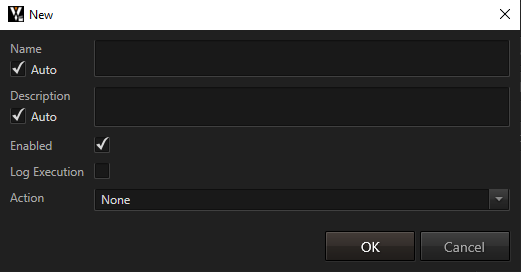
In the upcoming window you can define the Name and Description of the macro. By default these will be generated automatically based on the macro's effect. Enabled let's you temporarily disable a macro without having to delete it. If Log Execution is active the Ventuz Director will create a log message on execution with its Name, a unique identifier and all given parameters.

Actions

The Actions define the executed commands.

Cue

Will cue a given Template, Page or Asset on one or several specified Channels. You can decide to Ignore Channel Rules on these channels.

Take

Takes the currently cued item on the given Channels.

Cue&Take

Will cue a given Template, Page or Asset on one or several specified Channels. Once cued the macro will directly take it on air. You can decide to Ignore Channel Rules on these channels.

Take Out

Takes out the current on air item on the given Channels.

Clear

Clears the outputs on the specified Channels.

Project Data

Allows to change values of the Project Data based on shortcuts. You will have to specify the Project Data's Data Path - in the dropdown menu you will have a list of all available data. Based on the type you will have different options for the Value Mode which defines what to do with the value once the assigned shortcut is triggered.

Single, Double, Integer

Set Sets the value of the channel to a specified number.
Set Relative Adds the given number to the current value of the data channel.

Boolean

Set Set the boolean value to either true or false.
Toggle Set a boolean to true if currently false and vice versa.

Event

Trigger Fires the Event in the Project Data with the given Parameter as Event Argument.

String

Set Sets the String to the given text.

Enum

Set Sets the enumeration to the given item. A dropdown is available listing all possible items.

Asset

Set Sets the asset path to any valid reference to an asset in the asset folder of the show.

Arrays

Set Sets the array to the given value. The value must be a parsable string representation of the array.
All types of arrays have that option.

Color

Set Set the color to a specified value.

Group

A Group defines a set of macros that will be executed at the same time. You can add macros by  clicking the Available Macros... button. Here you can select any number of available macros and Add them to the group's list. You can rearrange Macros and Delete them in the Group's options. Furthermore you can disable single macros in the group with the checkbox in front of them.

Sequence

A Sequence defines a set of macros that will be executed one after another. You can add macros by  clicking the Available Macros... button. Here you can select any number of available macros and Add them to the group's list. You may also define and add a new Delay macro. You can rearrange Macros and Delete them in the Group's options. Furthermore you can disable single macros in the group with the checkbox in front of them.

Delay

A Delay simply waits for a set number of milliseconds. This is useful in conjunction with sequences.

Managing Macros

In the Macro Overview you can rearrange, Duplicate and Delete macros. If you need to change their behavior you can Edit them by  double clicking.

Using Macros

After defining a macro you will have to assign it a Shortcut in the Shortcut Manager. Go to Tools->Shortcuts... and search for your macros in the Macro category on the bottom of the list of assignable commands. Then assign shortcuts as described on the help page for Shortcuts.

Macro Plugin

You are also able to create macros and assign them to shortcuts in the Director Plugin API. The Macro API is able to dynamically declare and register macros, execute them and also add callback functions to these macros. See the Plugin Documentation for more information.

See also:
  • Shortcuts
  • Templates
  • Project Data
  • Plug Ins

« Previous Article
» Index «
Next Article »
Copyright 2020 Ventuz Technology